This is the final chapter of the Zipic indie development retrospective series. After covering Product Design and Independent Distribution, developer Shili takes us deep into the codebase.
This article is packed with hardcore, practical macOS development experience. From SwiftUI component adaptation to low-level Core Graphics applications, and from Raycast extension integration to PDF compression implementation, it not only solves performance bottlenecks but also pushes the native experience to the limit.
Hi everyone, I’m Shili 👋!
Welcome to the final part of the Zipic retrospective series. If the first two articles were about “what to build” and “how to sell,” then today’s article is purely about “how to write.”
Although macOS development shares many frameworks with iOS development, it faces distinctly different challenges in file systems, window management, and low-level graphics processing. Zipic strives for extreme lightness and performance, which means we can’t simply rely on high-level wrappers; often, we must dive down to Core Graphics or even kernel event levels to find answers.
Here are some specific technical challenges I encountered during development and the final solutions.
Technical Implementation in UI Details
Hiding the Main Window Title Bar in macOS 26
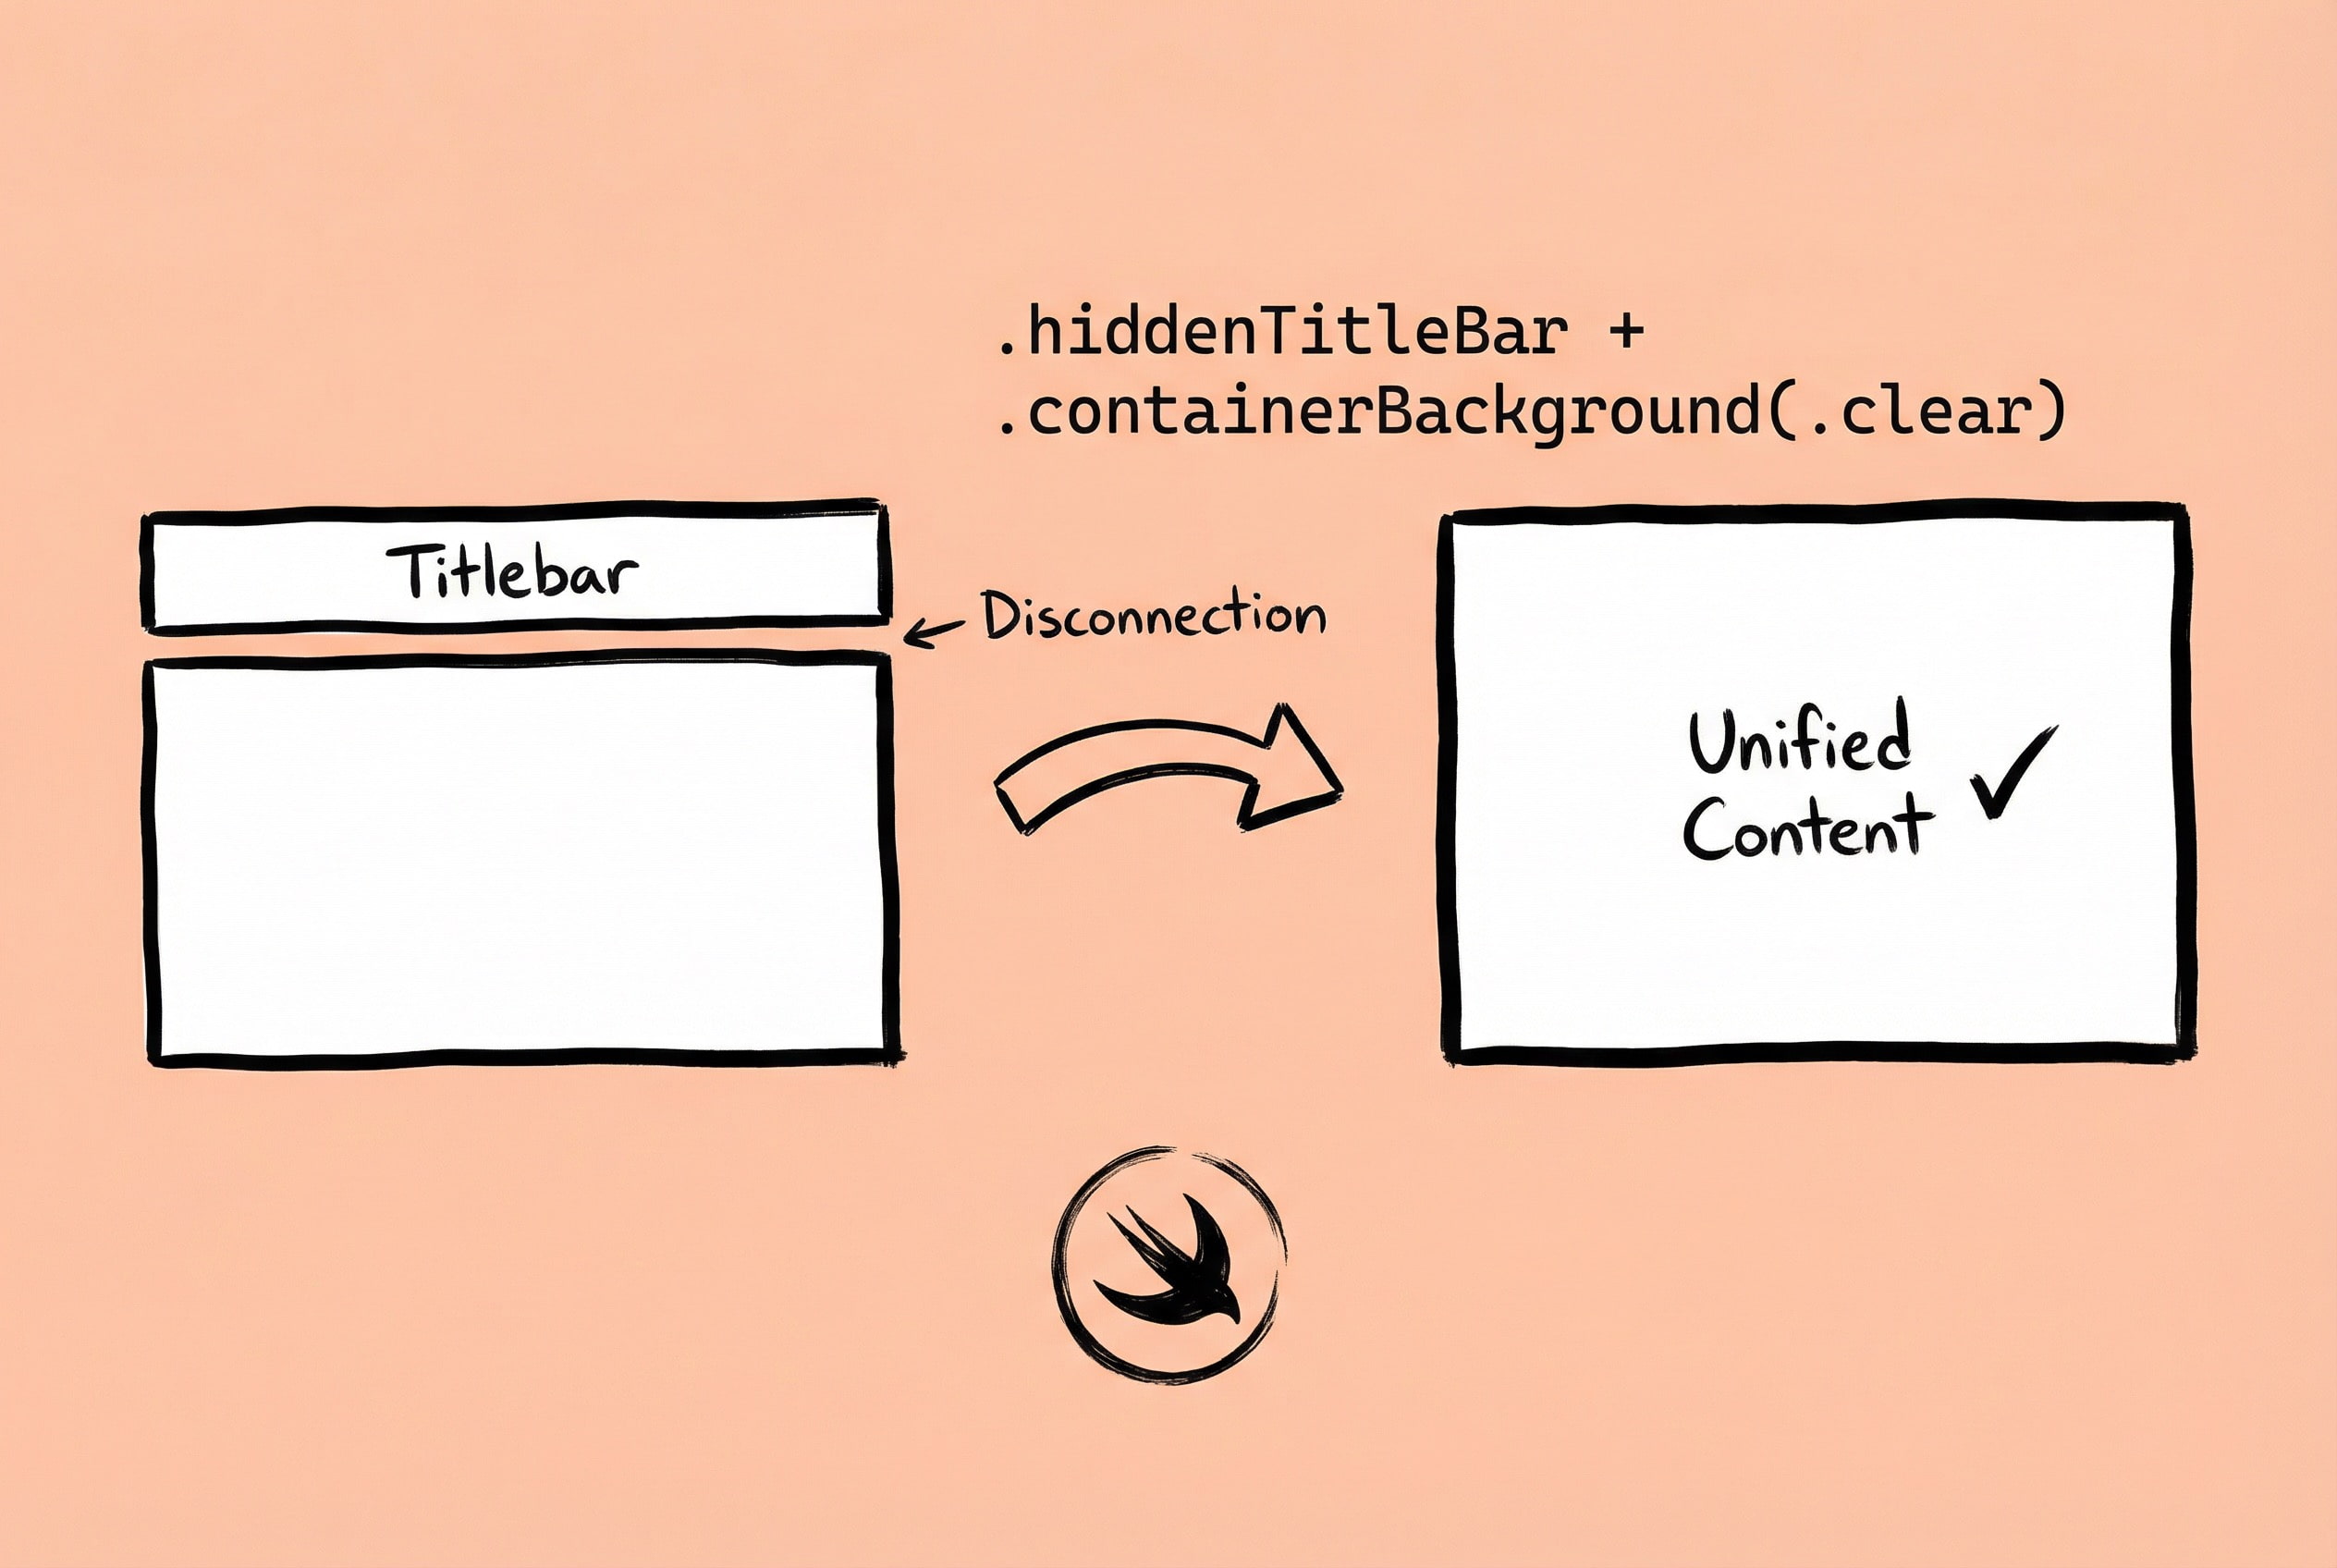
Zipic’s interface design strives for simplicity and doesn’t need a traditional title bar. In early versions, using .windowStyle(.hiddenTitleBar) perfectly hid the title bar, and everything was fine.
But after upgrading to macOS 26, a problem arose. The title bar was indeed “hidden,” but a white background area remained, like a “ghost” of the title bar still occupying space, leaving an uncoordinated blank strip at the top of the window. Even more troublesome, this issue didn’t show up in Xcode preview mode—previews looked fine—but appeared when running on a real device, meaning every debug session required compiling and running.
After researching, I found that macOS 26 introduced a new window background system. The original .hiddenTitleBar only hid the UI elements of the title bar but didn’t handle the underlying container background. The new solution is to use the .containerBackground(.clear, for: .window) modifier:
WindowGroup {
    ContentView()
}
.windowStyle(.hiddenTitleBar)
.containerBackground(.clear, for: .window)
This modifier tells the system that the window’s container background should be transparent. Combined with .hiddenTitleBar, this finally achieved a completely title-bar-less effect.
For specific adaptation details, refer to: macOS Development - Hiding the Main Window Title Bar in macOS 26
Pitfalls & Experience: If the app uses NavigationSplitView, you also need to handle the sidebar title separately. By default, the sidebar displays an inline-style navigation title, which also needs to be hidden:
NavigationSplitView {
    SidebarView()
        .toolbar(removing: .title)
} detail: {
    DetailView()
}
Another detail is window dragging—how do users drag the window after hiding the title bar? My approach is to use the isMovableByWindowBackground property of NSWindow, or add custom drag gestures in specific areas, maintaining a clean interface without affecting user operation. Additionally, .containerBackground is a macOS 15+ API, so conditional checks are needed if you need to support earlier system versions.
File Size Display Consistent with Finder
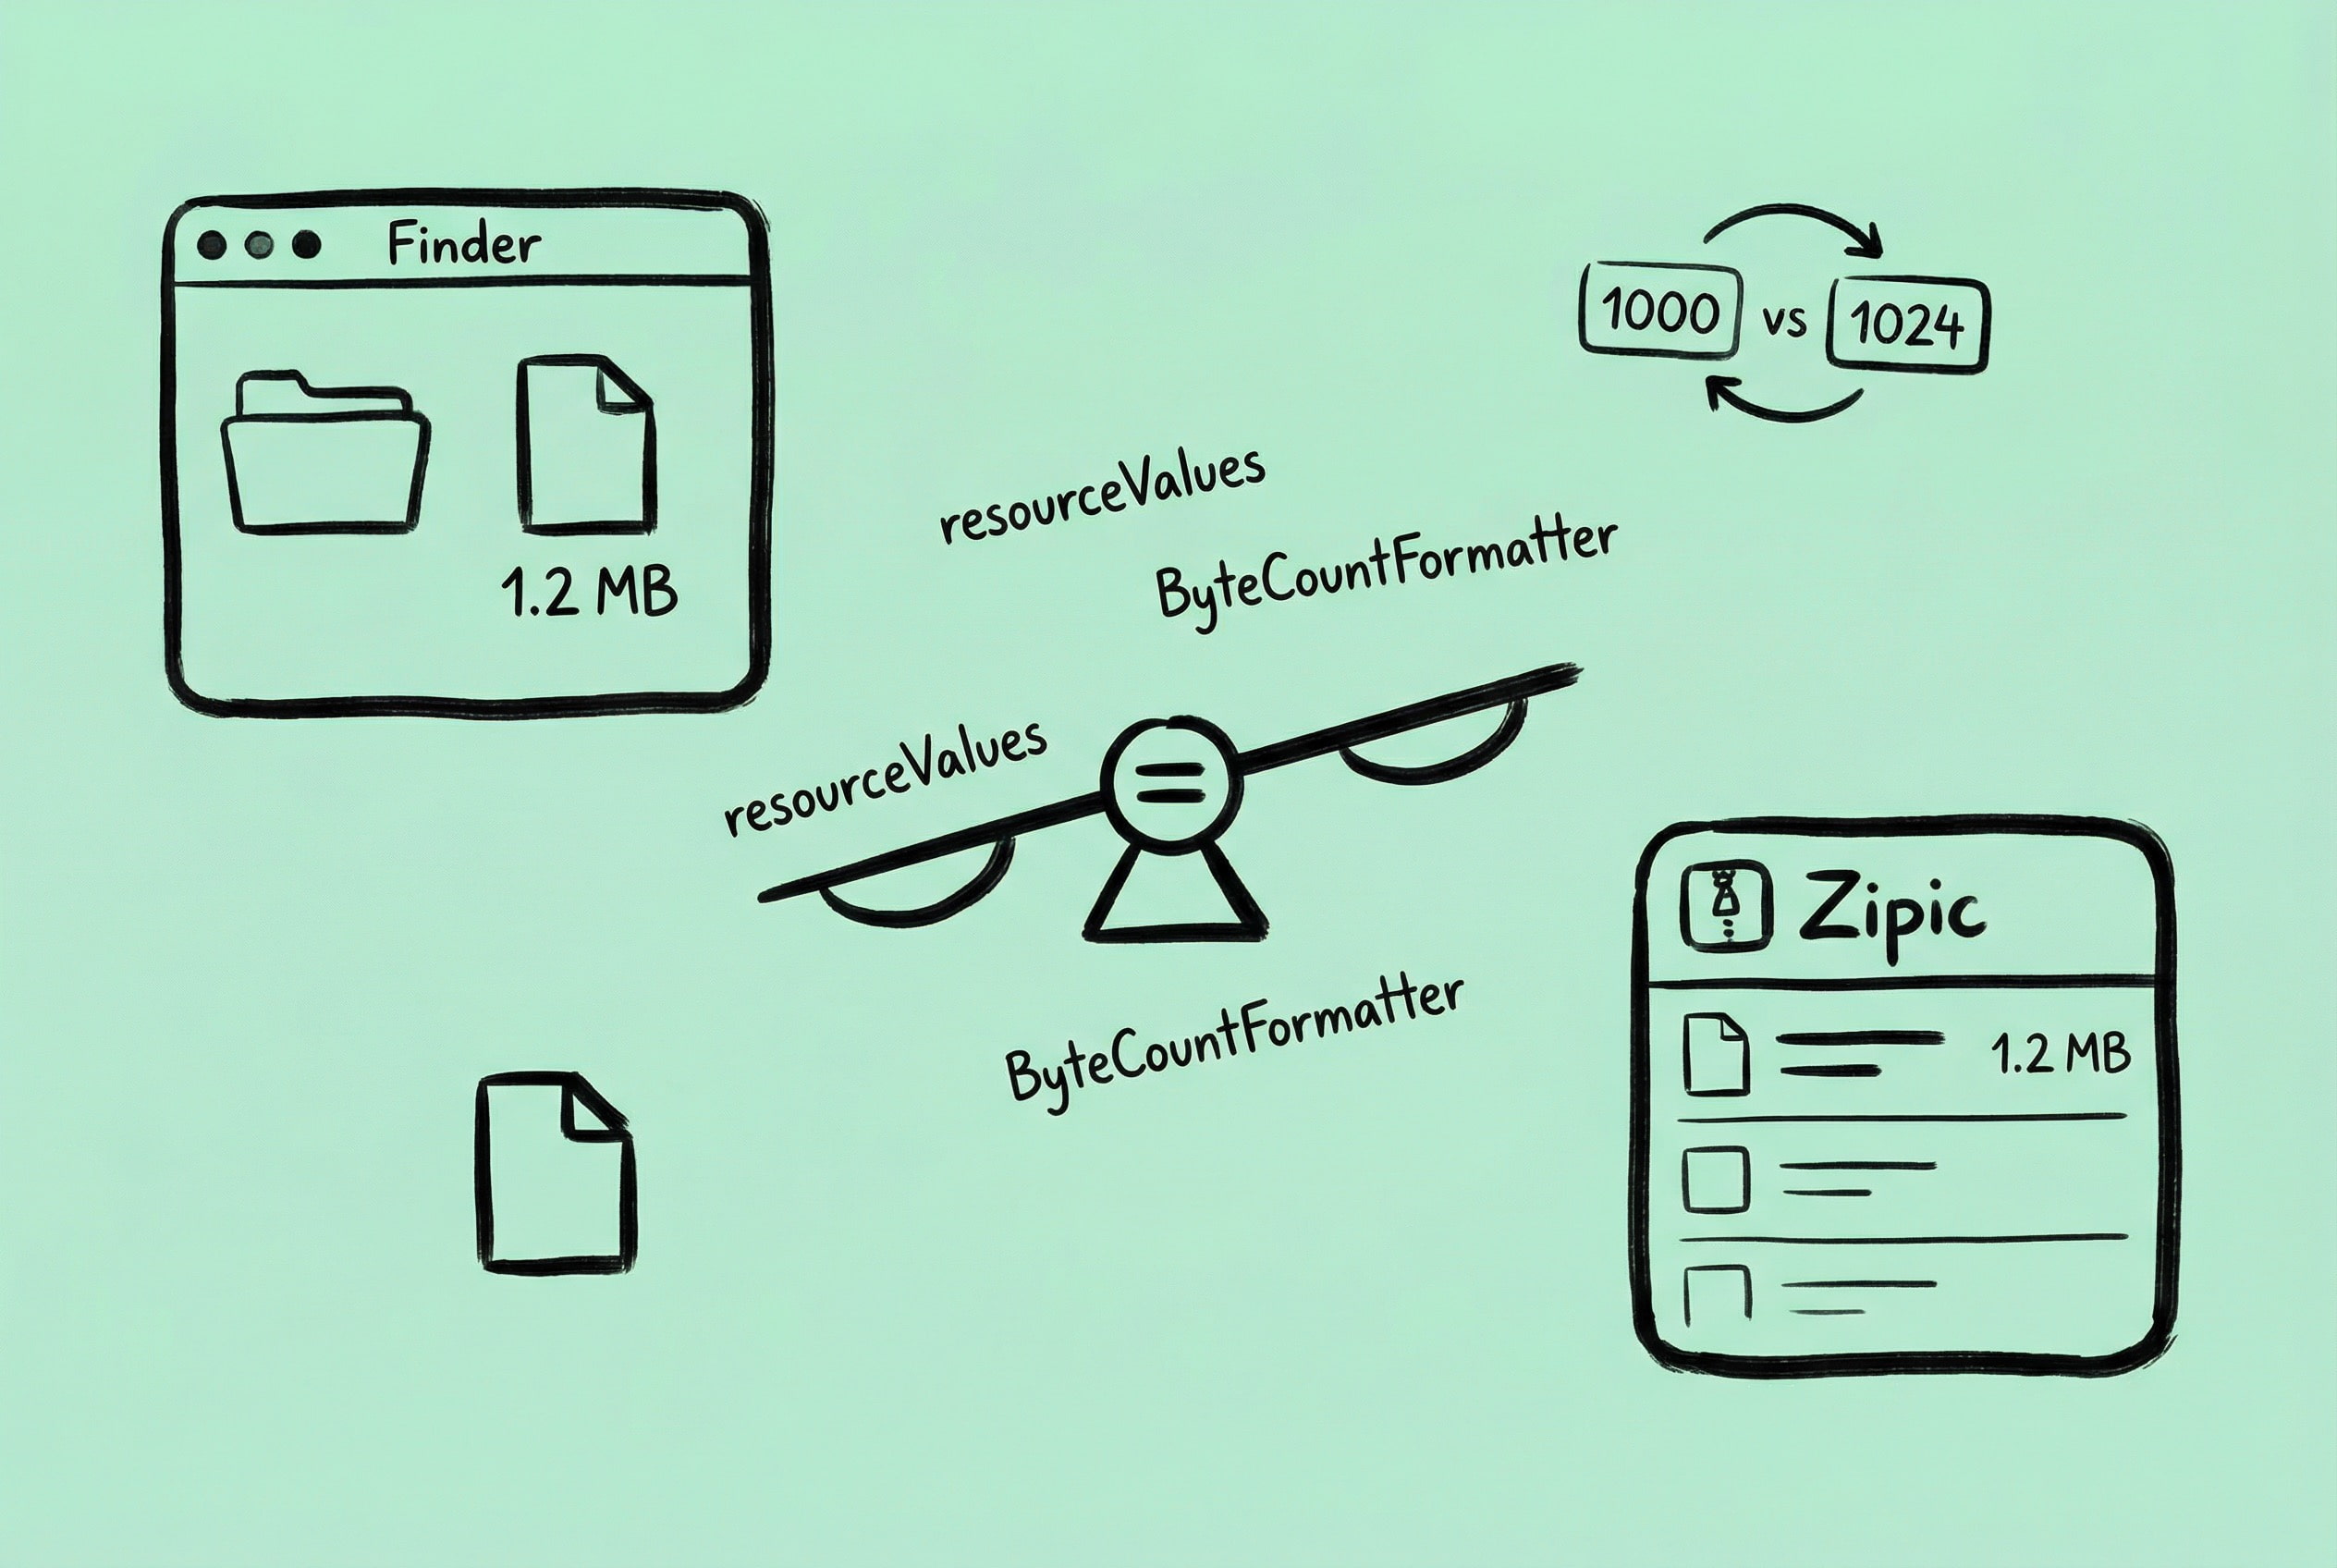
A user reported: “The file size shown in Zipic is different from what I see in Finder. Is there something wrong with the compression?”
This confused me. The file size is obtained using the fileSize property from FileManager, so how could it be wrong? After careful comparison, I found that a difference indeed existed. For example, a file might show 1.26 MB in Finder but 1.2 MB in Zipic. Although the difference is small, for a “precision compression” tool, this inconsistency causes user doubt.
The problem lies in the concept of “file size” itself. There are two types of sizes in the file system:
- Logical Size: The actual amount of data the file contains.
- Physical Size: The space the file occupies on the disk.
Finder displays the logical size by default and uses the base-1000 system (1 KB = 1000 bytes), rather than the base-1024 system programmers are used to. To get a file size consistent with Finder, you need to use the resourceValues API of URL:
let resourceValues = try url.resourceValues(forKeys: [.fileSizeKey])
let fileSize = resourceValues.fileSize ?? 0
When formatting for display, use ByteCountFormatter and specify the correct options:
let formatter = ByteCountFormatter()
formatter.countStyle = .file  // Use Finder's calculation method
formatter.allowedUnits = [.useBytes, .useKB, .useMB, .useGB]
let displaySize = formatter.string(fromByteCount: Int64(fileSize))
The key is .countStyle = .file, which makes the formatter use the standard macOS file system way to display size.
For detailed implementation, refer to: macOS Development - Getting File Size Consistent with Finder
Pitfalls & Experience: There are several special cases to note:
- Sparse Files: For some files, the logical size and physical size differ greatly. For example, a virtual machine disk file might logically be 64GB but actually occupy only a few GBs.
- APFS Transparent Compression: The APFS file system supports transparent compression. A file might be logically 10MB, but because the system automatically compresses it, it actually takes up only 3MB. In this case, calculating “space saved” becomes complicated.
- Symbolic Links: If the file is a symbolic link, you might get the size of the link itself rather than the target file. You need to use
.resolvingSymlinksInPath()to resolve the real path first.
My strategy is to uniformly use the logical size as the display standard, keeping it consistent with Finder. After the fix, I never received similar feedback again.
No Design Mockups, Just Code
Zipic’s UI has a “secret”: I never drew a design mockup.
Not because I’m lazy, but I found that for utility apps, having clear design principles in mind is more efficient than drawing mockups. Zipic’s UI strictly adheres to the four basic principles in “The Non-Designer’s Design Book”: Proximity, Alignment, Repetition, Contrast. These four principles are simple to understand but are the easiest feasible way to take UI to the next level.
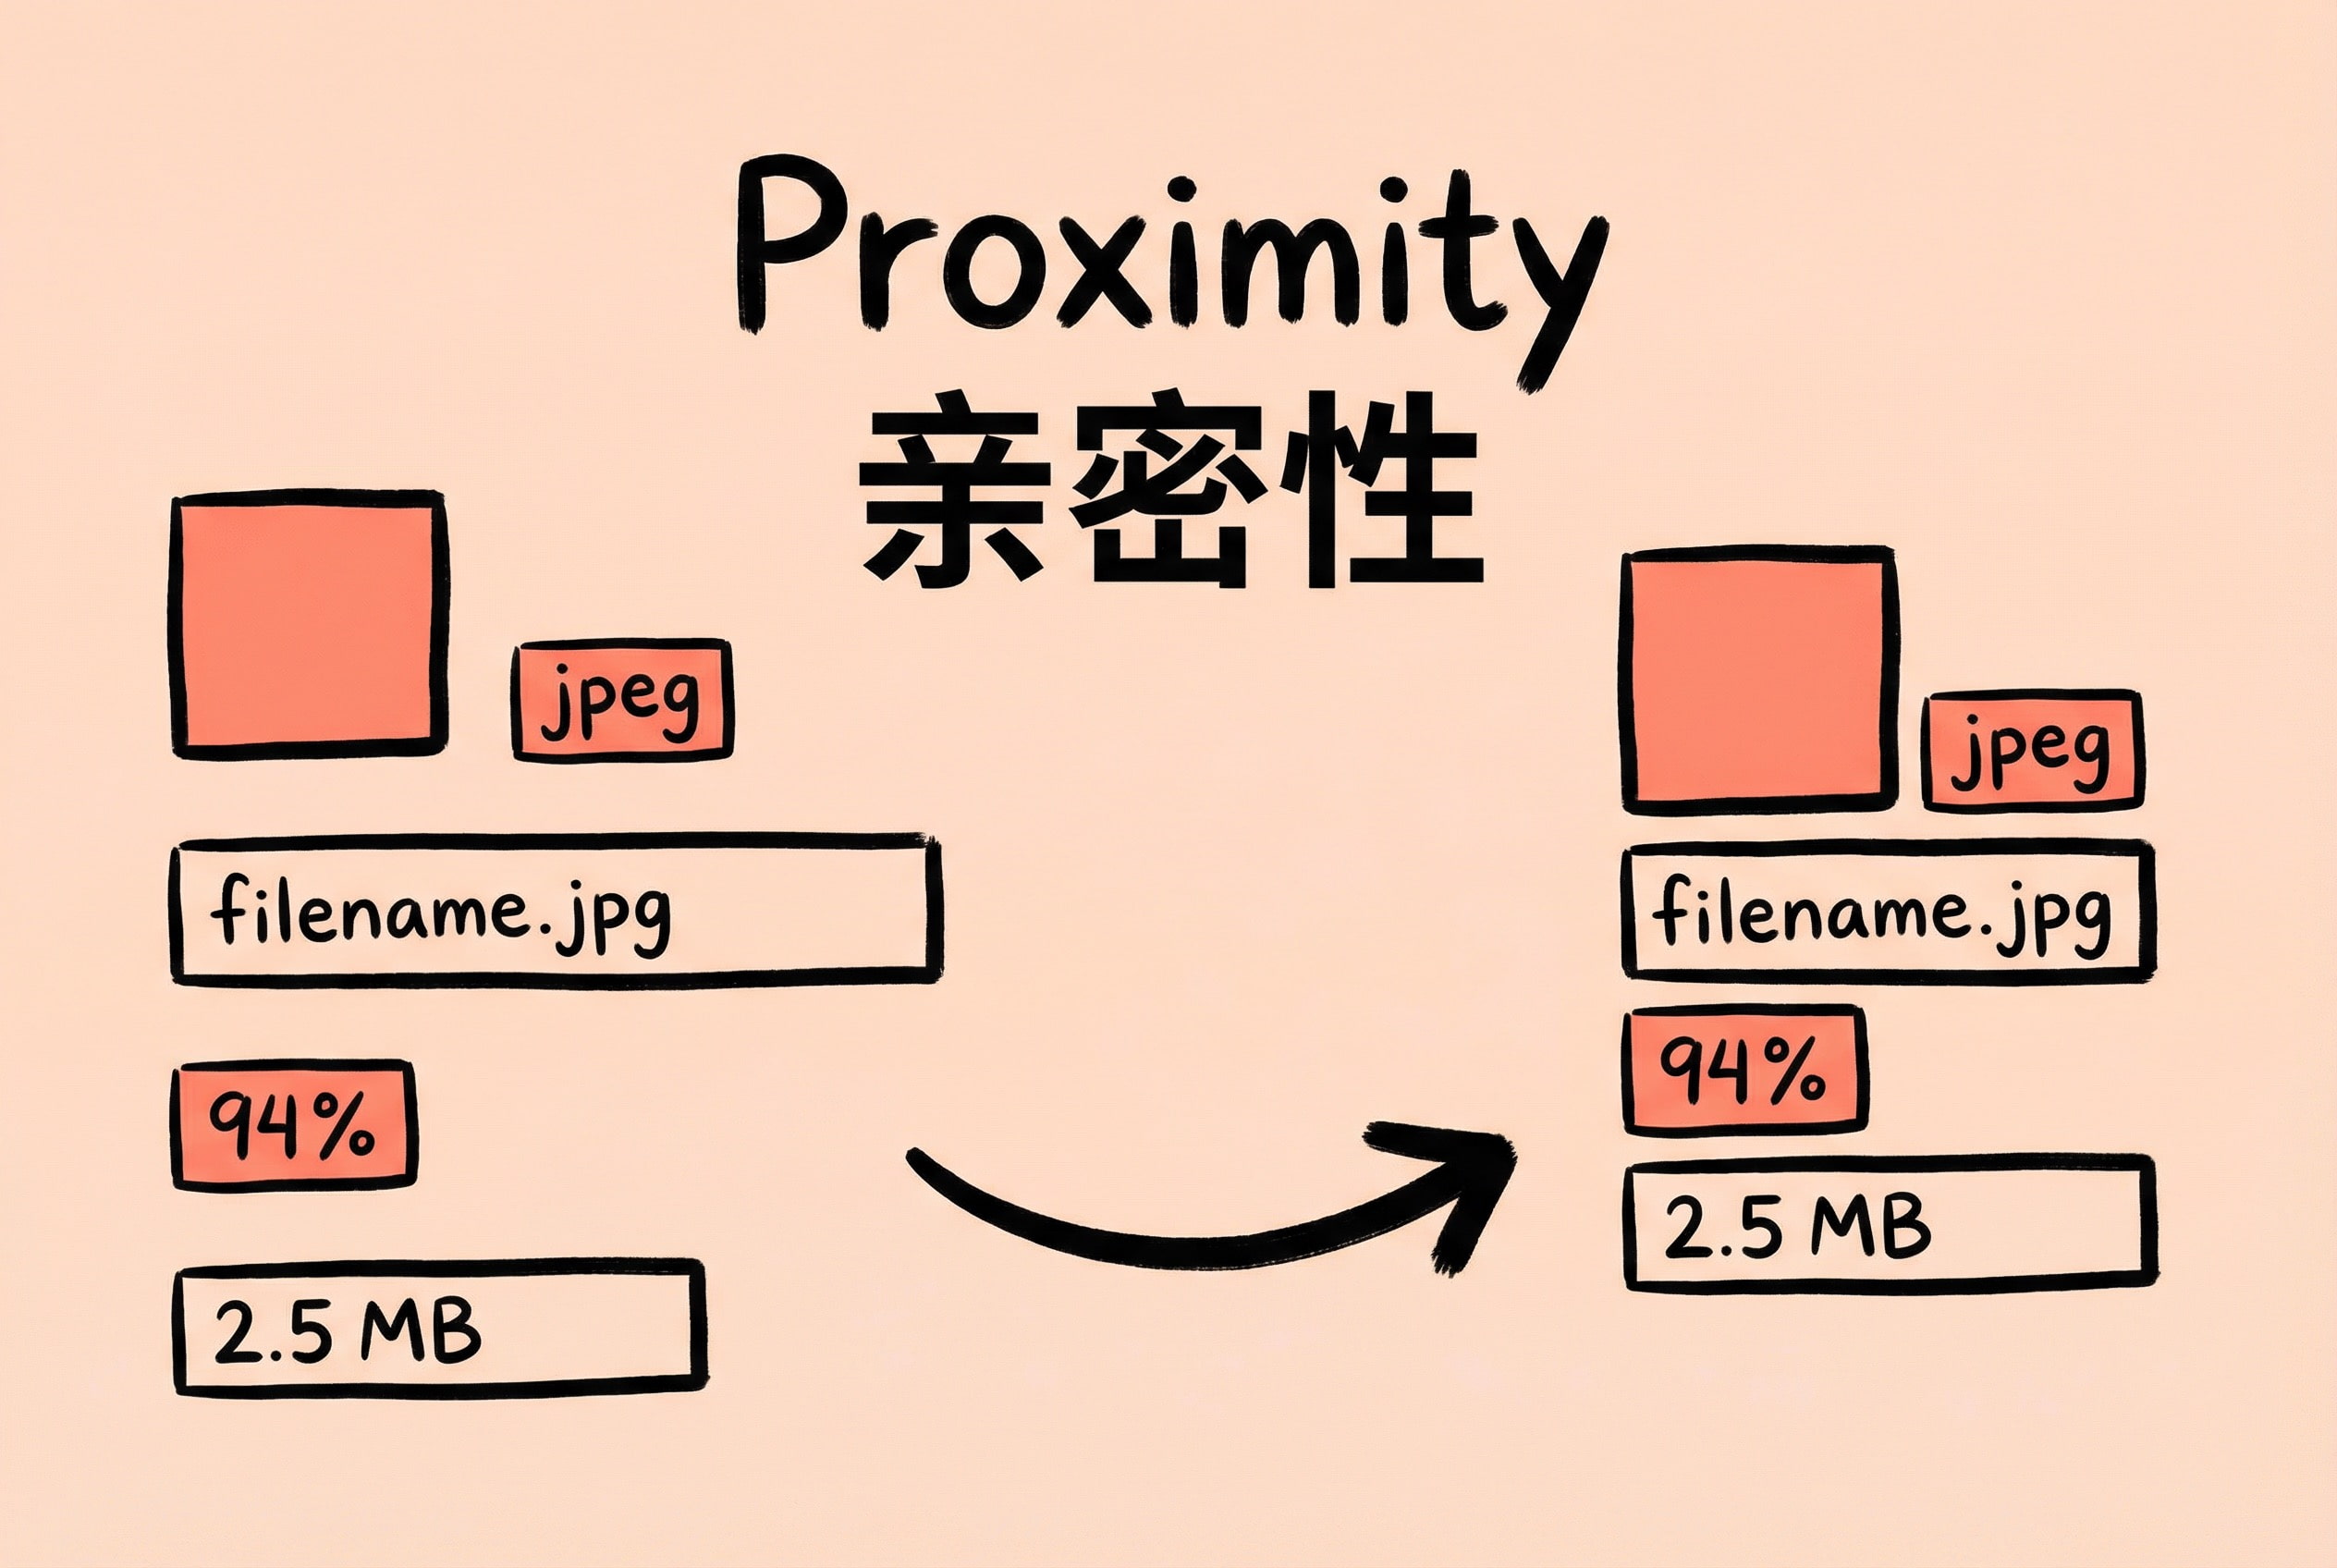
- Proximity: Related elements are placed together. in Zipic’s compression list, each file item’s thumbnail, filename, size, and compression rate are close to each other, forming a visual unit; while there is obvious spacing between different files. Users can distinguish which information belongs to the same image at a glance. The settings panel is the same, grouped by function—output settings together, quality settings together, not mixing “output path” and “compression quality.”
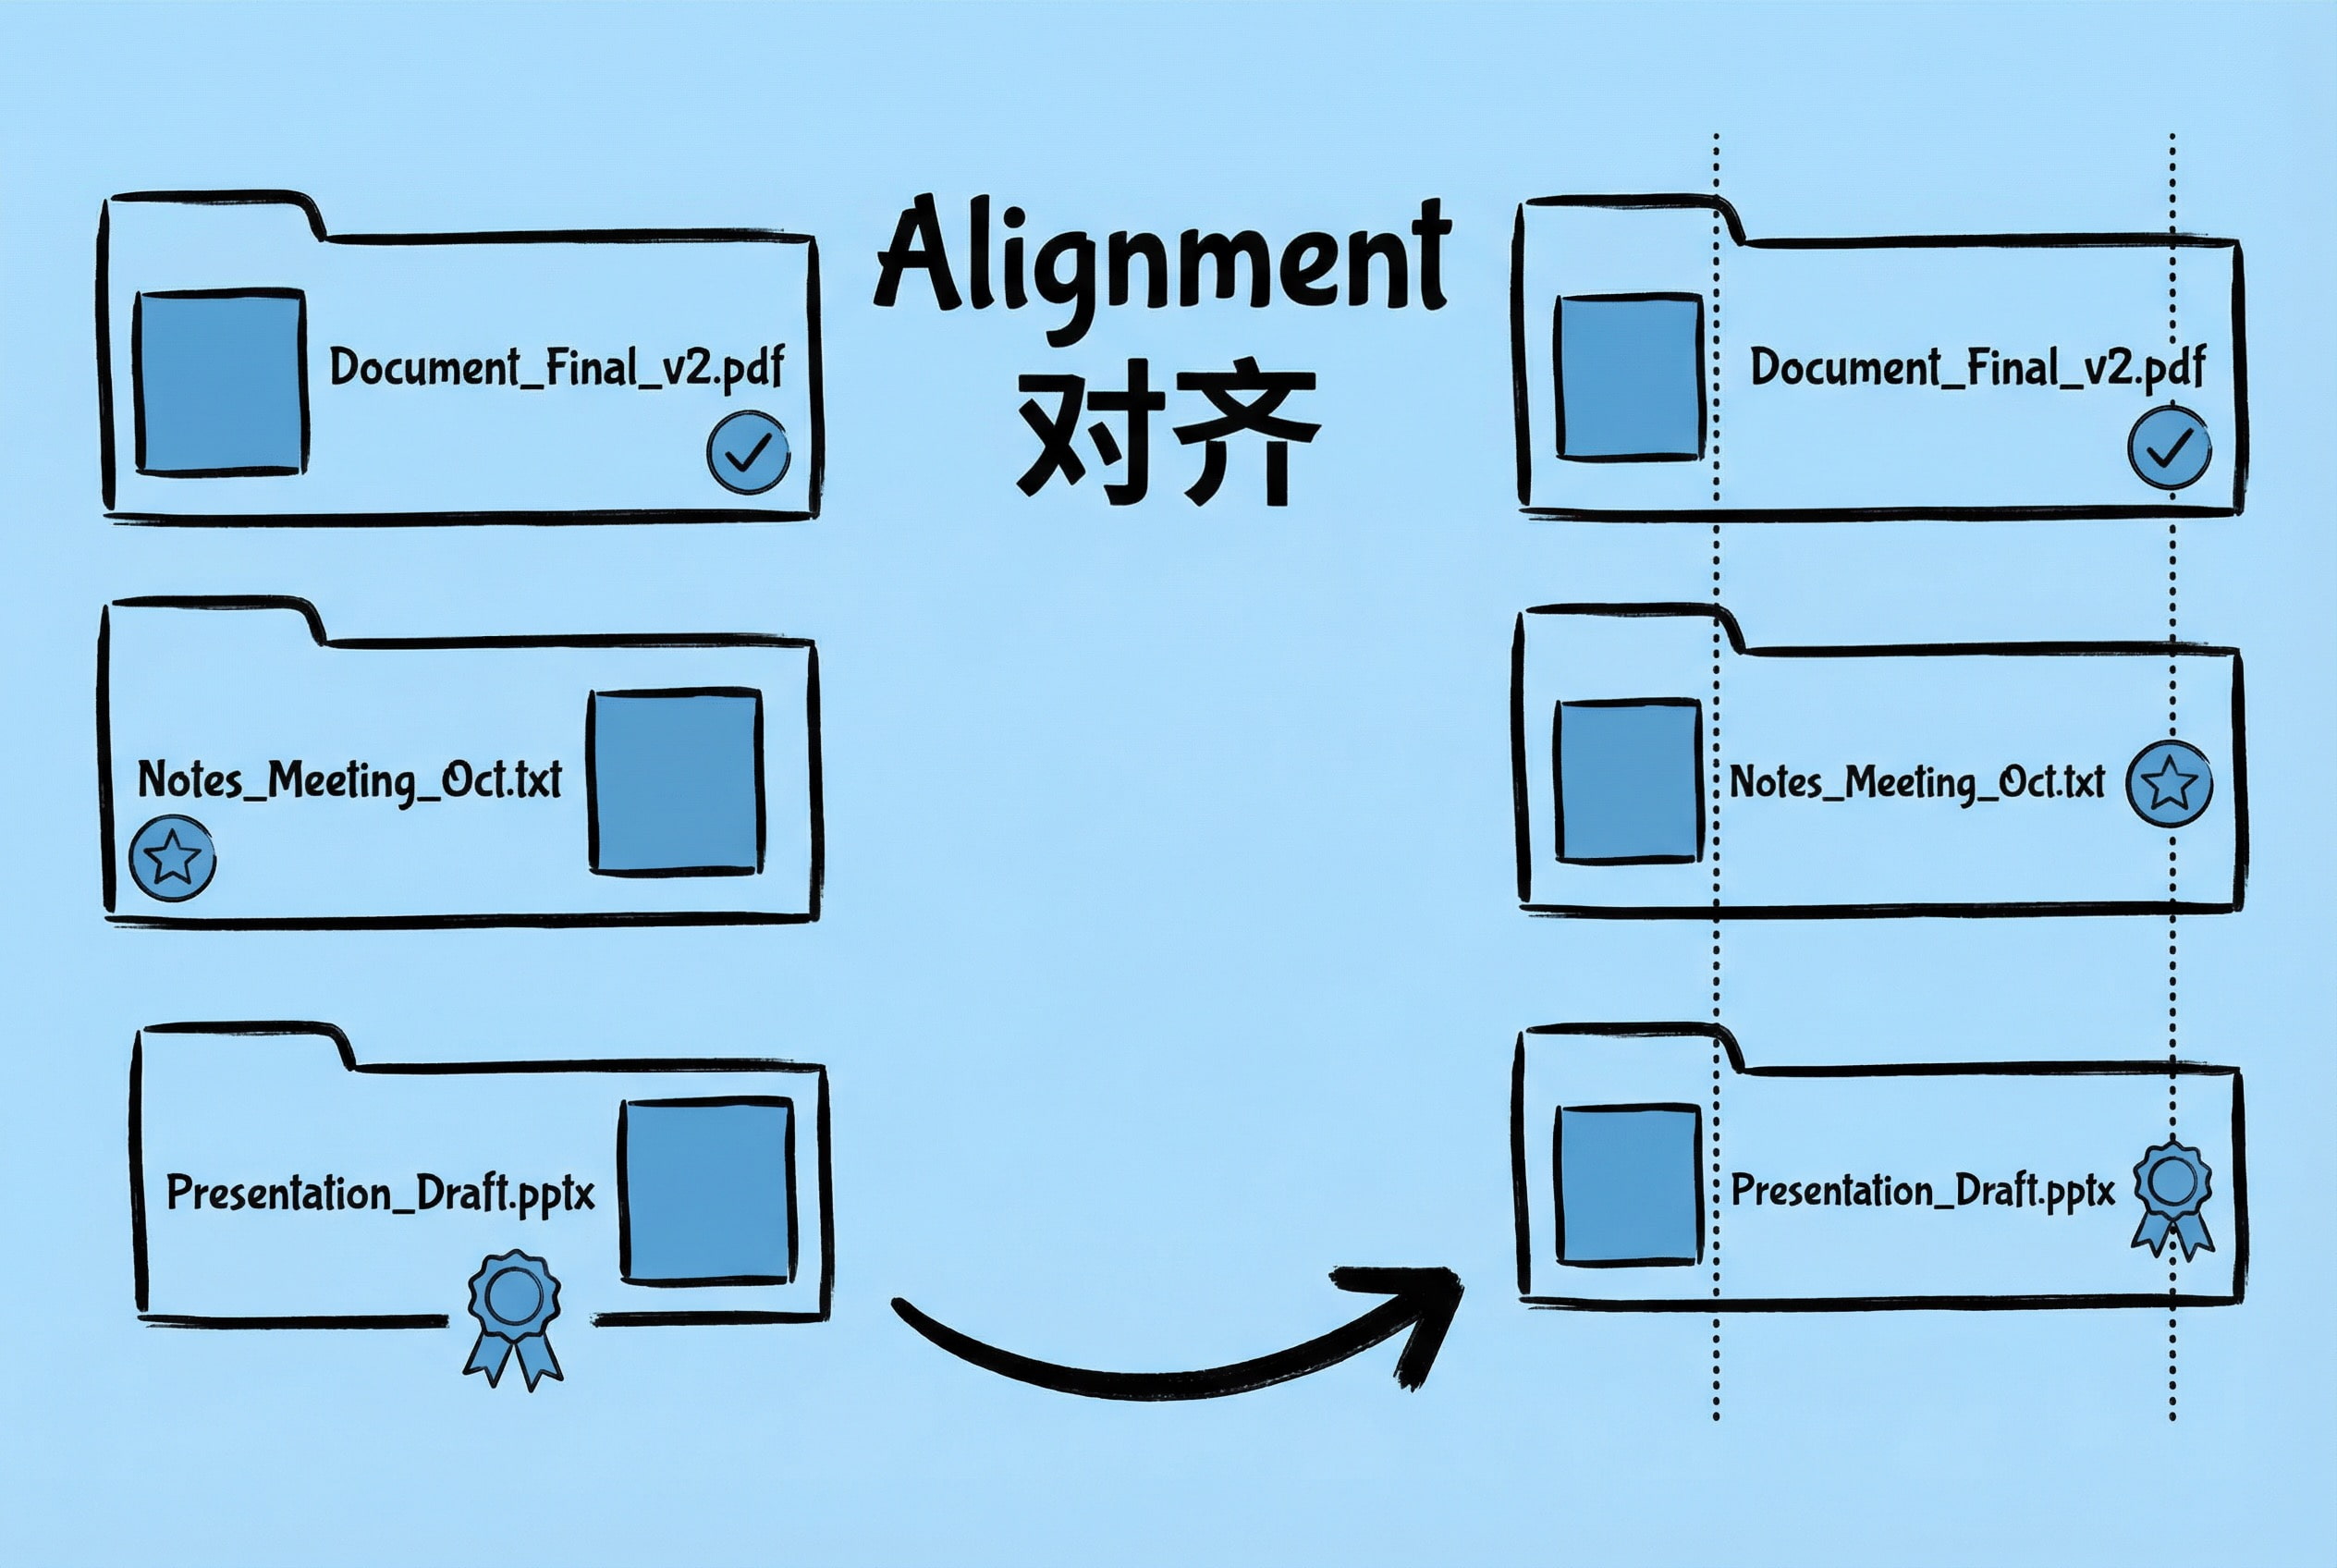
- Alignment: All elements must have a visual connection. In Zipic’s sidebar, list view, and details panel, all text within the same element is aligned. It looks trivial, but if alignment is messy, the whole interface looks “amateur.” SwiftUI’s
alignmentparameter is used a lot;.leading,.trailing, and.centermust be chosen based on content type.
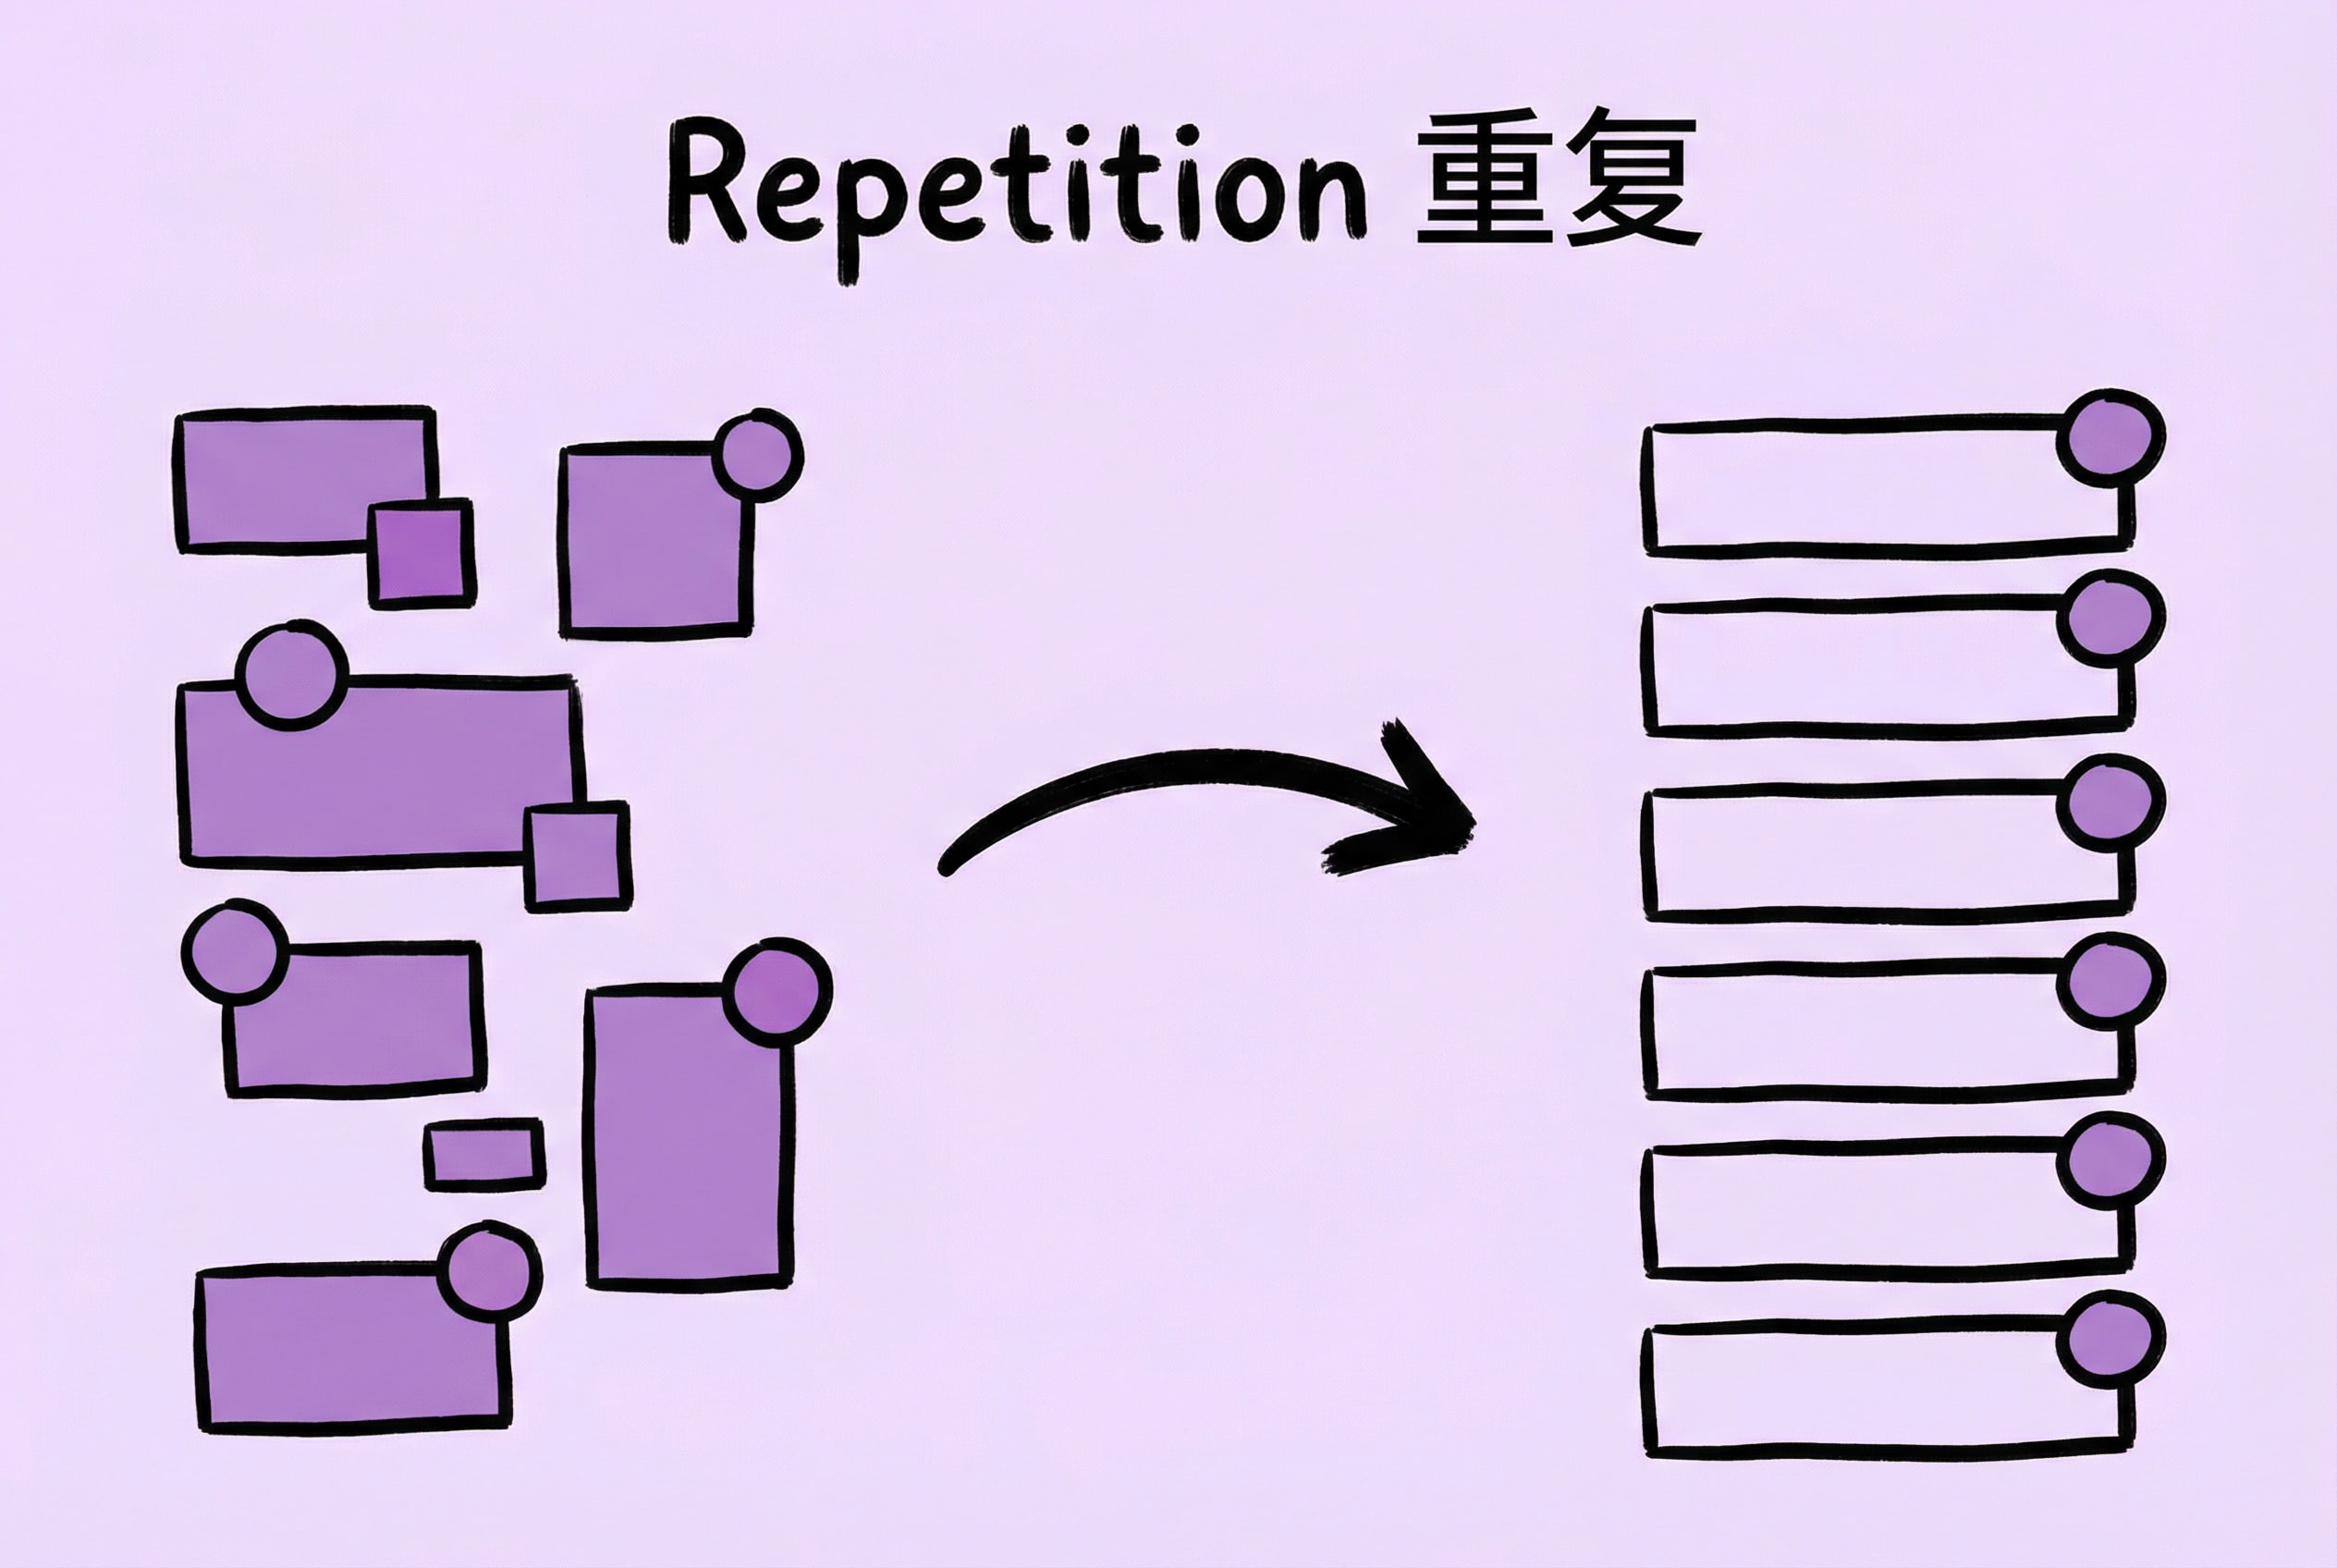
- Repetition: Unified visual elements run throughout. The corner radius in Zipic is unified, and all clickable text uses the same color. Icon styles are also unified—either all SF Symbols or all custom icons, no mixing. This consistency makes users feel “this is a complete product,” not “cobbled together.”
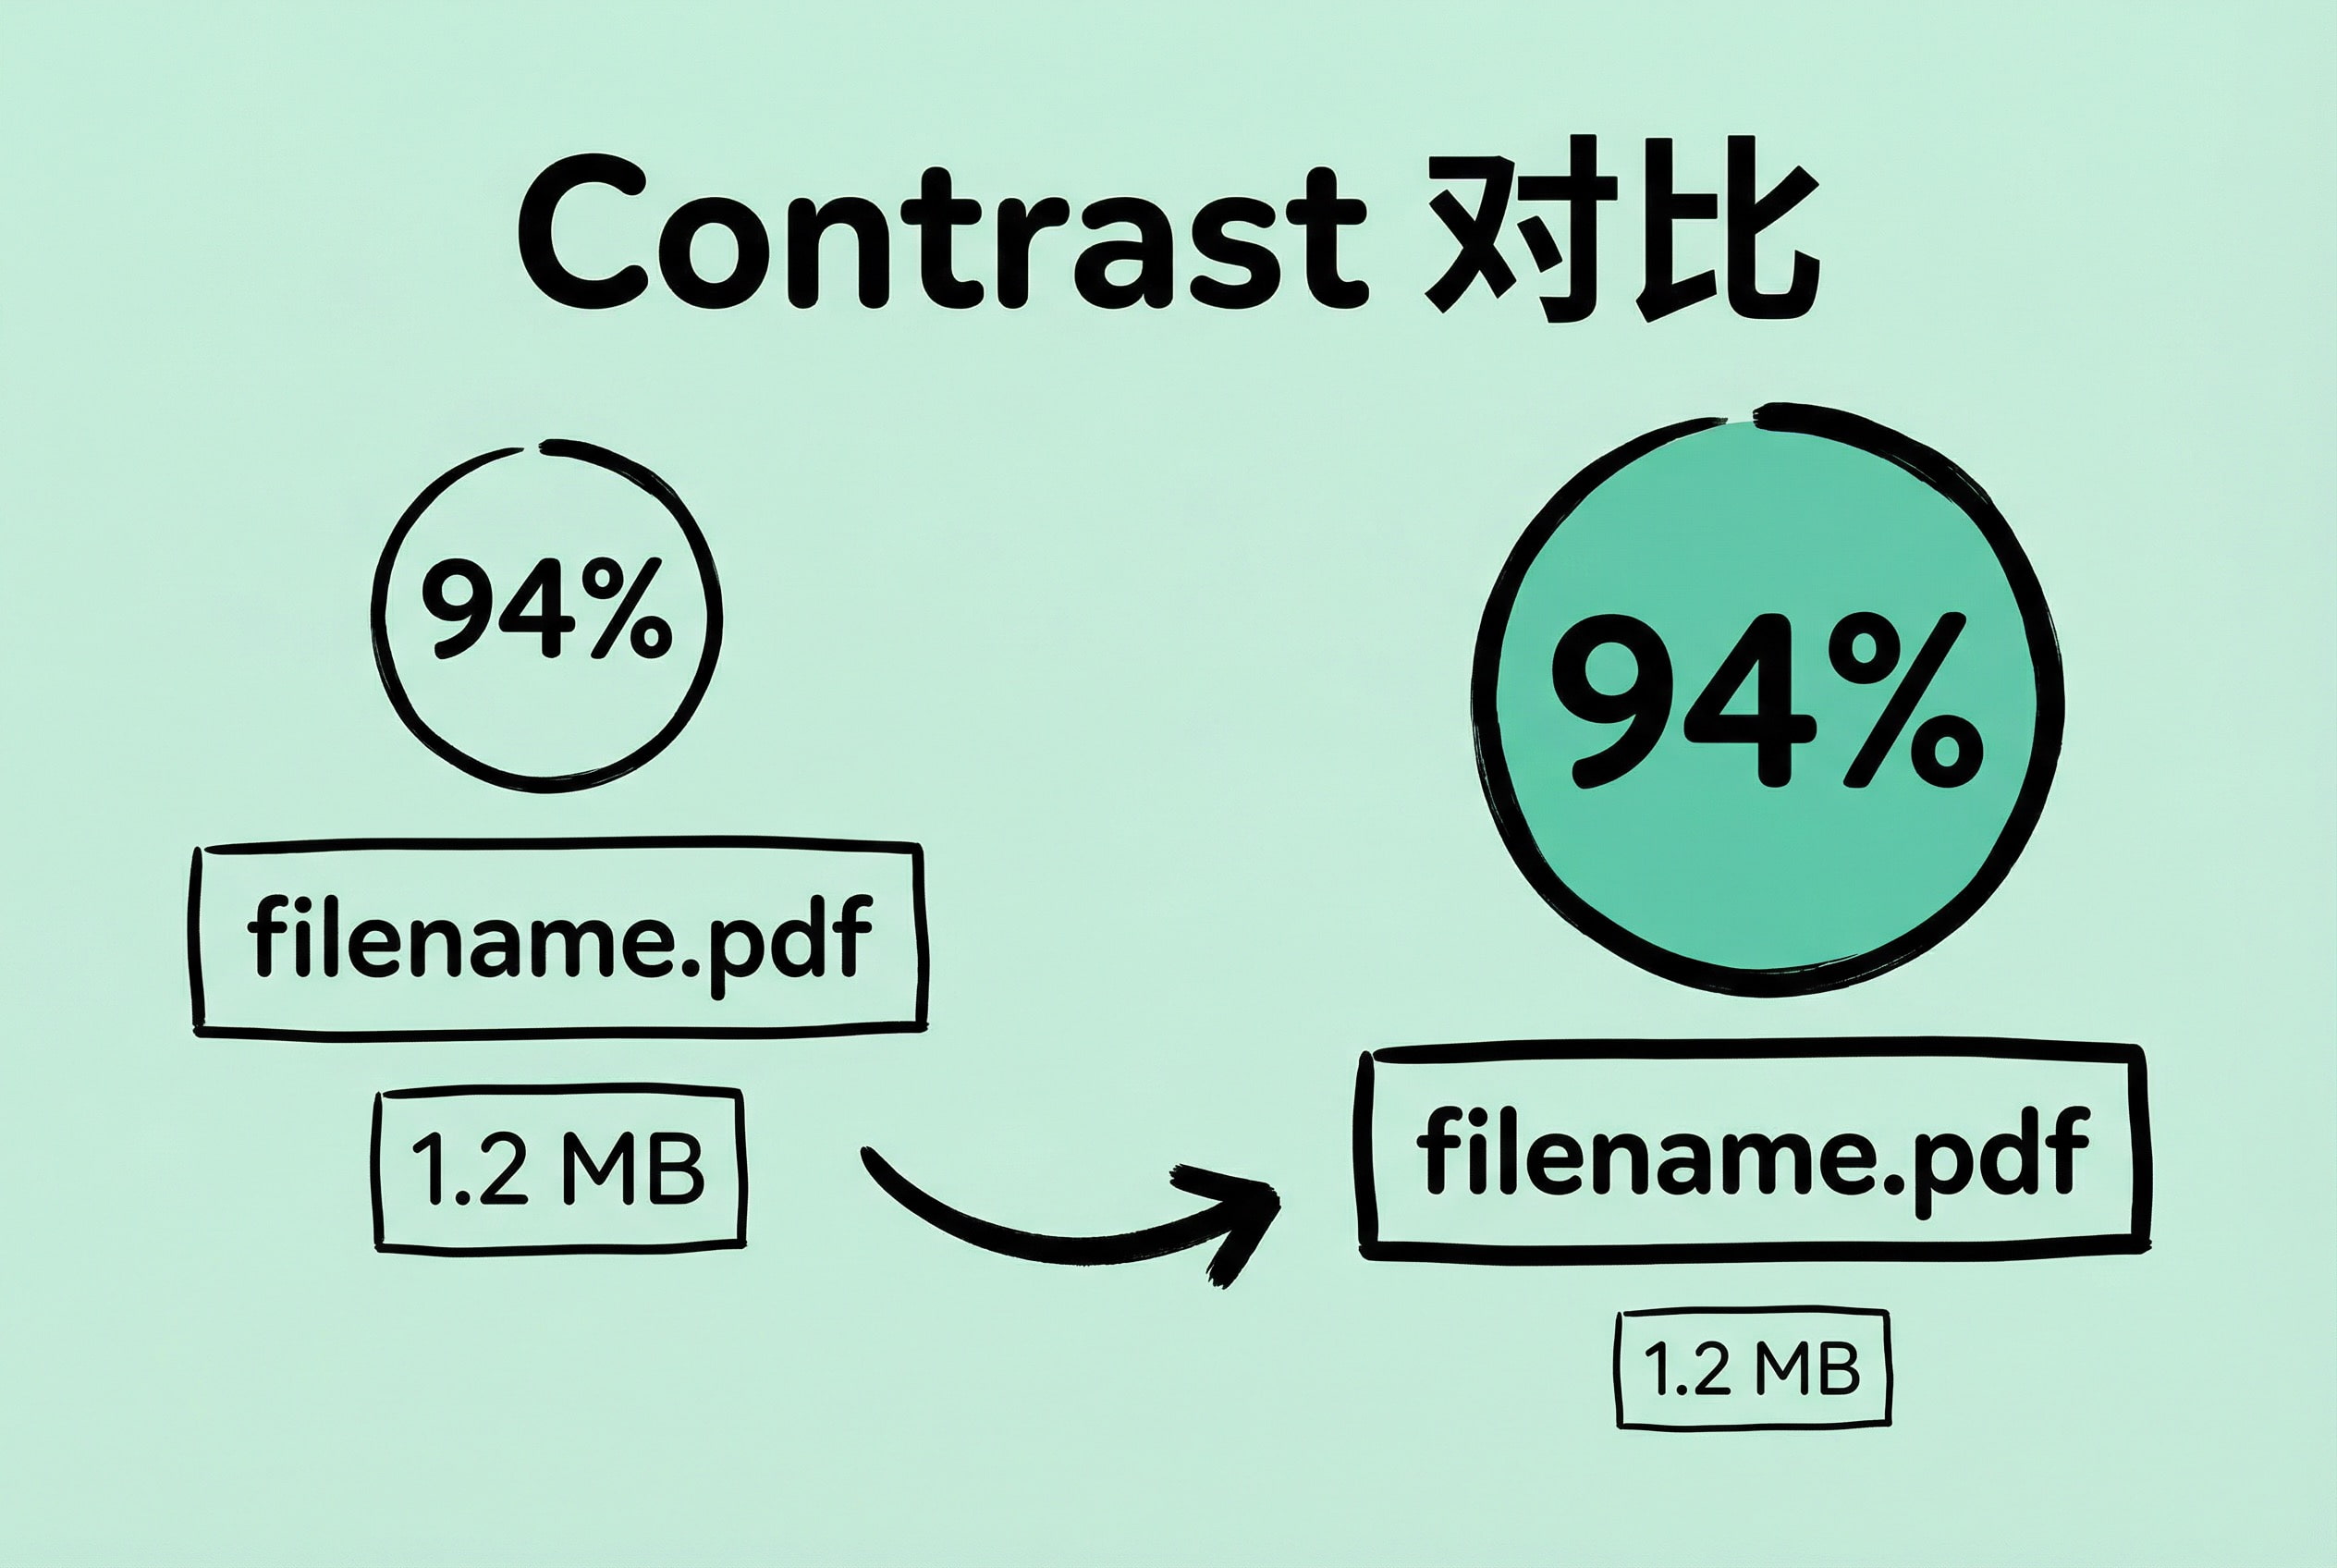
- Contrast: Important things should stand out. The compression rate is the data users care about most, so it is displayed with a blue gradient tag; the filename is secondary, using a regular font; the original size is even more secondary, using light gray. Primary and secondary are distinct; users know what to click without thinking.
These four principles sound simple, but using them well requires constant adjustment. My approach is: write the code, run it to see the effect, and if something feels “off,” check it against these four principles. Are related elements not close enough? Is there an alignment issue? Are repetitive elements not unified enough? Is what should be highlighted not standing out?
The benefit of no design mockups is fast iteration—change a few lines of code to see the effect, without changing the mockup first and then the code. Of course, this method has a prerequisite: having clear design principles in mind, otherwise, it’s easy to make a mess while changing things.
Technical Implementation of Core Features
Next, I’ll share implementation details of several core features, which are interesting technical points on the macOS platform.
Directory Monitor for Automatic Compression
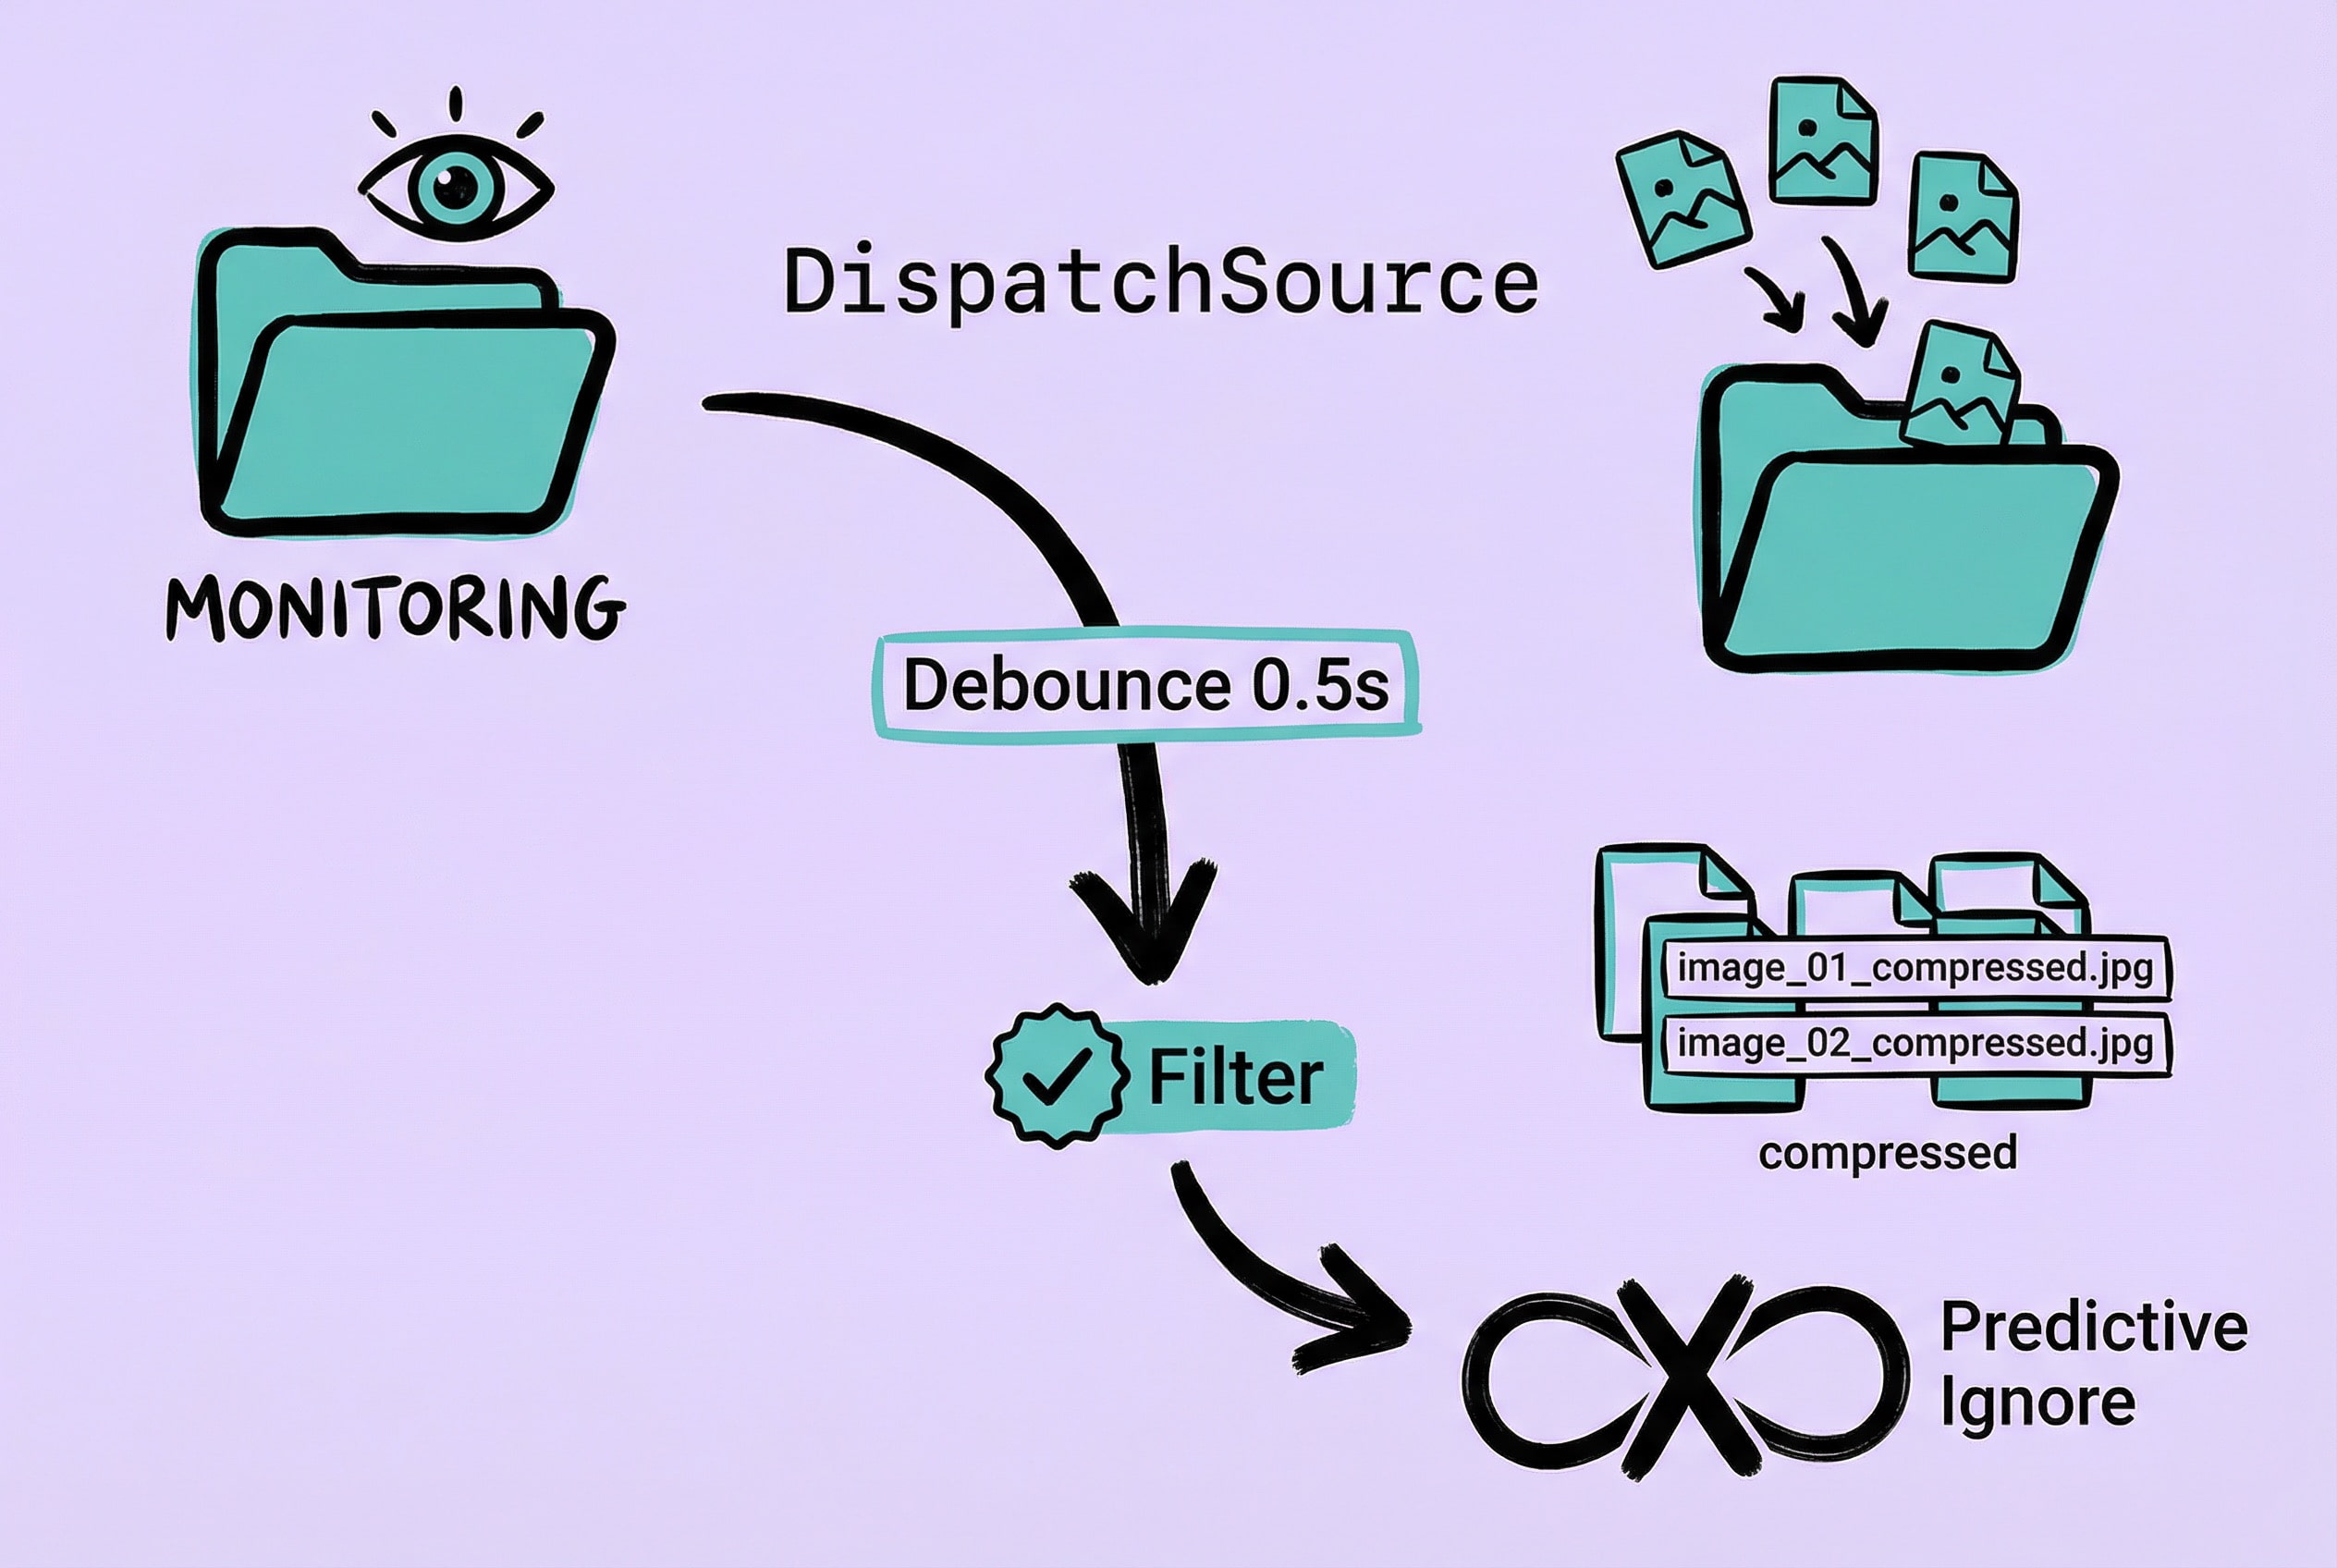
Directory monitoring is a signature feature of Zipic: users specify a folder, Zipic monitors its changes in real-time, and automatically compresses any new image added. The requirement looks straightforward, but I encountered many problems during implementation: which monitoring mechanism to choose, how to handle event bursts, what about infinite loops triggered by output files…
First is the choice of monitoring mechanism. The most intuitive way is polling—scanning the directory every few seconds to see if there are new files. But this method consumes too many resources, especially when the monitored folder contains thousands of files. I ultimately chose macOS’s DispatchSource.FileSystemEvent, an efficient monitoring mechanism based on kernel-level kqueue, which triggers only when file system changes actually occur, keeping CPU usage extremely low.
// Open directory with O_EVTONLY flag (only listen for events, don't block unmounting)
fileDescriptor = open(url.path, O_EVTONLY)

// Create DispatchSource to monitor file system object
source = DispatchSource.makeFileSystemObjectSource(
    fileDescriptor: fileDescriptor,
    eventMask: [.write, .extend, .delete, .rename],
    queue: configuration.queue
)
The next problem encountered was event bursts. If a user drags in hundreds of images at once, the system triggers hundreds of events in an instant. Processing each event immediately is inefficient and can cause interface lag. The solution is to implement a Debounce mechanism: when multiple events are received continuously, wait for a short period (default 0.5 seconds) and merge events within this period into one processing batch. This way, if a user drags in 100 images, it ultimately triggers only one compression task.
The trickiest problem is infinite loops. Imagine: User monitors Folder A, Zipic detects new image photo.jpg, compresses it to generate photo_compressed.jpg. But this output file is also in Folder A, so it triggers the monitoring event again… and so on, creating an infinite loop.
For this, I designed a Predictive Ignore Mechanism. When an input file is detected, the system predicts the path of the output file and adds it to the ignore list in advance:
let predictor = FileTransformPredictor.imageCompression(suffix: "_compressed")
let predictedOutputs = predictor.predictOutputFiles(for: inputURL)
ignoreList.addPredictiveIgnore(predictedOutputs)
The filtering system is also important. Users may only want to compress specific types of images, or only process files larger than a certain size. I used the Predicate pattern to implement flexible condition combinations:
// Only monitor image files, larger than 1KB, modified within 1 hour
let filter = FileFilter.imageFiles
    .and(.fileSize(1024...))
    .and(.modifiedWithin(3600))
There are also some details worth noting. Monitoring depth should be set according to actual scenarios—for most users, monitoring one or two levels of subdirectories is enough. If set to infinite depth, encountering complex directory structures (like node_modules) will create a massive number of watchers, consuming too many system resources. Additionally, newly created subdirectories also need to be dynamically added to monitoring, which requires the system to automatically check for new subdirectories and create watchers for them when directory changes are detected.
After repeatedly polishing this solution, I later open-sourced the core part as the FSWatcher project, hoping to help developers with similar needs.
PDF Compression: Utilizing Native macOS Capabilities
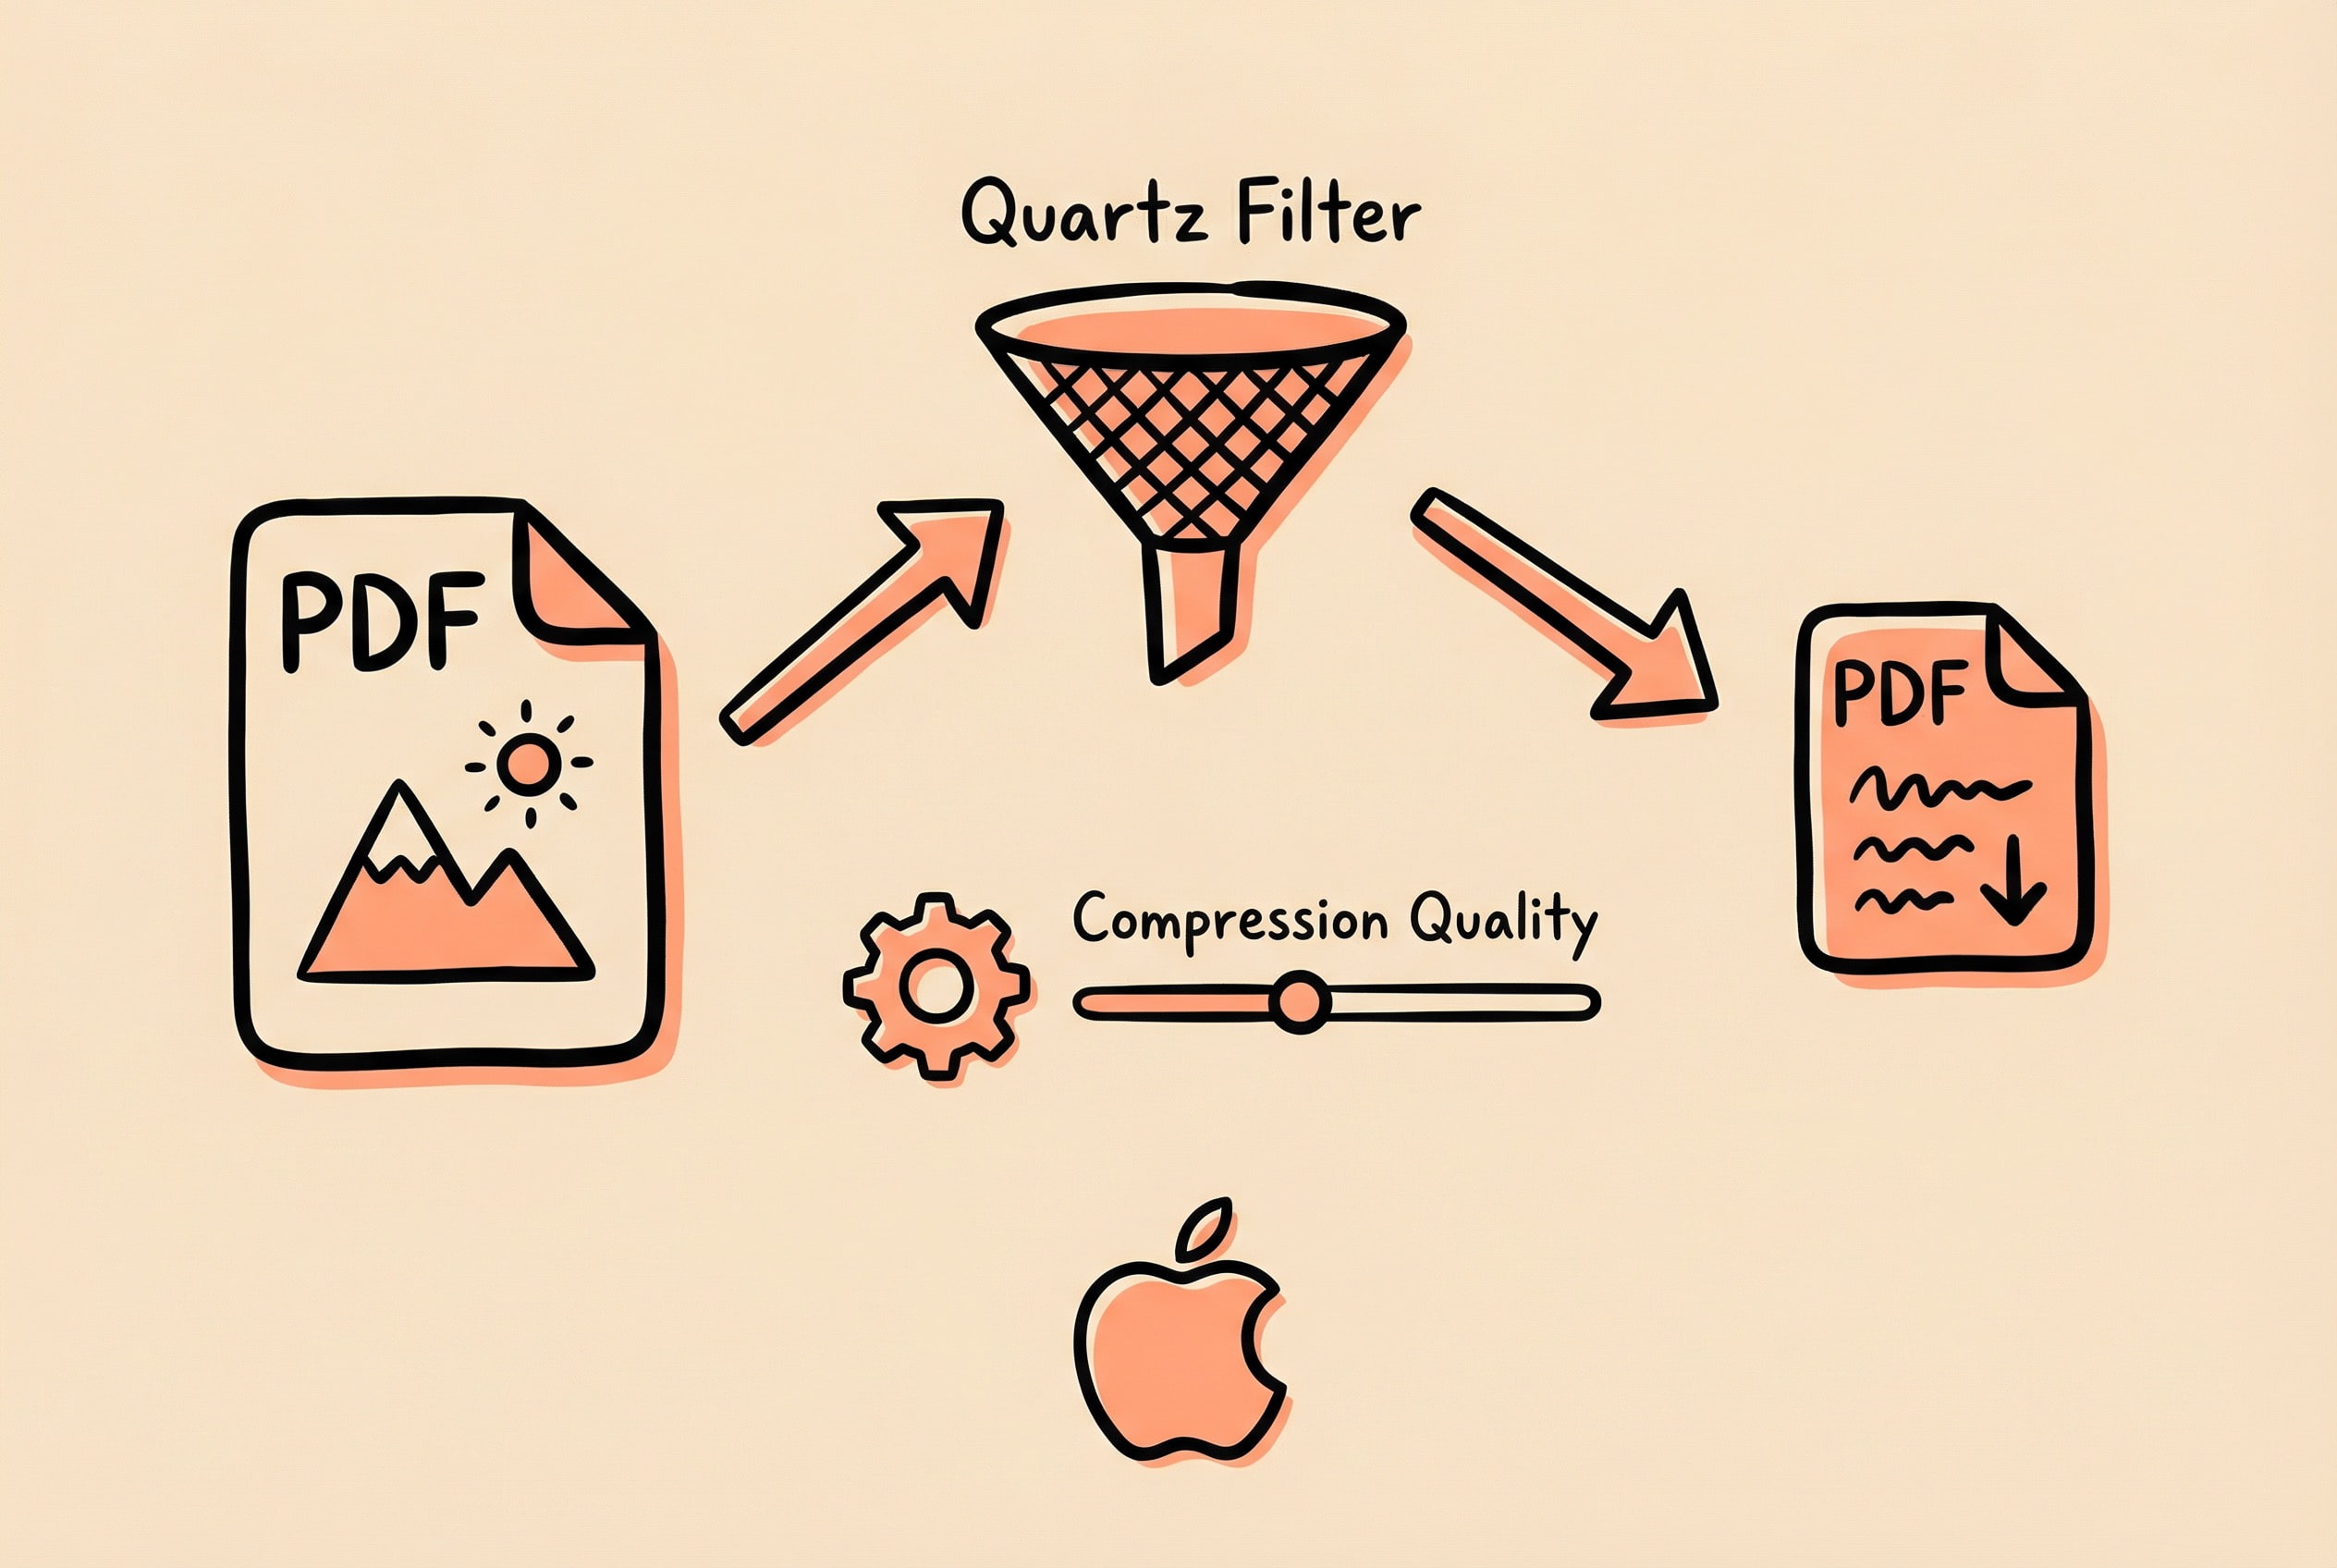
As the most common format for daily documents, PDFs are often stuffed with images. Supporting PDF compression was a highly requested feature.
PDF compression and ordinary image compression are completely different things. Image compression is relatively simple—read pixel data, re-encode with algorithms, write to a new file. But PDF is a complex container format that may contain text, vector graphics, embedded fonts, bookmarks, forms… and of course, images. The key question is: How to compress only the images within without destroying the PDF structure?
Initially, I considered several solutions: Ghostscript is powerful but bulky and requires handling external dependency distribution; ImageMagick doesn’t preserve PDF structure well enough; parsing PDF format manually to extract and re-compress images—thinking about this path reveals it as a bottomless pit.
Ultimately, I chose macOS native Quartz Filter technology. To be honest, I wish I had known about it sooner. It’s hidden in the system specifically for this purpose; the “Reduce File Size” option when exporting PDFs in the system’s “Preview” app uses exactly this. The working principle is elegant: it automatically performs JPEG re-compression on bitmap images within the PDF while rendering pages, leaving text, vector graphics, and fonts untouched.
This is a unique advantage of the macOS platform—the Core Graphics framework has hardware acceleration support, processing is fast, and no external dependencies need to be bundled, so the app size won’t bloat.
The core idea is to dynamically generate a custom .qfilter configuration file defining compression parameters, and then apply this filter via the Core Graphics framework to render the PDF. The whole flow: Generate corresponding Quartz Filter config based on user’s selected compression level -> Read source PDF -> Create new PDF context and apply Filter -> Render page by page (Filter handles image compression automatically at this step) -> Output compressed PDF.
Key Code (Quartz Filter File Generation):
private static func generateQFilter(at url: URL, compressionQuality: Double, level: Int) {
    let xmlContent = """
    <?xml version="1.0" encoding="UTF-8"?>
    <!DOCTYPE plist PUBLIC "-//Apple//DTD PLIST 1.0//EN" "...">
    <plist version="1.0">
    <dict>
        <key>FilterData</key>
        <dict>
            <key>ColorSettings</key>
            <dict>
                <key>ImageSettings</key>
                <dict>
                    <key>Compression Quality</key>
                    <real>\(compressionQuality)</real>      <!-- 0.0-1.0 -->
                    <key>ImageCompression</key>
                    <string>ImageJPEGCompress</string>       <!-- JPEG Compression -->
                    <key>ImageScaleSettings</key>
                    <dict>
                        <key>ImageScaleFactor</key>
                        <real>1.0</real>                     <!-- Keep Original Size -->
                    </dict>
                </dict>
            </dict>
        </dict>
        <key>FilterType</key>
        <integer>1</integer>
        <key>Name</key>
        <string>Compress PDF</string>
    </dict>
    </plist>
    """
    try xmlContent.write(to: url, atomically: true, encoding: .utf8)
}
For the design of compression levels, I defined 6 levels corresponding to different JPEG quality parameters (0.9 to 0.2). It is worth noting that at level 0.2, images show obvious compression artifacts. For documents that need to be printed or presented, higher quality levels are recommended; aggressive settings can be used for network transmission or archiving.
Key Code (PDF Compression Core Logic):
static func pdf(at sourceURL: URL, to destinationURL: URL, compressionLevel: Double) -> CommandResult {
    // 1. Load Quartz Filter
    guard let filter = QuartzFilterManager.filterForCompressionLevel(compressionLevel) else {
        return CommandResult(output: "Failed to load filter", error: .exit, status: -1)
    }

    // 2. Read Source PDF
    guard let sourcePDF = PDFDocument(url: sourceURL) else {
        return CommandResult(output: "Failed to load PDF", error: .exit, status: -1)
    }

    // 3. Create Data Consumer and PDF Context
    let mutableData = NSMutableData()
    guard let consumer = CGDataConsumer(data: mutableData),
          let firstPage = sourcePDF.page(at: 0) else { return /* error */ }

    var mediaBox = firstPage.bounds(for: .mediaBox)
    guard let pdfContext = CGContext(consumer: consumer, mediaBox: &mediaBox, nil) else {
        return /* error */
    }

    // 4. Apply Filter to Context (Key Step)
    guard filter.apply(to: pdfContext) else {
        return CommandResult(output: "Failed to apply filter", error: .exit, status: -1)
    }

    // 5. Render All Pages
    return renderPDFPages(sourcePDF: sourcePDF, context: pdfContext,
                          data: mutableData, destinationURL: destinationURL)
}
Key Code (Page Rendering Implementation):
private static func renderPDFPages(
    sourcePDF: PDFDocument,
    context: CGContext,
    data: NSMutableData,
    destinationURL: URL
) -> CommandResult {
    // Render page by page (Filter automatically handles image compression)
    for pageIndex in 0..<sourcePDF.pageCount {
        guard let page = sourcePDF.page(at: pageIndex) else { continue }
        var pageRect = page.bounds(for: .mediaBox)

        context.beginPage(mediaBox: &pageRect)
        page.draw(with: .mediaBox, to: context)  // Filter applies during drawing
        context.endPage()
    }

    context.closePDF()

    // Write to file
    try data.write(to: destinationURL, options: .atomic)
    return CommandResult(output: "Success", error: .exit, status: 0)
}
Pitfalls & Experience: The dynamically generated .qfilter file needs to be stored in a suitable location (I chose ~/Library/zipic/filters/). You need to handle cases where the file doesn’t exist or is corrupted, regenerating it if necessary.
Also note that Quartz Filter only compresses bitmap images in the PDF. If a PDF mainly consists of text and vector graphics, the compressed size might not change much—this needs to be explained to users at the product level to avoid confusion like “why did I compress it but it didn’t get smaller.” The good news is that metadata (bookmarks, links, forms, etc.) in the PDF can be fully preserved under this scheme, which many third-party solutions cannot achieve.
Thumbnail Generation Optimization
Zipic’s list view needs to display a large number of image thumbnails. The initial implementation was naive: using AsyncImage to load the original image directly and letting the system scale it down automatically. It was fine for small images, but with large images, it lagged noticeably, and memory usage skyrocketed.
First Optimization: Pre-generate Thumbnail Cache
The idea is straightforward—since scaling happens every time, why not pre-generate thumbnails and save them to disk, then load the small image next time? The early implementation used NSImage’s lockFocus/unlockFocus methods:
// Early version (Deprecated)
func thumbnail(with width: CGFloat) -> NSImage {
    let thumbnailImage = NSImage(size: thumbnailSize)
    thumbnailImage.lockFocus()
    self.draw(in: thumbnailRect, from: .zero, operation: .sourceOver, fraction: 1.0)
    thumbnailImage.unlockFocus()
    return thumbnailImage
}
The problem is: this method requires fully decoding the original image into memory first, then scaling and drawing. Decoding an 8000x6000 image takes up about 192MB of memory. When batch processing, memory easily hits several GBs. Moreover, lockFocus has been marked as a deprecated API by Apple, and calling it on background threads may trigger priority inversion.
Second Optimization: CGContext Manual Drawing
To solve the lockFocus issue, I switched to using CGContext to manually create a bitmap context:
// Improved version (Still problematic)
guard let cgImage = self.cgImage(forProposedRect: nil, context: nil, hints: nil) else {
    return self
}
guard let context = CGContext(...) else { return self }
context.draw(cgImage, in: CGRect(origin: .zero, size: thumbnailSize))
This solved the thread safety issue, but the essence didn’t change—the original image still had to be fully decoded to get the CGImage, so the memory problem persisted.
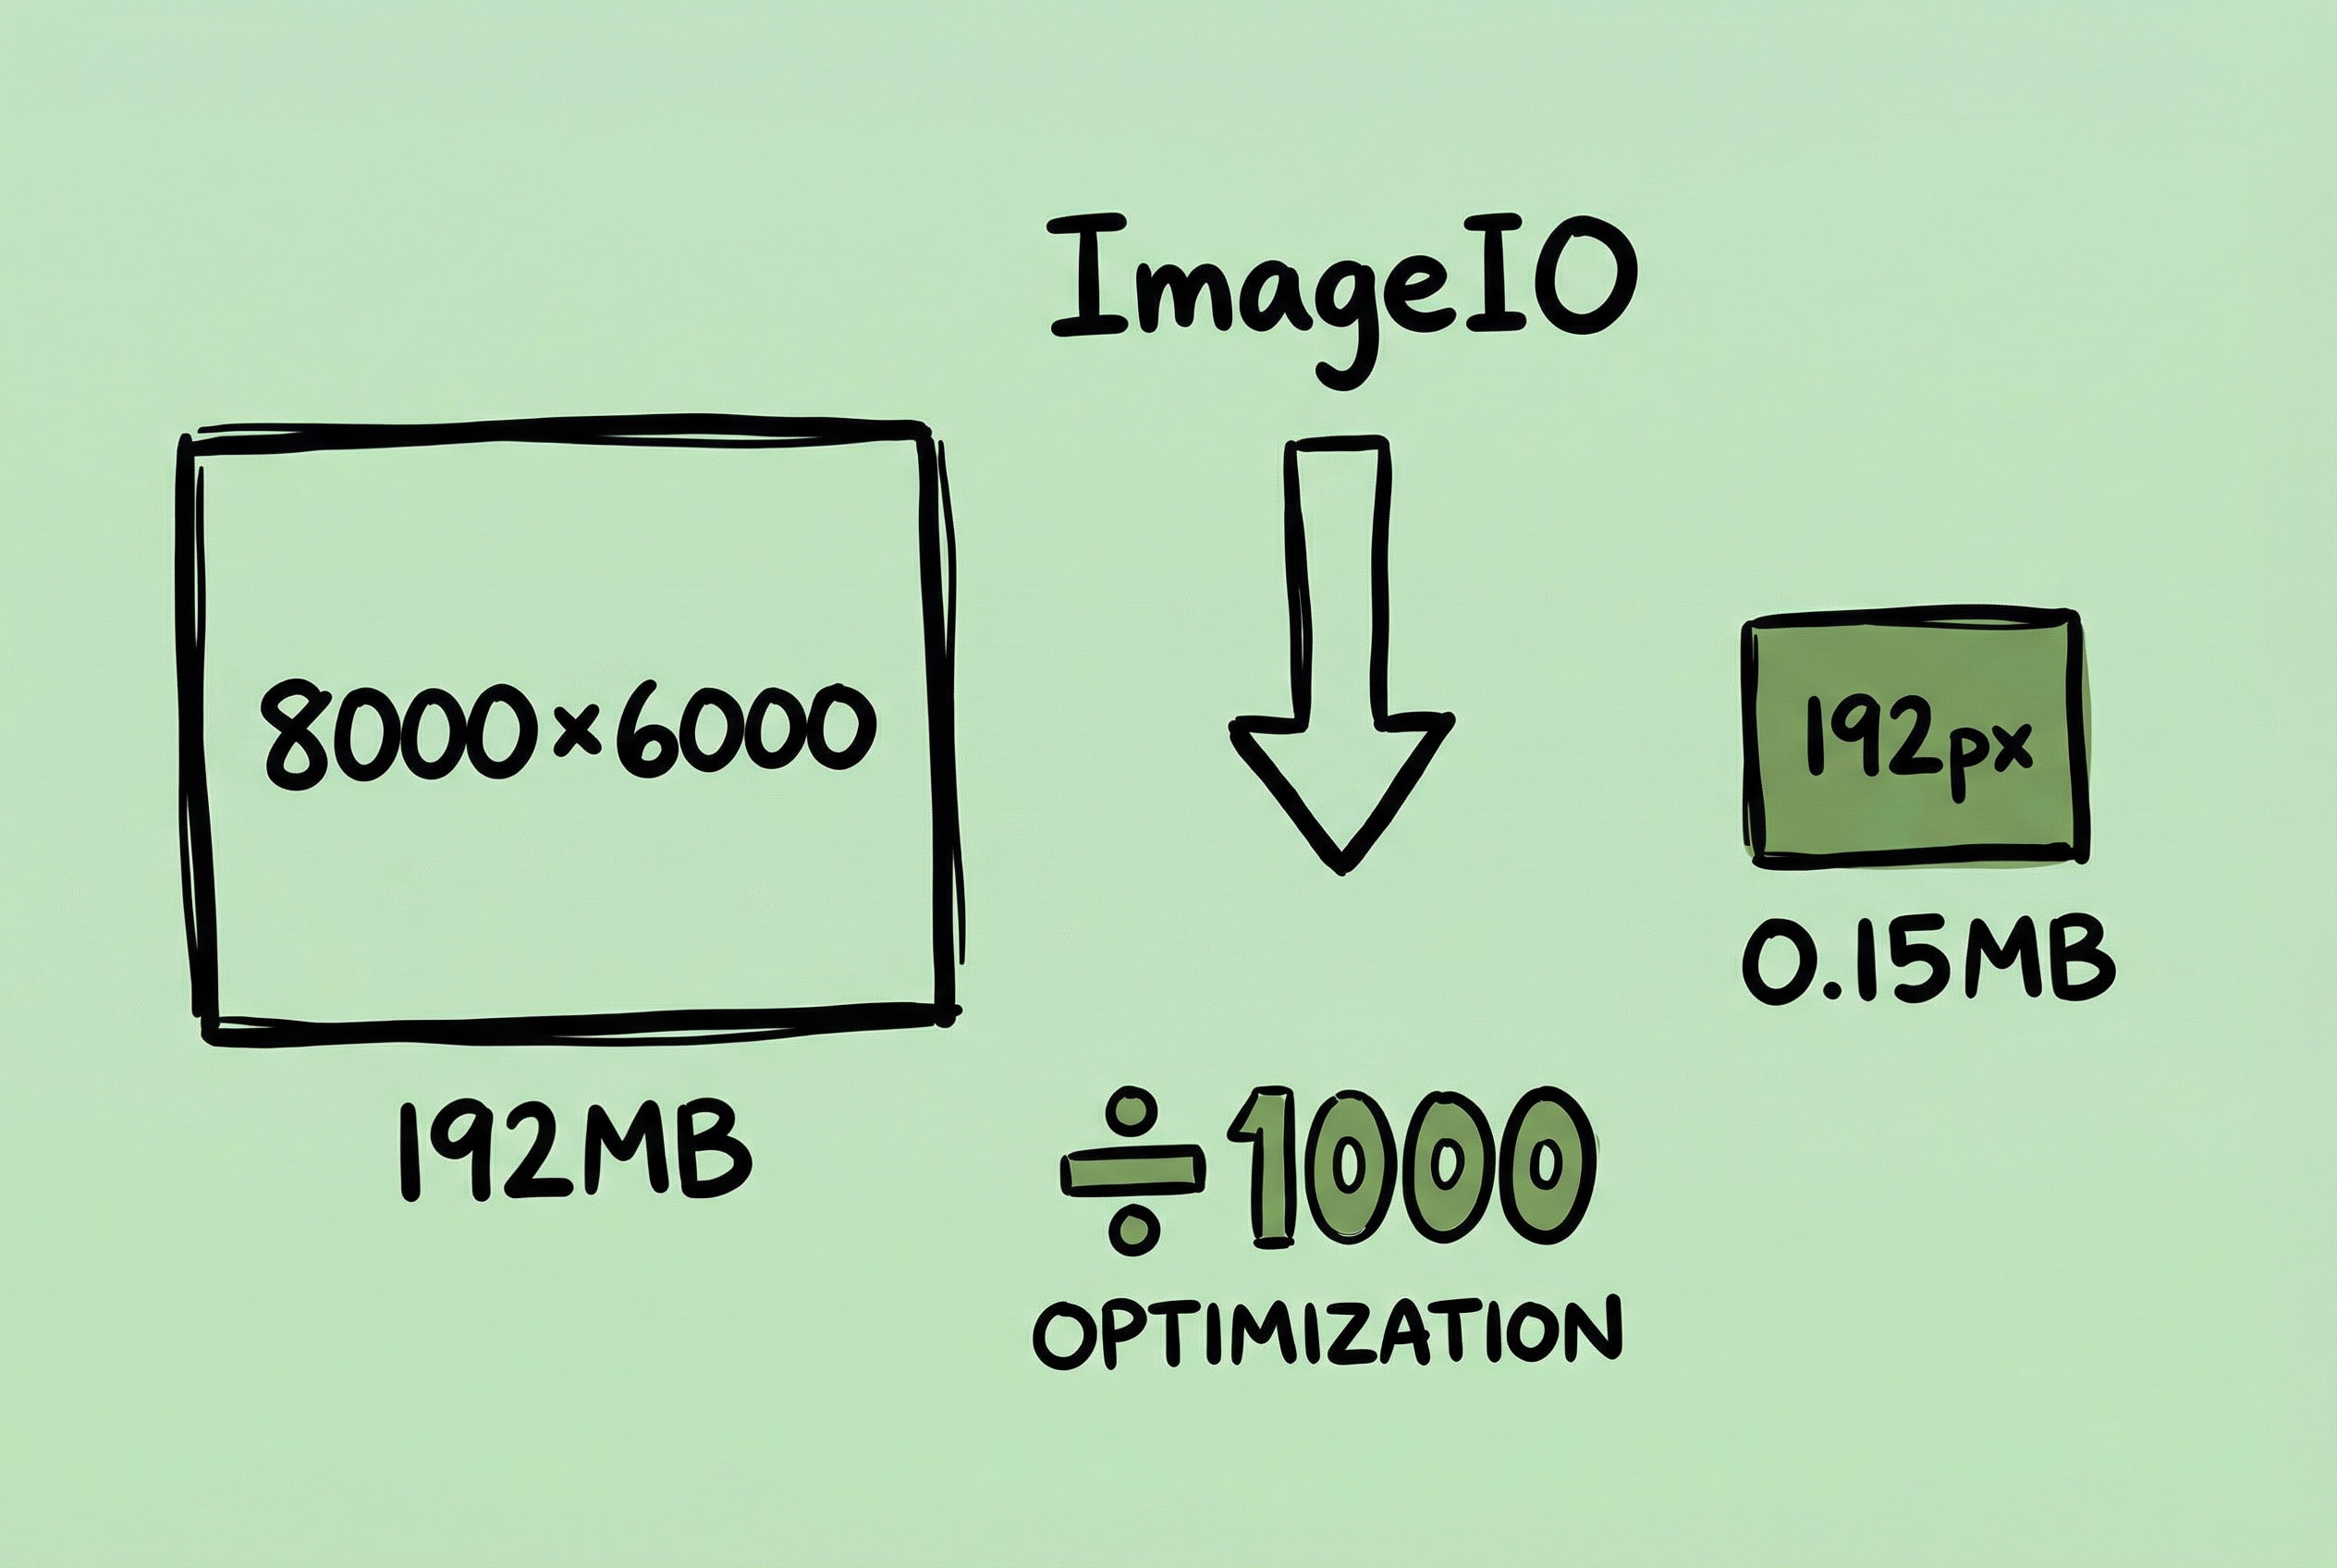
Final Solution: ImageIO Downsampling
Later, I discovered that the ImageIO framework provides the CGImageSourceCreateThumbnailAtIndex API, which can generate thumbnails of a specified size directly from the image file using progressive downsampling internally, without needing to fully decode the original image. This is the correct answer.
func savePNGThumbnail(for imageURL: URL, maxPixelSize: Int = 192) -> URL? {
    return autoreleasepool {
        // Create image source (Do not cache original image)
        let sourceOptions: CFDictionary = [kCGImageSourceShouldCache: false] as CFDictionary
        guard let source = CGImageSourceCreateWithURL(imageURL as CFURL, sourceOptions) else {
            return nil
        }

        // Configure thumbnail options
        let thumbnailOptions: [CFString: Any] = [
            kCGImageSourceCreateThumbnailFromImageAlways: true,
            kCGImageSourceCreateThumbnailWithTransform: true,  // Auto-apply EXIF orientation
            kCGImageSourceShouldCacheImmediately: true,        // Decode immediately to avoid priority inversion
            kCGImageSourceThumbnailMaxPixelSize: maxPixelSize  // Max dimension 192px
        ]

        // Generate thumbnail directly (Internal downsampling, no full decode)
        guard let cgImage = CGImageSourceCreateThumbnailAtIndex(source, 0, thumbnailOptions as CFDictionary) else {
            return nil
        }

        // Write PNG file
        let destURL = thumbnailsDir.appendingPathComponent(fileComponent)
            .deletingPathExtension().appendingPathExtension("png")
        guard let destination = CGImageDestinationCreateWithURL(
            destURL as CFURL, UTType.png.identifier as CFString, 1, nil
        ) else { return nil }

        CGImageDestinationAddImage(destination, cgImage, nil)
        guard CGImageDestinationFinalize(destination) else { return nil }
        return destURL
    }
}
Effect Comparison: Processing the same 8000x6000 JPEG, full decoding takes about 192MB, while downsampling to generate a 192px thumbnail takes about 0.15MB—memory savings of nearly a thousand times.
Key Parameters:
kCGImageSourceShouldCache: false: Disable caching when creating image source to avoid original image data staying in memory.kCGImageSourceShouldCacheImmediately: true: Decode immediately on the current thread to prevent being scheduled to a low-priority background thread causing priority inversion.kCGImageSourceCreateThumbnailWithTransform: true: Automatically apply EXIF orientation information so portrait photos taken with phones won’t display “sideways.”kCGImageSourceThumbnailMaxPixelSize: Specify the maximum edge length; ImageIO will downsample as needed internally.
Pitfalls & Experience:
- Memory Release: Wrap the loop body with
autoreleasepoolduring batch processing to ensure temporary objects are released immediately after processing each image, avoiding memory accumulation. - Filename Conflict: Early thumbnails were stored using only filenames, so
photo.jpgin different directories would overwrite each other. The solution is for the cache directory to preserve the relative path structure, e.g., thumbnails fora/photo.jpgandb/photo.jpgare saved tothumbnails/a/photo.pngandthumbnails/b/photo.pngrespectively.
The core principle of this optimization is: For scenarios where only thumbnails need to be displayed, never fully decode the original image. ImageIO’s downsampling is the best practice recommended by Apple.
Device Fingerprint Stability Optimization
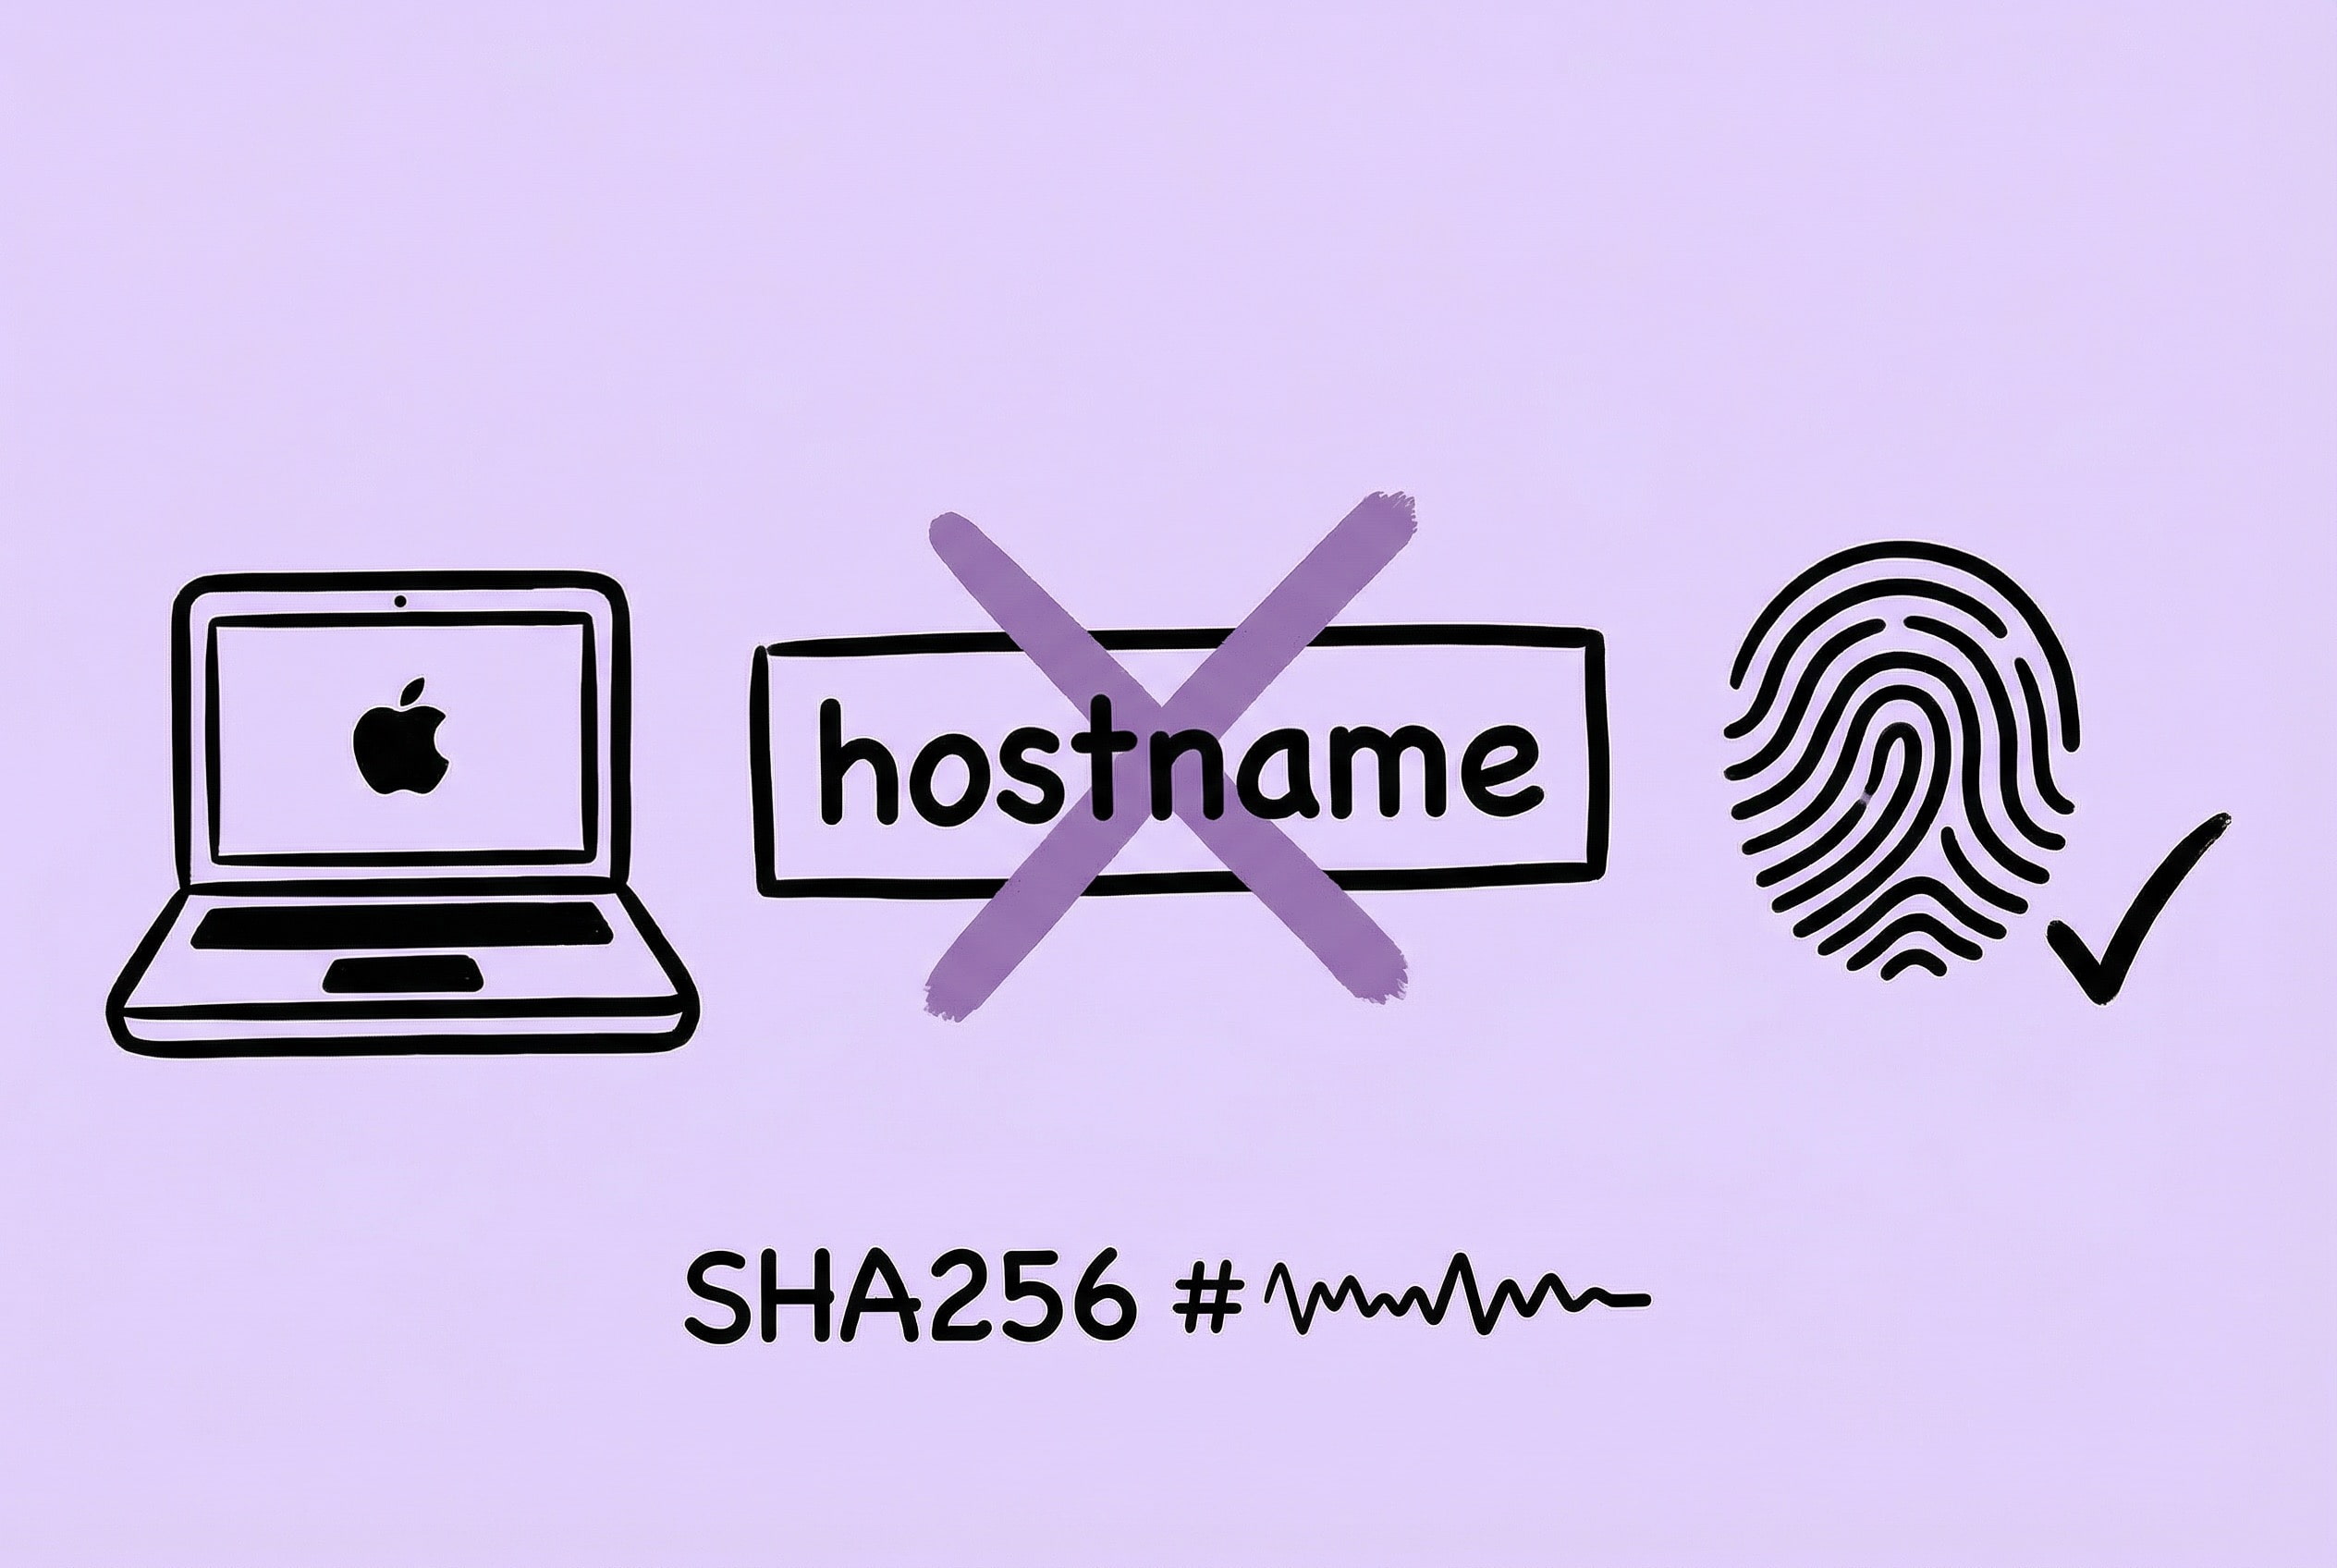
I once received user feedback saying “I didn’t change my computer but I need to reactivate.” Investigation revealed that the old fingerprint algorithm included the hostname, which changes with network environment changes or system updates, causing fingerprint drift and triggering false positives.
The solution was to make the device fingerprint rely only on stable hardware identifiers, removing any mutable software identifiers. Ultimately, only the mainboard serial number and Ethernet MAC address are kept for calculation:
func generateStable() -> String {
    var components: [String] = []

    if let boardSerial = getBoardSerial() {
        components.append(boardSerial) // Mainboard Serial
    }
    if let macAddress = getMACAddress() {
        components.append(macAddress)  // Ethernet MAC Address
    }

    let joined = components.joined(separator: "|")
    let data = Data(joined.utf8)
    return data.sha256().map { String(format: "%02hhx", $0) }.joined()
}
Pitfalls & Experience:
- Silent Migration Strategy: Automatically fallback to try the old fingerprint when verification fails. If the old fingerprint is valid, silently de-register the old device and reactivate with the new fingerprint in the background, making the whole process imperceptible to the user.
- Network Error Tolerance: Revoke authorization only under specific business error codes. For anomalies like timeouts or network jitter, only log and retry without changing the local authorization status.
Batch Compression Concurrency Optimization

When a user drags in hundreds of images at once, efficient processing is a technical challenge. The initial serial solution—compressing one by one—was obviously too slow, but simply maximizing concurrency also causes problems: system lag, memory spikes, and chaotic task scheduling.
The final solution is a combination of OperationQueue + DispatchGroup, cooperating with QueueManager to implement double-queue load balancing scheduling.
Why Double Queues?
The problem with a single queue is obvious: User drags in 500 large images first, filling the queue; then immediately drags in 3 small images wanting quick processing, but they have to wait behind the 500 images. The double-queue design allows new tasks to be assigned to the lighter-loaded queue, so small batch tasks won’t be blocked by large batch tasks.
Key Code (QueueManager Load Balancing Allocation):
class QueueManager {
    static let shared = QueueManager(num: 2)  // Double Queue

    var queues = [OperationQueue]()
    var counts = [Int]()  // Record task count of each queue

    init(num: Int) {
        for _ in 1...num {
            let queue = OperationQueue()
            queue.qualityOfService = .userInitiated
            queue.maxConcurrentOperationCount = 8  // Configurable
            queues.append(queue)
            counts.append(0)
        }
    }

    /// Load Balancing: Choose the queue with fewest tasks
    func allocate(count: Int) -> OperationQueue {
        var index = 0
        if let minCount = counts.min(),
           let indexOfMinValue = counts.firstIndex(of: minCount) {
            index = indexOfMinValue
        }
        counts[index] += count
        return queues[index]
    }
}
Key Code (Batch Compression Flow):
static func compress(urls: [URL], by compressedImages: CompressedImages) {
    let group = DispatchGroup()

    // 1. Get the queue with lightest load
    let operationQueue = QueueManager.shared.allocate(count: urls.count)

    // 2. Create Operation for each image
    for url in urls {
        let operation = BlockOperation {
            // Generate thumbnail, execute compression, update UI
        }

        operation.completionBlock = {
            group.leave()
        }

        group.enter()
        operationQueue.addOperation(operation)
    }

    // 3. Send notification when all tasks are done
    group.notify(queue: .main) {
        // Show completion notification
    }
}
Why OperationQueue instead of GCD?
OperationQueue has several key advantages over native GCD: supports task cancellation (needed when user clears the list), can set maximum concurrency count, and can query task status. These features are crucial for batch processing scenarios requiring fine-grained control.
Pitfalls & Experience:
- Thread Safety: Multiple Operations will concurrently update progress statistics, needing
DispatchSemaphoreto protect shared state and avoid data races. - QoS Settings: Must set
queue.qualityOfService = .userInitiated, otherwise the system will issue priority warnings and tasks might be executed with downgraded performance. - Concurrency Count Selection: The default of 8 is an empirical value. Compression is CPU-intensive; too high concurrency leads to increased context switching overhead, while too low leaves CPU underutilized.
- UI Updates: UI updates inside Operations must be dispatched to the main thread, otherwise there will be thread safety issues and warnings.
- Multi-batch Progress Tracking: Users might drag in multiple batches of images continuously. Each batch needs to track progress independently, and total progress is a weighted average of all batches. I designed a
TaskStackto manage this scenario.
Building an Open Ecosystem: URL Scheme & Raycast Extension
For a utility product to truly integrate into a user’s workflow, relying solely on its own interface is not enough. Users might be using Raycast, Alfred, Shortcuts, or even writing their own scripts—if Zipic can be invoked by these tools, the usage scenarios broaden significantly.
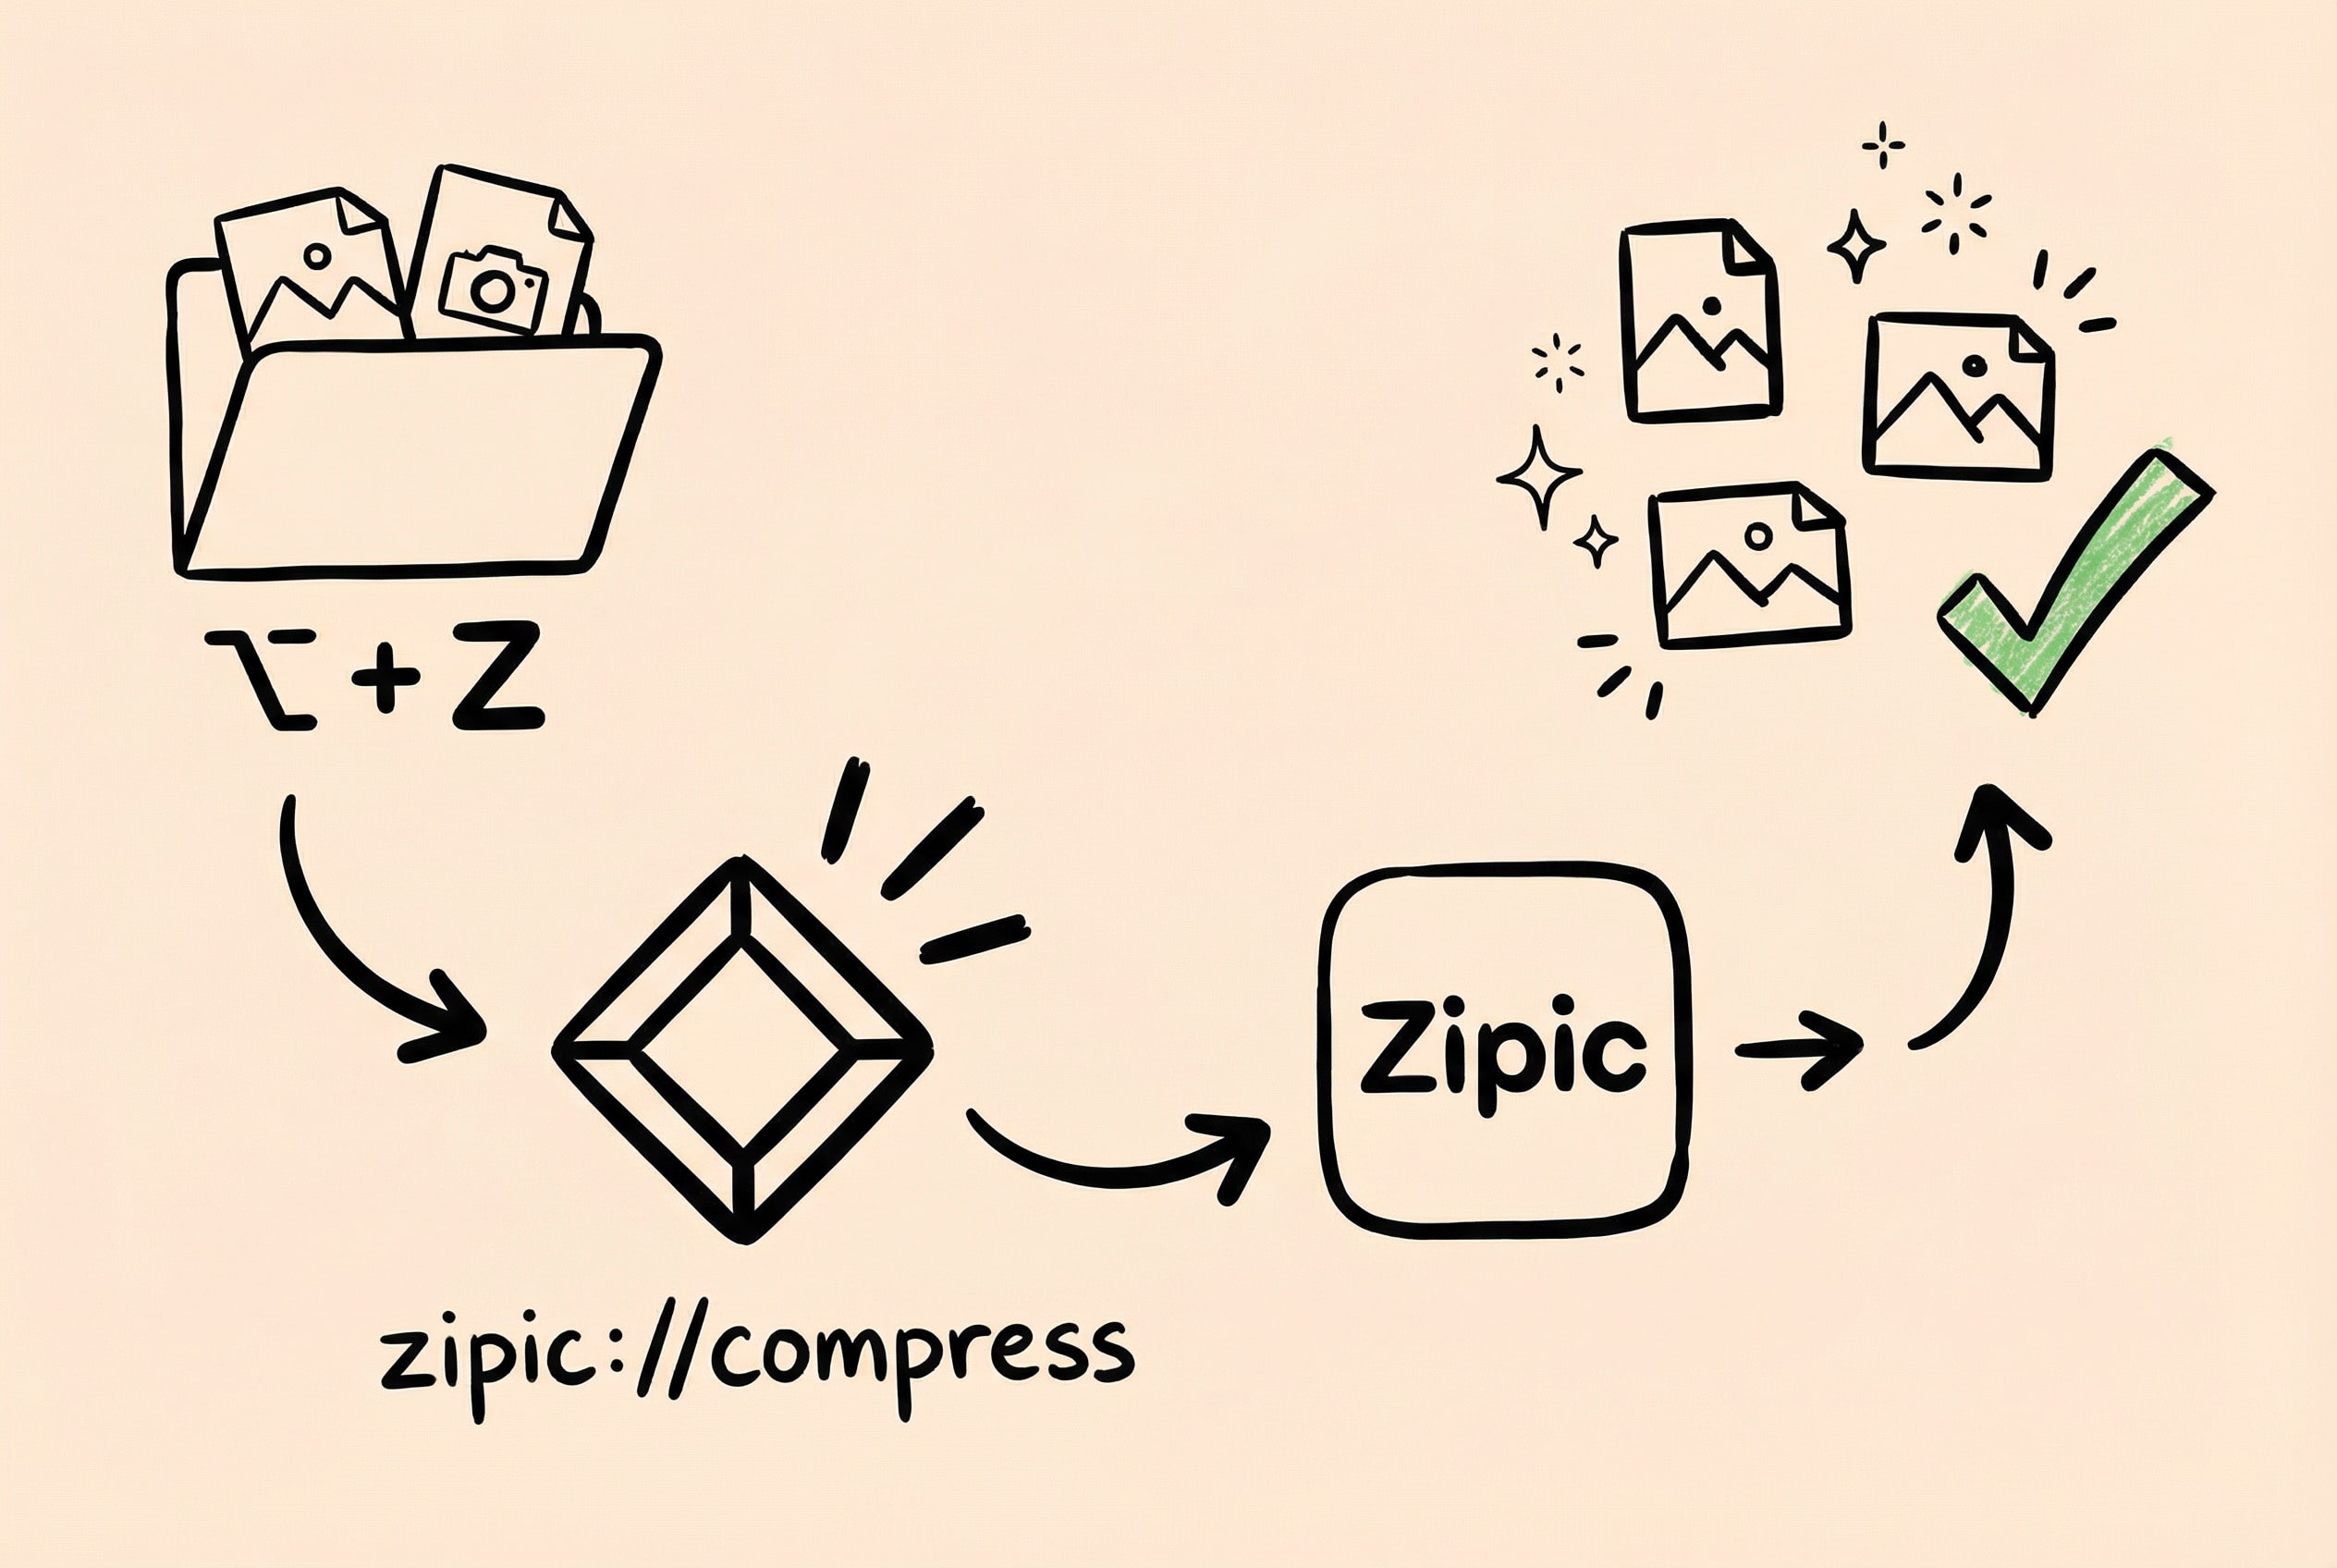
The most common way for cross-app communication on macOS is URL Scheme. After registering a custom scheme in Info.plist, any application can invoke Zipic to execute tasks via open "zipic://...".
My design is: zipic://compress?url=Path1&url=Path2&level=3&format=webp, supporting passing multiple file paths and compression parameters.
// Handle incoming URL at App entry after registering URL Scheme
private func handle(_ url: URL) {
    guard url.scheme == "zipic", url.host == "compress" else { return }
    // Parse URL parameters
    guard let queryItems = URLComponents(url: url, resolvingAgainstBaseURL: true)?.queryItems else { return }

    // Parse file path parameters (Support multiple url parameters)
    let urls = queryItems.compactMap { item -> URL? in
        guard item.name == "url", let path = item.value?.removingPercentEncoding else { return nil }
        return URL(fileURLWithPath: path)
    }

    // Parse compression options (level, format, etc.) and execute compression
    Common.compress(urls: urls, by: CompressedImages.shared, with: parseOptions(from: queryItems))
}
Raycast Extension Practice
Based on this URL Scheme, I developed Zipic’s Raycast Extension, which currently has 2000+ installs.
The user’s typical workflow became: Select image in Finder -> Call up Raycast with shortcut -> Type compress and hit Enter. If a global hotkey is set for the command, it can even be “Select image -> Hit shortcut -> Compression done,” taking less than 1 second.
// Raycast Extension Core Logic (TypeScript)
export default async function Command() {
  const selectedItems = await getSelectedFinderItems();
  const paths = selectedItems.map(item => item.path);

  // Build URL Scheme Call
  const data = JSON.stringify({ urls: paths });
  const url = `zipic://compress?data=${encodeURIComponent(data)}`;

  await open(url);  // Call Zipic
}
What the extension does is simple: Get the file paths selected in Finder, assemble them into a URL conforming to Zipic’s spec, and then open. The Zipic app receives the request, parses paths, executes compression, and sends a system notification upon completion.
Pitfalls & Experience:
- Path Encoding: File paths may contain spaces, Chinese, or other special characters. You must perform Percent Encoding when assembling the URL, otherwise, the App side will error during parsing (Swift’s
URLComponentshelps, but the initiator must be standard). - Security Validation: After receiving paths, the App must verify if the files exist, if they are supported image formats, and filter out special directories like
.appor.bundleto prevent malicious invocation or accidental operation.
Besides URL Scheme, Zipic also supports App Intents for macOS 13+, which can be called directly in “Shortcuts” and might even be recognized by Apple Intelligence in the future. But URL Scheme currently has the advantages of good compatibility and simple integration, making it still the best choice for productivity tools like Raycast/Alfred.
Conclusion and Outlook
Looking back at Zipic’s development process, from polishing UI details to optimizing low-level performance, every “seemingly simple” feature has unknown technical trade-offs behind it.
I always believe that technology serves the product. Whether choosing native Swift development or obsessing over ImageIO memory optimization, the ultimate goal is to provide users with a smooth “open-use-leave” tool.
Zipic’s creation also relies on contributions from the open-source community. Sparkle solved automatic updates, Keygen solved licensing, and libwebp provided core compression capabilities. As a give-back, I have also organized and open-sourced the core folder monitoring solution mentioned in the text as the FSWatcher project, hoping to help developers with similar needs.
Finally, thank you to everyone who read this series of articles. If you are interested in native macOS development, or want to experience the actual effects of these technologies mentioned, feel free to visit the Zipic Website to download a trial.
I hope this set of articles encourages more developers to try creating their own indie products on the macOS platform.
See you around!