The New Navigation System in SwiftUI

Published on

For a long time, developers have criticized SwiftUI’s navigation system. Due to the limitations of NavigationView, developers had to use various tricks and even black technology to achieve some basic functions (such as returning to the root view, adding any view to the stack, returning to any level view, Deep Link jump, etc.). SwiftUI 4.0 (iOS 16+, macOS 13+) has made significant changes to the navigation system, providing a new API that manages views as a stack, making it easy for developers to implement programmatic navigation. This article will introduce the new navigation system.

Divide into two

The most direct change in the new navigation system is to abandon NavigationView and split its functions into two separate controls: NavigationStack and NavigationSplitView.

NavigationStack is designed for single-column scenarios, such as iPhone, Apple TV, and Apple Watch:

Swift
NavigationStack {}
// Equivalent to
NavigationView{}
    .navigationViewStyle(.stack)

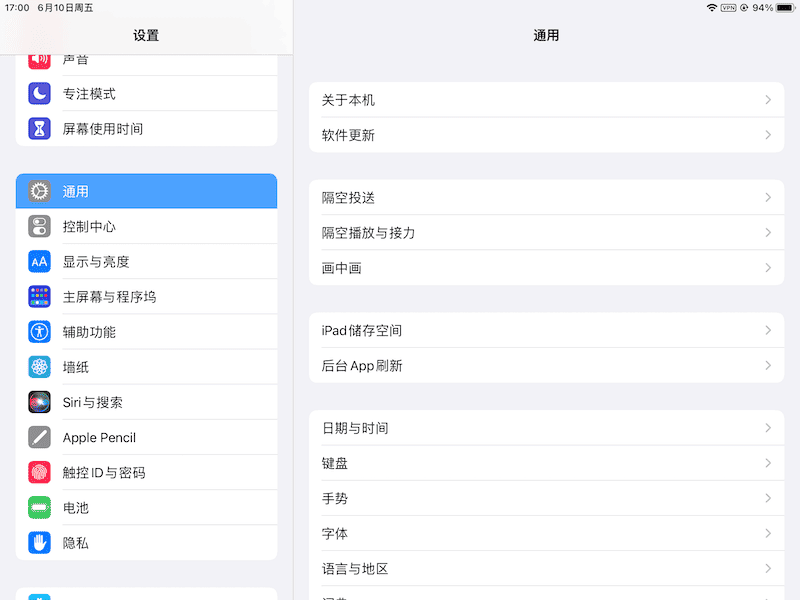
NavigationSplitView is designed for multi-column scenarios, such as iPadOS and macOS:

Swift
NavigationSplitView {
   SideBarView()
} detail: {
   DetailView()
}

// Corresponds to dual-column scenarios

NavigationView {
    SideBarView()
    DetailView()
}
.navigationViewStyle(.columns)
https://cdn.fatbobman.com/navigationSplitView_2_demo.PNG

Swift
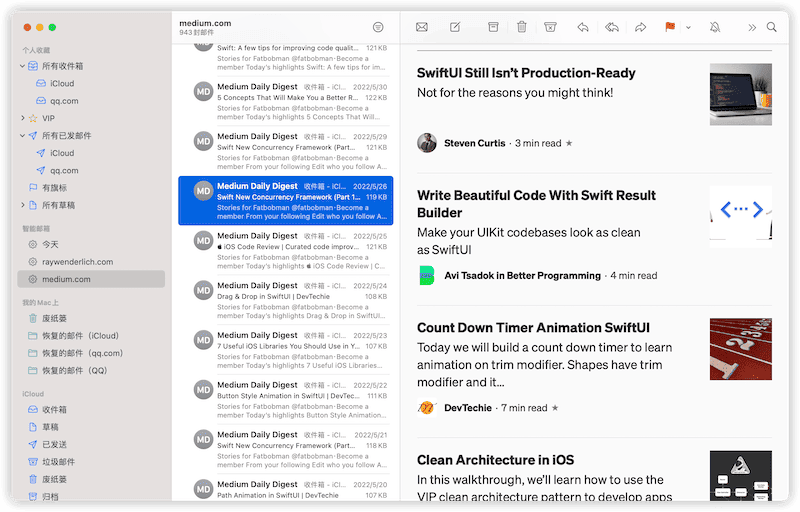
NavigationSplitView {
    SideBarView()
} content: {
    ContentView()
} detail: {
    DetailView
}

// Corresponds to three-column scene
NavigationView {
    SideBarView()
    ContentView()
    DetailView()
}
.navigationViewStyle(.columns)
https://cdn.fatbobman.com/navigationSplitView_3_demo.png

Compared to setting the NavigationView style through navigationViewStyle, dividing the layout into two parts will make the layout more clear, and also force developers to make more adaptations for SwiftUI applications on iPadOS and macOS.

On devices like the iPhone, NavigationSplitView will automatically adapt to single-column display. However, in terms of switching animation, programmatic API interfaces, and other aspects, it is significantly different from NavigationStack. Therefore, for applications that support multiple hardware platforms, it is best to use corresponding navigation controls for different scenarios.

Two Components, Two Logics

Compared to the changes in component names, the programmatic navigation API is the biggest highlight of this update. With the new programmatic API, developers can easily implement features such as returning to the root view, adding any view to the current view stack (view navigation), and external view navigation (Deep Link).

Apple provides two different logical APIs for NavigationStack and NavigationSplitView, which may cause confusion for some developers.

Programmatic Navigation of NavigationView

Actually, NavigationView has some programmatic navigation capabilities. For example, we can use the following two constructors of NavigationLink to achieve limited programmatic navigation:

Swift
init<S>(_ title: S, isActive: Binding<Bool>, @ViewBuilder destination: () -> Destination)
init<S, V>(_ title: S, tag: V, selection: Binding<V?>, @ViewBuilder destination: () -> Destination)

There are some limitations to the above two methods:

  • Binding needs to be done view by view, and if a developer wants to return to any level of view, they need to manage the state themselves.
  • When declaring NavigationLink, the target view still needs to be set, which can result in unnecessary instance creation overhead.
  • It is difficult to implement navigation from outside the view.

“Can be used, but not easy to use” may be a more appropriate summary of the old version of programmatic navigation.

NavigationStack addresses the above issues from two perspectives.

Type-based reactive target view handling mechanism

For example, the following code is a way to use programmatic navigation in older versions (before 4.0) of SwiftUI:

Swift
struct NavigationViewDemo: View {
    @State var selectedTarget: Target?
    @State var target: Int?
    var body: some View {
        NavigationView{
            List{
                NavigationLink("SubView1", destination: SubView1(), tag: Target.subView1, selection: $selectedTarget) // SwiftUI creates an instance of the target view regardless of whether it enters the target view when entering the current view (not evaluating the body)
                NavigationLink("SubView2", destination: SubView2(), tag: Target.subView1, selection: $selectedTarget)
                NavigationLink("SubView3", destination: SubView3(), tag: 3, selection: $target)
                NavigationLink("SubView4", destination: SubView4(), tag: 4, selection: $target)
            }
        }
    }

    enum Target {
        case subView1,subView2
    }
}

NavigationStack makes the above functionality clearer, more flexible and efficient.

Swift
struct NavigationStackDemo: View {
    var body: some View {
        NavigationStack {
            List {
                NavigationLink("SubView1", value: Target.subView1) // Only declare the associated state value
                NavigationLink("SubView2", value: Target.subView2)
                NavigationLink("SubView3", value: 3)
                NavigationLink("SubView4", value: 4)
            }
            .navigationDestination(for: Target.self){ target in // Uniformly handle the same type and return the target view
                switch target {
                    case .subView1:
                        SubView1()
                    case .subView2:
                        SubView2()
                }
            }
            .navigationDestination(for: Int.self) { target in  // Add multiple handling modules for different types
                switch target {
                case 3:
                    SubView3()
                default:
                    SubView4()
                }
            }
        }
    }

    enum Target {
        case subView1,subView2
    }
}

The NavigationStack processing method has the following characteristics and advantages:

  • Since there is no need to specify the target view in NavigationLink, there is no need to create extra view instances.

    By using this stack, NavigationStack will only be able to handle specific types of sequence elements.

  • Uniform management of targets driven by values of the same type (navigationDestination of all views in the stack can be handled uniformly in the root view), which is advantageous for complex logical judgments and easy to extract code.

  • NavigationLink will prioritize the closest type target management code. For example, if both the root view and the third-level view have defined responses to Int through navigationDestination, then the views above the third level will use the processing logic of the third level.

Manageable View Stack System

Compared with the type-based reactive target view processing mechanism, the manageable view stack system is the killer feature of the new navigation system.

NavigationStack supports two types of stack management:

  • NavigationPath

    By adding multiple navigationDestination, NavigationStack can respond to multiple types of values (Hashable), use removeLast (_ k: Int = 1) to return the specified level, and use append to enter a new level.

Swift
class PathManager:ObservableObject{
    @Published var path = NavigationPath()
}

struct NavigationViewDemo1: View {
    @StateObject var pathManager = PathManager()
    var body: some View {
        NavigationStack(path:$pathManager.path) {
            List {
                NavigationLink("SubView1", value: 1)
                NavigationLink("SubView2", value: Target.subView2)
                NavigationLink("SubView3", value: 3)
                NavigationLink("SubView4", value: 4)
            }
            .navigationDestination(for: Target.self) { target in
                switch target {
                case .subView1:
                    SubView1()
                case .subView2:
                    SubView2()
                }
            }
            .navigationDestination(for: Int.self) { target in
                switch target {
                case 1:
                    SubView1()
                case 3:
                    SubView3()
                default:
                    SubView4()
                }
            }
        }
        .environmentObject(pathManager)
        .task{
            // Using append can jump to the specified level, below will be root -> SubView3 -> SubView1 -> SubView2, adding levels in the initial state will shield the animation
            pathManager.path.append(3)
            pathManager.path.append(1)
            pathManager.path.append(Target.subView2)
        }
    }
}

enum Target {
    case subView1, subView2
}

struct SubView1: View {
    @EnvironmentObject var pathManager:PathManager
    var body: some View {
        List{
            // This form of NavigationLink can still be used, and the processing of the target view is in the navigationDestination of the corresponding root view.
            NavigationLink("SubView2", destination: Target.subView2 )
            NavigationLink("subView3",value: 3)
            Button("go to SubView3"){
                pathManager.path.append(3) // The effect is the same as NavigationLink("subView3",value: 3) above
            }
            Button("Return to Root View"){
                pathManager.path.removeLast(pathManager.path.count)
            }
            Button("Return to Previous View"){
                pathManager.path.removeLast()
            }
        }
    }
}
  • A sequence of single type elements that conform to Hashable.
Swift
class PathManager:ObservableObject{
    @Published var path:[Int] = [] // Hashable sequence
}

struct NavigationViewDemo1: View {
    @StateObject var pathManager = PathManager()
    var body: some View {
        NavigationStack(path:$pathManager.path) {
            List {
                NavigationLink("SubView1", value: 1)
                NavigationLink("SubView3", value: 3)
                NavigationLink("SubView4", value: 4)
            }
            // Can only respond to sequence element types
            .navigationDestination(for: Int.self) { target in
                switch target {
                case 1:
                    SubView1()
                case 3:
                    SubView3()
                default:
                    SubView4()
                }
            }
        }
        .environmentObject(pathManager)
        .task{
            pathManager.path = [3,4]  // Directly jump to the specified level, assignment is more convenient
        }
    }
}

struct SubView1: View {
    @EnvironmentObject var pathManager:PathManager
    var body: some View {
        List{
            NavigationLink("subView3",value: 3)
            Button("go to SubView3"){
                pathManager.path.append(3) // Same effect as NavigationLink("subView3",value: 3) above
            }
            Button("Return to root view"){
                pathManager.path.removeAll()
            }
            Button("Return to the previous view"){
                if pathManager.path.count > 0 {
                    pathManager.path.removeLast()
                }
            }
            Button("Respond to Deep Link and reset Path Stack "){
                pathManager.path = [3,1,1] // Will automatically shield the animation
            }

        }
    }
}

Developers can choose the corresponding view stack type according to their needs.

⚠️ Do not mix declarative navigation with programmatic navigation when using the stack management system, as this will destroy the current view stack data

The following code will reset the stack data if you click on declarative navigation.

Swift
NavigationLink("SubView3",value: 3)
NavigationLink("SubView4", destination: { SubView4() }) // Do not mix declarative navigation with programmatic navigation

If NavigationStack is stacking views in a three-dimensional space, then NavigationSplitView dynamically switches views between different columns in a two-dimensional space.

Column layout

In versions prior to SwiftUI 4.0, you can use NavigationView to create programmatically navigated views with two columns on the left and right:

Swift
class MyStore: ObservableObject {
    @Published var selection: Int?
}

struct NavigationViewDoubleColumnView: View {
    @StateObject var store = MyStore()
    var body: some View {
        NavigationView {
            SideBarView()
            DetailView()
        }
        .environmentObject(store)
    }
}

struct SideBarView: View {
    @EnvironmentObject var store: MyStore
    var body: some View {
        List(0..<30, id: .self) { i in
            // Here we did not use NavigationLink to switch the right view, but changed the value of selection to make the right view respond to the change of the value.
            Button("ID: \(i)") {
                store.selection = i
            }
        }
    }
}

struct DetailView: View {
    @EnvironmentObject var store: MyStore
    var body: some View {
        if let selection = store.selection {
            Text("View: \(selection)")
        } else {
            Text("Please select")
        }
    }
}

https://cdn.fatbobman.com/double_colunm_2022-06-11_10.16.38.png

Implementing the above code using NavigationSplitView is basically the same. The biggest difference is that SwiftUI 4.0 provides us with the ability to quickly bind data through List in NavigationSplitView.

Swift
struct NavigationSplitViewDoubleColumnView: View {
    @StateObject var store = MyStore()
    var body: some View {
        NavigationSplitView {
            SideBarView()
        } detail: {
            DetailView()
        }
        .environmentObject(store)
    }
}

struct SideBarView: View {
    @EnvironmentObject var store: MyStore
    var body: some View {
        // You can directly bind data in List, without explicitly modifying it through Button
        List(0..<30, id: \\.self, selection: $store.selection) { i in
            NavigationLink("ID: \\(i)", value: i)  // use programmatic NavigationLink
        }
    }
}

https://cdn.fatbobman.com/image-20220611104123815.png

With the further enhancement provided by SwiftUI 4.0 for List, we can also rewrite the code without using NavigationLink as follows:

Swift
struct SideBarView: View {
    @EnvironmentObject var store: MyStore
    var body: some View {
        List(0..<30, id: \\.self, selection: $store.selection) { i in
            Text("ID: \\(i)") // Alternatively, Label or other views can be used, but not Button
//            NavigationLink("ID: \\(i)", value: i)
        }
    }
}

In SwiftUI 4.0, after binding data to List, the content in the loop created by List constructor or ForEach (which cannot have click attributes, such as Button or onTapGesture), will be implicitly added with tag modifier, thereby possessing the ability to change the bound data after being clicked.

Regardless of whether List is placed in the far-left column (double-column mode) or in the left two columns (triple-column mode) of NavigationSplitView, navigation can be performed through List’s binding data. This is a unique feature of NavigationSplitView.

Starting from iOS 16.1, developers can navigate to views without binding data through List. By placing a .navigationDestination in the NavigationSplitView sidebar, the NavigationLink in the sidebar will replace the root view of the detail column.

Swift
NavigationSplitView {
    LazyVStack {
        NavigationLink("link", value: 213)
    }
    .navigationDestination(for: Int.self) { i in
        Text("The value is \\(i)")
    }
} detail: {
    Text("Click an item")
}

Collaboration with NavigationStack

Before SwiftUI 4.0, if we wanted to achieve stack navigation within the sidebar of a multi-column NavigationView, we could use the following code:

struct SideBarView: View {
    @EnvironmentObject var store: MyStore
    var body: some View {
        List(0..<30, id: \\.self) { i in
            NavigationLink("ID: \\(i)", destination: Text("\\(i)")) // must use NavigationLink
                .isDetailLink(false) // specify that the destination should not be shown in the Detail column
        }
    }
}

However, if we want to embed a NavigationView that can achieve stack navigation in the Detail column, there will be significant issues. In this case, two NavigationTitles and two Toolbars will appear in the Detail column.

Swift
struct NavigationViewDoubleColumnView: View {
    @StateObject var store = MyStore()
    var body: some View {
        NavigationView {
            SideBarView()
            DetailView()
                .navigationTitle("Detail")  // Define title for Detail column
                .toolbar{
                    EditButton()  // Create button in Detail column
                }
        }
        .environmentObject(store)
    }
}

struct SideBarView: View {
    @EnvironmentObject var store: MyStore
    var body: some View {
        List(0..<30, id: \\.self) { i in
            Button("ID: \\(i)") {
                store.selection = i
            }
        }
    }
}

struct DetailView: View {
    @EnvironmentObject var store: MyStore
    var body: some View {
        NavigationView {
            VStack {
                if let selection = store.selection {
                    NavigationLink("View details", destination: Text("\\(selection)"))
                } else {
                    Text("Please select")
                }
            }
            .toolbar{
                EditButton()  // Create button in NavigationView of Detail column
            }
            .navigationTitle("Detail") // Define title for NavigationView in Detail column
            .navigationBarTitleDisplayMode(.inline)
        }
        .navigationViewStyle(.stack)
    }
}

https://cdn.fatbobman.com/image-20220611110657857.png

Therefore, I had to use HStack in the iPad version application to avoid the above-mentioned problem. For details, please refer to Adapting to iPad with SwiftUI.

NavigationSplitView has solved the above problem and can now work perfectly with NavigationStack.

Swift
class MyStore: ObservableObject {
    @Published var selection: Int?
}

struct NavigationSplitViewDoubleColumnView: View {
    @StateObject var store = MyStore()
    var body: some View {
        NavigationSplitView {
            SideBarView()
        } detail: {
            DetailView()
                .toolbar {
                    EditButton() // Create a button in the Detail column of NavigationView
                }
                .navigationTitle("Detail")
        }
        .environmentObject(store)
    }
}

struct SideBarView: View {
    @EnvironmentObject var store: MyStore
    var body: some View {
        List(0..<30, id: \\.self, selection: $store.selection) { i in
            Text("ID: \\(i)")
        }
    }
}

struct DetailView: View {
    @EnvironmentObject var store: MyStore
    var body: some View {
        NavigationStack {
            VStack {
                if let selection = store.selection {
                    NavigationLink("View Details", value: selection)
                } else {
                    Text("Please select")
                }
            }
            .navigationDestination(for: Int.self, destination: {
                Text("\\($0)")
            })
            .toolbar {
                RenameButton() // Create a button in the Detail column of NavigationView
            }
            .navigationTitle("Detail inLine")
            .navigationBarTitleDisplayMode(.inline)
        }
    }
}

NavigationSplitView will retain the latest Title setting and merge the Toolbar buttons added separately in the NavigationSplitView and NavigationStack for the Detail column.

https://cdn.fatbobman.com/image-20220611134247340.png

By using NavigationStack in NavigationSplitView, developers have richer view scheduling capabilities.

Dynamically Control Multi-Column Display State

Another issue that previously plagued the multi-column NavigationView was the inability to dynamically control the display state of multiple columns through programming. NavigationSplitView provides the columnVisibility parameter (of type NavigationSplitViewVisibility) in the constructor, allowing developers to control the display state of the navigation bar.

Swift
struct NavigationSplitViewDoubleColumnView: View {
    @StateObject var store = MyStore()
    @State var mode: NavigationSplitViewVisibility = .all
    var body: some View {
        NavigationSplitView(columnVisibility: $mode) {
            SideBarView()
        }
    content: {
            ContentColumnView()
        }
    detail: {
            DetailView()
        }
        .environmentObject(store)
    }
}

https://cdn.fatbobman.com/three_column_2022-06-11_13.52.10.png

  • detailOnly Only display the detail column (far right column)
  • doubleColumn Hides the Sidebar (far left) column in three-column mode
  • all Show all columns
  • automatic Automatically determine display behavior based on current context

The above options do not apply to all platforms. For example, ‘detailOnly’ does not work on macOS.

If you want to use similar functionality on versions of SwiftUI before 4.0, you can refer to my implementation in the article “Enhancing SwiftUI’s NavigationView with NavigationViewKit”.

Other Enhancements

In addition to the above features, the new navigation system has also been enhanced in many other areas.

Setting Column Width

NavigationSplitView provides a new modifier ‘navigationSplitViewColumnWidth’ for views in the column. With it, developers can modify the default width of the column:

Swift
struct NavigationSplitViewDemo: View {
    @State var mode: NavigationSplitViewVisibility = .all
    var body: some View {
        NavigationSplitView(columnVisibility: $mode) {
            SideBarView()
                .navigationSplitViewColumnWidth(200)
        }
    content: {
            ContentColumnView()
                .navigationSplitViewColumnWidth(min: 100, ideal: 150, max: 200)
        }
    detail: {
            DetailView()
        }
    }
}

Set the style of NavigationSplitView

The navigationSplitViewStyle can be used to set the style of NavigationSplitView.

Swift
struct NavigationSplitViewDemo: View {
    @State var mode: NavigationSplitViewVisibility = .all
    var body: some View {
        NavigationSplitView(columnVisibility: $mode) {
            SideBarView()
        }
    content: {
            ContentColumnView()
        }
    detail: {
            DetailView()
        }
        .navigationSplitViewStyle(.balanced) // 设置样式
    }
}
  • prominentDetail

    Keep the size of the right Detail pane unchanged regardless of whether the left sidebar is displayed or not (usually full screen). This is the default mode for the iPad in portrait display mode.

  • balanced

    When displaying the left sidebar, reduce the size of the right Detail pane. This is the default mode for the iPad in landscape display mode.

  • automatic

    Default value, automatically adjust the appearance style based on context.

Adding a menu in NavigationTitle

Using the new navigationTitle constructor, you can embed a menu in the title bar.

Swift
.navigationTitle( Text("Setting"), actions: {
                Button("Action1"){}
                Button("Action2"){}
                Button("Action3"){}
            })

https://cdn.fatbobman.com/image-20220612085945286.png

Change NavigationBar background color

Swift
NavigationStack{
    List(0..<30,id:\.self){ i in
        Text("\(i)")
    }
    .listStyle(.plain)
    .navigationTitle("Hello")
    .toolbarBackground(.pink, in: .navigationBar)
}

https://cdn.fatbobman.com/RocketSim_Screenshot_iPhone_13_Pro_Max_2022-06-12_09.12.01.png

The background color of the NavigationStack toolbar is only displayed when the view is scrolled.

In SwiftUI 4.0, the scope of the toolbar has been expanded to TabView. In the toolbar settings, you can use placement to set the applicable object.

Hide toolbar

Swift
NavigationStack {
    ContentView()
        .toolbar(.hidden, in: .navigationBar)
}

Set the color appearance of the toolbar (Color Scheme)

Swift
.toolbarColorScheme(.dark, for: .navigationBar)

https://cdn.fatbobman.com/RocketSim_Screenshot_iPhone_13_Pro_Max_2022-06-12_09.21.29.png

Toolbar Roles

Use toolbarRole to set the role of the current toolbar. Different roles will result in different appearances and layouts of the toolbar (depending on the device).

Swift
struct ToolRoleTest: View {
    var body: some View {
        NavigationStack {
            List(0..<10, id: \.self) {
                NavigationLink("ID: \($0)", value: $0)
            }
            .navigationDestination(for: Int.self) {
                Text("\($0)")
                    .navigationTitle("Title for \($0)")
                    .toolbarRole(.editor)
            }
            .navigationTitle("Title")
            .navigationBarTitleDisplayMode(.inline)
            .toolbarRole(.browser)
            .toolbar {
                ToolbarItem(placement: .primaryAction) {
                    EditButton()
                }
            }
        }
    }
}
  • navigationStack

    Default role, long press to display a list of view stacks

  • browser

    On iPad, the title of the current view will be displayed on the left side

    Default role, long press to display the view stack list.

https://cdn.fatbobman.com/image-20220612190914949.png

  • editor

Do not display the previous page view Title next to the back button.

https://cdn.fatbobman.com/image-20220612191040190.png

In previous versions of SwiftUI, NavigationLink was actually always present as a special type of Button. Starting with SwiftUI 4.0, SwiftUI has truly recognized it as a Button.

Swift
NavigationStack {
    VStack {
        NavigationLink("Hello world", value: "sub1")
            .buttonStyle(.bordered)
            .controlSize(.large)
        NavigationLink("Goto next", destination: Text("Next"))
            .buttonStyle(.borderedProminent)
            .controlSize(.large)
            .tint(.red)
    }
    .navigationDestination(for: String.self){ _ in
        Text("Sub View")
    }
}

https://cdn.fatbobman.com/image-20220613220926715.png

Summary

The changes in the SwiftUI 4.0 navigation system are so significant that developers need to face the facts calmly while being pleasantly surprised. Due to version compatibility issues, a considerable number of developers will not use the new API, so everyone needs to carefully consider the following issues:

  • How to gain inspiration from the new API
  • How to apply programming navigation concepts in older versions
  • How to enable programs in both new and old versions to enjoy the convenience provided by the system

On the other hand, the new navigation system also sends a clear signal to every developer that Apple hopes that applications can provide UI interfaces that are more in line with the characteristics of their respective devices for iPad and macOS. This signal will become stronger and stronger, and Apple will also provide more and more APIs for this purpose.

Currently, someone has implemented a compatibility library for NavigationStack for low-version SwiftUI - NavigationBackport. Interested friends can refer to the author’s implementation method.

Get weekly handpicked updates on Swift and SwiftUI!