在 上篇 中,我们对 SwiftUI 布局过程中涉及的众多尺寸概念进行了说明。本篇中,我们将通过对视图修饰器 frame 和 offset 的仿制进一步加深对 SwiftUI 布局机制的理解,并通过一些示例展示在布局时需要注意的问题。
相同的长相、不同的内涵
在 SwiftUI 中,我们可以利用不同的布局容器生成看起来几乎一样的显示结果。例如,无论是 ZStack、overlay、background、VStack、HStack 都可以实现下图的版式。
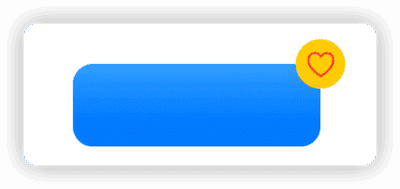
以 ZStack、overlay、background 举例:
struct HeartView: View {
    var body: some View {
        Circle()
            .fill(.yellow)
            .frame(width: 30, height: 30)
            .overlay(Image(systemName: "heart").foregroundColor(.red))
    }
}

struct ButtonView: View {
    var body: some View {
        RoundedRectangle(cornerRadius: 12)
            .fill(Color.blue.gradient)
            .frame(width: 150, height: 50)
    }
}

// ZStack
struct IconDemo1: View {
    var body: some View {
        ZStack(alignment: .topTrailing) {
            ButtonView()
            HeartView()
                .alignmentGuide(.top, computeValue: { $0.height / 2 })
                .alignmentGuide(.trailing, computeValue: { $0.width / 2 })
        }
    }
}

// overlay
struct IconDemo2: View {
    var body: some View {
        ButtonView()
            .overlay(alignment: .topTrailing) {
                HeartView()
                    .alignmentGuide(.top, computeValue: { $0.height / 2 })
                    .alignmentGuide(.trailing, computeValue: { $0.width / 2 })
            }
    }
}

// background
struct IconDemo3: View {
    var body: some View {
            HeartView()
            .background(alignment:.center){
                ButtonView()
                    .alignmentGuide(HorizontalAlignment.center, computeValue: {$0[.trailing]})
                    .alignmentGuide(VerticalAlignment.center, computeValue: {$0[.top]})
            }
    }
}
虽然 IconDemo 1、IconDemo 2、IconDemo 3 在单独预览时看起来完全一样,但如果将它们放置到其他的布局容器中,你会发现它们在容器内的布局后的摆放结果明显不同 —— 需求尺寸的构成和大小不一样( 下图中,用红框标注了各自的需求尺寸 )。

布局容器在规划自身的需求尺寸上的策略不同是造成上述现象的原因。
像 ZStack、VStack、HStack 这几个容器,它们的需求尺寸是由其全部子视图按照指定的布局指南进行摆放后的获得的总尺寸所构成的。而 overlay 和 background 的需求尺寸则完全取决于它们的主视图( 本例中,overlay 的需求尺寸由 ButtonView 决定,background 的需求尺寸由 HeartView 决定 )。假设当前的设计需求是想将 ButtonView 和 HeartView 视作一个整体进行布局,那么 ZStack 是一个不错的选择。
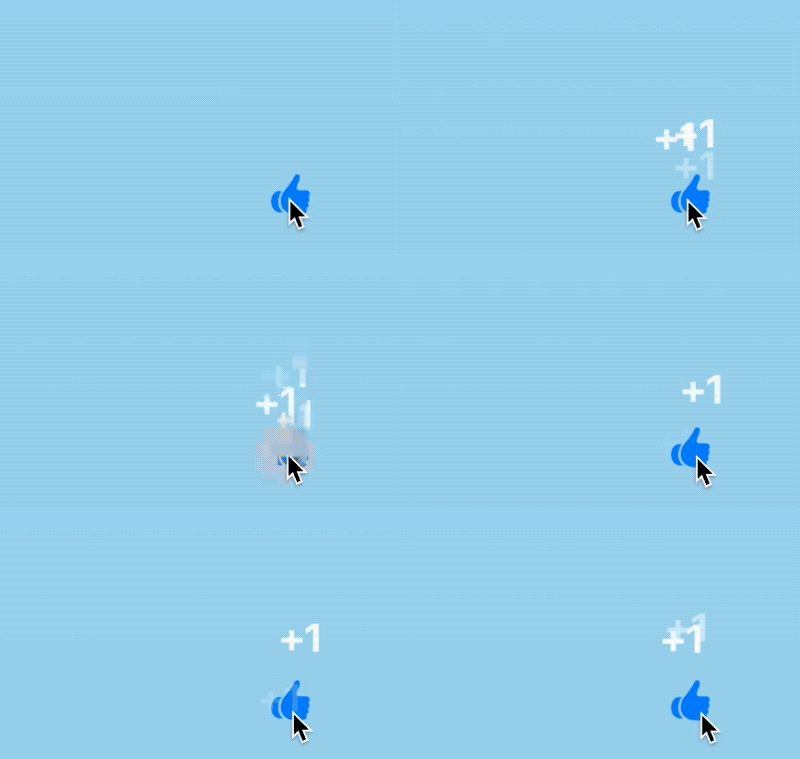
每种容器都有其适合的场景,例如对于如下需求 —— 创建类似视频 app 中的点赞功能的子视图( 在布局时,仅需考虑手势图标的位置和尺寸),overlay 这种需求尺寸仅依赖于主视图的容器便有了用武之地:
struct FavoriteDemo: View {
    var body: some View {
        ZStack(alignment: .bottomTrailing) {
            Rectangle()
                .fill(Color.cyan.gradient.opacity(0.5))
            Favorite()
                .alignmentGuide(.bottom, computeValue: { $0[.bottom] + 200 })
                .alignmentGuide(.trailing, computeValue: { $0[.trailing] + 100 })
        }
        .ignoresSafeArea()
    }
}

struct Favorite: View {
    @State var hearts = [(String, CGFloat, CGFloat)]()
    var body: some View {
        Image(systemName: "hand.thumbsup")
            .symbolVariant(.fill)
            .foregroundColor(.blue)
            .font(.title)
            .overlay(alignment: .bottom) {
                ZStack {
                    Color.clear
                    ForEach(hearts, id: \.0) { heart in
                        Text("+1")
                            .font(.title)
                            .foregroundColor(.white)
                            .bold()
                            .transition(.asymmetric(insertion: .move(edge: .bottom).combined(with: .opacity), removal: .move(edge: .top).combined(with: .opacity)))
                            .offset(x: heart.1, y: heart.2)
                            .task {
                                try? await Task.sleep(nanoseconds: 500000000)
                                if let index = hearts.firstIndex(where: { $0.0 == heart.0 }) {
                                    let _ = withAnimation(.easeIn) {
                                        hearts.remove(at: index)
                                    }
                                }
                            }
                    }
                }
                .frame(width: 50, height: 100)
                .allowsHitTesting(false)
            }
            .onTapGesture {
                withAnimation(.easeOut) {
                    hearts.append((UUID().uuidString, .random(in: -10...10), .random(in: -10...10)))
                }
            }
    }
}
相同长相的视图,未必有相同的内涵。当用布局容器创建合成视图时,必须将构成后的合成视图对父容器的布局影响考虑到其中。针对不同的需求,选择恰当的容器。
面子和里子
与 UIKit 和 AppKit 类似,SwiftUI 的布局操作是在视图层面( 里子 )进行的,而所有针对关联图层( backing layer )的操作仍是通过 Core Animation 来完成的。因此,针对 CALayer( 面子 )直接做出的调整,SwiftUI 的布局系统是无法感知的。
而这种在布局之后、渲染之前对内容进行调整的操作,大量存在于 SwiftUI 之中,例如:offset、scaleEffect、rotationEffect、shadow、background、cornerRadius 等操作都是在此阶段进行的。
例如:
struct OffsetDemo1:View{
    var body: some View{
        HStack{
            Rectangle()
                .fill(.orange.gradient)
                .frame(maxWidth:.infinity)
            Rectangle()
                .fill(.green.gradient)
                .frame(maxWidth:.infinity)
            Rectangle()
                .fill(.cyan.gradient)
                .frame(maxWidth:.infinity)
        }
        .border(.red)
    }
}
我们使用 offset 调整中间矩形的位置,并不会对 HStack 的尺寸造成任何影响,在此种情况下,面子和里子是脱节的:
Rectangle()
    .fill(.green.gradient)
    .frame(width: 100, height: 50)
    .border(.blue)
    .offset(x: 30, y: 30)
    .border(.green)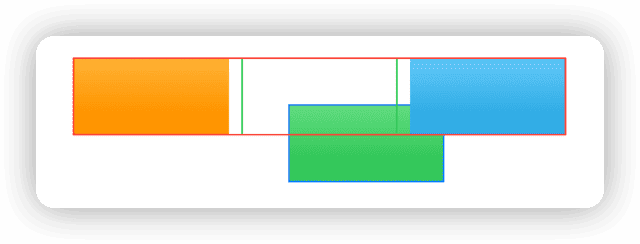
在 SwiftUI 中,offset 修饰符对应的是 Core Animation 中的 CGAffineTransform 操作。
.offset(x: 30, y: 30)相当于.transformEffect(.init(translationX: 30, y: 30))。这种直接在 CALayer 层面进行的修改,并不会对布局造成影响
上面或许就是你想要的效果,但如果想实现让位移后的视图能够对它的父视图( 容器 )的布局有所影响,或许就需要换一种方式 —— 用布局容器而非 Core Animtion 操作:
// 通过 padding
Rectangle()
    .fill(.green.gradient)
    .frame(width: 100, height: 50)
    .border(.blue)
    .padding(EdgeInsets(top: 30, leading: 30, bottom: 0, trailing: 0))
    .border(.green)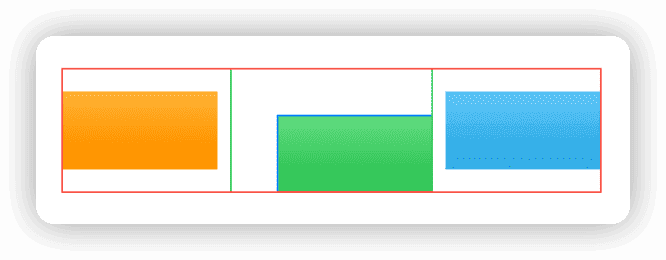
或者:
// 通过 frame
Rectangle()
    .fill(.green.gradient)
    .frame(width: 100, height: 50)
    .border(.blue)
    .frame(width: 130, height: 80, alignment: .bottomTrailing)
    .border(.green)

// 通过 position
Rectangle()
    .fill(.green.gradient)
    .frame(width: 100, height: 50)
    .border(.blue)
    .position(x: 80, y: 55)
    .frame(width: 130, height: 80)
    .border(.green)
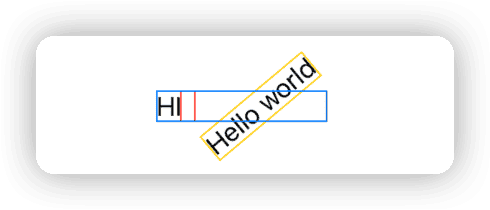
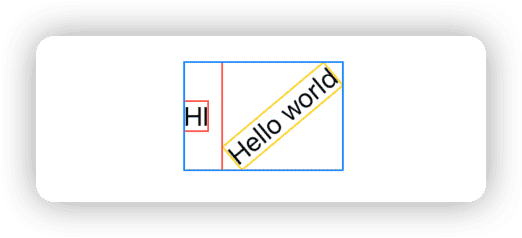
相较于 offset 视图修饰器,由于没有现成的可替换手段,想让 rotationEffect 修改后的结果反过来影响布局则要略显烦琐:
struct RotationDemo: View {
    var body: some View {
        HStack(alignment: .center) {
            Text("HI")
                .border(.red)
            Text("Hello world")
                .fixedSize()
                .border(.yellow)
                .rotationEffect(.degrees(-40))
                .border(.red)
        }
        .border(.blue)
    }
}
extension View {
    func rotationEffectWithFrame(_ angle: Angle) -> some View {
        modifier(RotationEffectWithFrameModifier(angle: angle))
    }
}

struct RotationEffectWithFrameModifier: ViewModifier {
    let angle: Angle
    @State private var size: CGSize = .zero
    var bounds: CGRect {
        CGRect(origin: .zero, size: size)
            .offsetBy(dx: -size.width / 2, dy: -size.height / 2)
            .applying(.init(rotationAngle: CGFloat(angle.radians)))
    }

    func body(content: Content) -> some View {
        content
            .rotationEffect(angle)
            .background(
                GeometryReader { proxy in
                    Color.clear
                        .task(id: proxy.frame(in: .local)) {
                            size = proxy.size
                        }
                }
            )
            .frame(width: bounds.width, height: bounds.height)
    }
}

truct RotationDemo: View {
    var body: some View {
        HStack(alignment: .center) {
            Text("HI")
                .border(.red)
            Text("Hello world")
                .fixedSize()
                .border(.yellow)
                .rotationEffectWithFrame(.degrees(-40))
                .border(.red)
        }
        .border(.blue)
    }
}
scaleEffect 也可以用类似的方式实现以影响原有的布局
在 SwiftUI 中,开发者在对视图进行调整前需要清楚该操作是针对里子( 基于布局机制 )还是面子( 在 CALayer 层面),或者是想通过对面子的修改进而影响里子,只有这样,才能让最终的呈现效果与预期的布局一致。
从模仿中学习
本章中,我们将通过使用 Layout 协议实现对 frame 和 offset 的仿制以加深对布局过程中的不同尺寸概念的认识。
有关 frame、offset 的布局逻辑在上篇中已有描述,本文仅对关键代码进行说明。可在 此处获取 本文的仿制代码
frame
SwiftUI 中有两个版本的 frame,本节我们将仿制 frame(width: CGFloat? = nil, height: CGFloat? = nil, alignment: Alignment = .center) 。
frame 视图修饰器本质上是对布局容器 _FrameLayout 的包装,本例中我们将自定义的布局容器命名为 MyFrameLayout ,视图修饰器命名为 myFrame 。
用 viewModifier 包装布局容器
在 SwiftUI 中,通常需要对布局容器进行二次包装后再使用。例如 _VStackLayout 被包装成 VStack,_FrameLayout 被包装成 frame 视图修饰器。
这种包装行为的作用为( 以 MyFrameLayout 举例 ):
-
简化代码
改善由 Layout 协议的 callAsFunction 所带来的多括号问题
-
预处理子视图
在 SwiftUI 布局 —— 对齐 一文中我们已经介绍了“对齐”是发生在容器中子视图之间的行为,因此对于 _FrameLayout 这种开发者只提供一个子视图同时又需要对齐的布局容器,我们需要通过在 modifier 中添加一个 Color. clear 视图来解决对齐对象不足的问题
private struct MyFrameLayout: Layout, ViewModifier {
    let width: CGFloat?
    let height: CGFloat?
    let alignment: Alignment

    func body(content: Content) -> some View {
        MyFrameLayout(width: width, height: height, alignment: alignment)() { // 由于 callAsFunction 所导致的多括号
            Color.clear // 添加用于辅助对齐的视图
            content
        }
    }
}

public extension View {
    func myFrame(width: CGFloat? = nil, height: CGFloat? = nil, alignment: Alignment = .center) -> some View {
        self
            .modifier(MyFrameLayout(width: width, height: height, alignment: alignment))
    }

    @available(*, deprecated, message: "Please pass one or more parameters.")
    func myFrame() -> some View {
        modifier(MyFrameLayout(width: nil, height: nil, alignment: .center))
    }
}
frame (width:, height:) 的实现
这一版本的 frame 有如下功能:
- 当两个维度都设置了具体值时,将使用这两个值作为 _FrameLayout 容器的需求尺寸,以及子视图的布局尺寸
- 当只有一个维度设置了具体值 A,则将该值 A 作为 _FrameLayout 容器在该维度上的需求尺寸,另一维度的需求尺寸则使用子视图在该维度上的需求尺寸( 以 A 及 _FrameLayout 获得的建议尺寸作为子视图的建议尺寸 )
func sizeThatFits(proposal: ProposedViewSize, subviews: Subviews, cache: inout ()) -> CGSize {
    guard subviews.count == 2, let content = subviews.last else { fatalError("Can't use MyFrameLayout directly") }
    var result: CGSize = .zero

    if let width, let height { // 两个维度都有设定
        result = .init(width: width, height: height)
    }

    if let width, height == nil {  // 仅宽度有设定
        let contentHeight = content.sizeThatFits(.init(width: width, height: proposal.height)).height // 子视图在该维度上的需求尺寸
        result = .init(width: width, height: contentHeight)
    }

    if let height, width == nil {
        let contentWidth = content.sizeThatFits(.init(width: proposal.width, height: height)).width
        result = .init(width: contentWidth, height: height)
    }

    if height == nil, width == nil {
        result = content.sizeThatFits(proposal)
    }

    return result
}
在 placeSubviews 中,我们将利用 modifier 中添加的辅助视图,对子视图进行对齐摆放。
func placeSubviews(in bounds: CGRect, proposal: ProposedViewSize, subviews: Subviews, cache: inout ()) {
    guard subviews.count == 2, let background = subviews.first, let content = subviews.last else {
        fatalError("Can't use MyFrameLayout directly")
    }
    // 在 bounds 中满铺 Color.clear
    background.place(at: .zero, anchor: .topLeading, proposal: .init(width: bounds.width, height: bounds.height))
    // 获取 Color.clear 对齐指南的位置
    let backgroundDimensions = background.dimensions(in: .init(width: bounds.width, height: bounds.height))
    let offsetX = backgroundDimensions[alignment.horizontal]
    let offsetY = backgroundDimensions[alignment.vertical]
    // 获取子视图对齐指南的位置
    let contentDimensions = content.dimensions(in: .init(width: bounds.width, height: bounds.height))
    // 计算 content 的 topLeading 偏移量
    let leading = offsetX - contentDimensions[alignment.horizontal] + bounds.minX
    let top = offsetY - contentDimensions[alignment.vertical] + bounds.minY
    content.place(at: .init(x: leading, y: top), anchor: .topLeading, proposal: .init(width: bounds.width, height: bounds.height))
}
现在我们已经可以在视图中使用 myFrame 替代 frame ,并实现完全一样的效果。
fixedSize
fixedSize 为子视图的特定维度提供未指定模式( nil )的建议尺寸,以使其在该维度上将理想尺寸作为其需求尺寸返回,并以该尺寸作为自身的需求尺寸返回给父视图。
private struct MyFixedSizeLayout: Layout, ViewModifier {
    let horizontal: Bool
    let vertical: Bool

    func sizeThatFits(proposal: ProposedViewSize, subviews: Subviews, cache: inout ()) -> CGSize {
        guard subviews.count == 1, let content = subviews.first else {
            fatalError("Can't use MyFixedSizeLayout directly")
        }
        // 准备提交给子视图的建议尺寸
        let width = horizontal ? nil : proposal.width // 如果 horizontal 为 true 则提交非指定模式的建议尺寸,否则则提供父视图在改维度上的建议尺寸
        let height = vertical ? nil : proposal.height // 如果 vertical 为 true 则提交非指定模式的建议尺寸,否则则提供父视图在改维度上的建议尺寸
        let size = content.sizeThatFits(.init(width: width, height: height)) // 向子视图提交上方确定的建议尺寸,并获取子视图的需求尺寸
        return size // 以子视图的需求尺寸作为 MyFixedSizeLayout 容器的需求尺寸
    }

    func placeSubviews(in bounds: CGRect, proposal: ProposedViewSize, subviews: Subviews, cache: inout ()) {
        guard subviews.count == 1, let content = subviews.first else {
            fatalError("Can't use MyFixedSizeLayout directly")
        }

        content.place(at: .init(x: bounds.minX, y: bounds.minY), anchor: .topLeading, proposal: .init(width: bounds.width, height: bounds.height))
    }

    func body(content: Content) -> some View {
        MyFixedSizeLayout(horizontal: horizontal, vertical: vertical)() {
            content
        }
    }
}

public extension View {
    func myFixedSize(horizontal: Bool, vertical: Bool) -> some View {
        modifier(MyFixedSizeLayout(horizontal: horizontal, vertical: vertical))
    }

    func myFixedSize() -> some View {
        myFixedSize(horizontal: true, vertical: true)
    }
}
又见 frame
鉴于两个版本的 frame 无论在功能上还是实现上均有巨大的不同,因此在 SwiftUI 中它们分别对应着不同的布局容器。 frame(minWidth:, idealWidth: , maxWidth: , minHeight: , idealHeight:, maxHeight: , alignment:) 是对布局容器 _FlexFrameLayout 的二次包装。
_FlexFrameLayout 实际上是两个功能的结合体:
- 在设置了 ideal 值且父视图的在该维度上提供了未指定模式的建议尺寸时,以 ideal value 作为需求尺寸返回,并将其作为子视图的布局尺寸
- 当 min 或( 和 ) max 有值时,会按如下规则返回 _FlexFrameLayout 的在该维度上的需求尺寸( 下图来自于 SwiftUI-Lab )
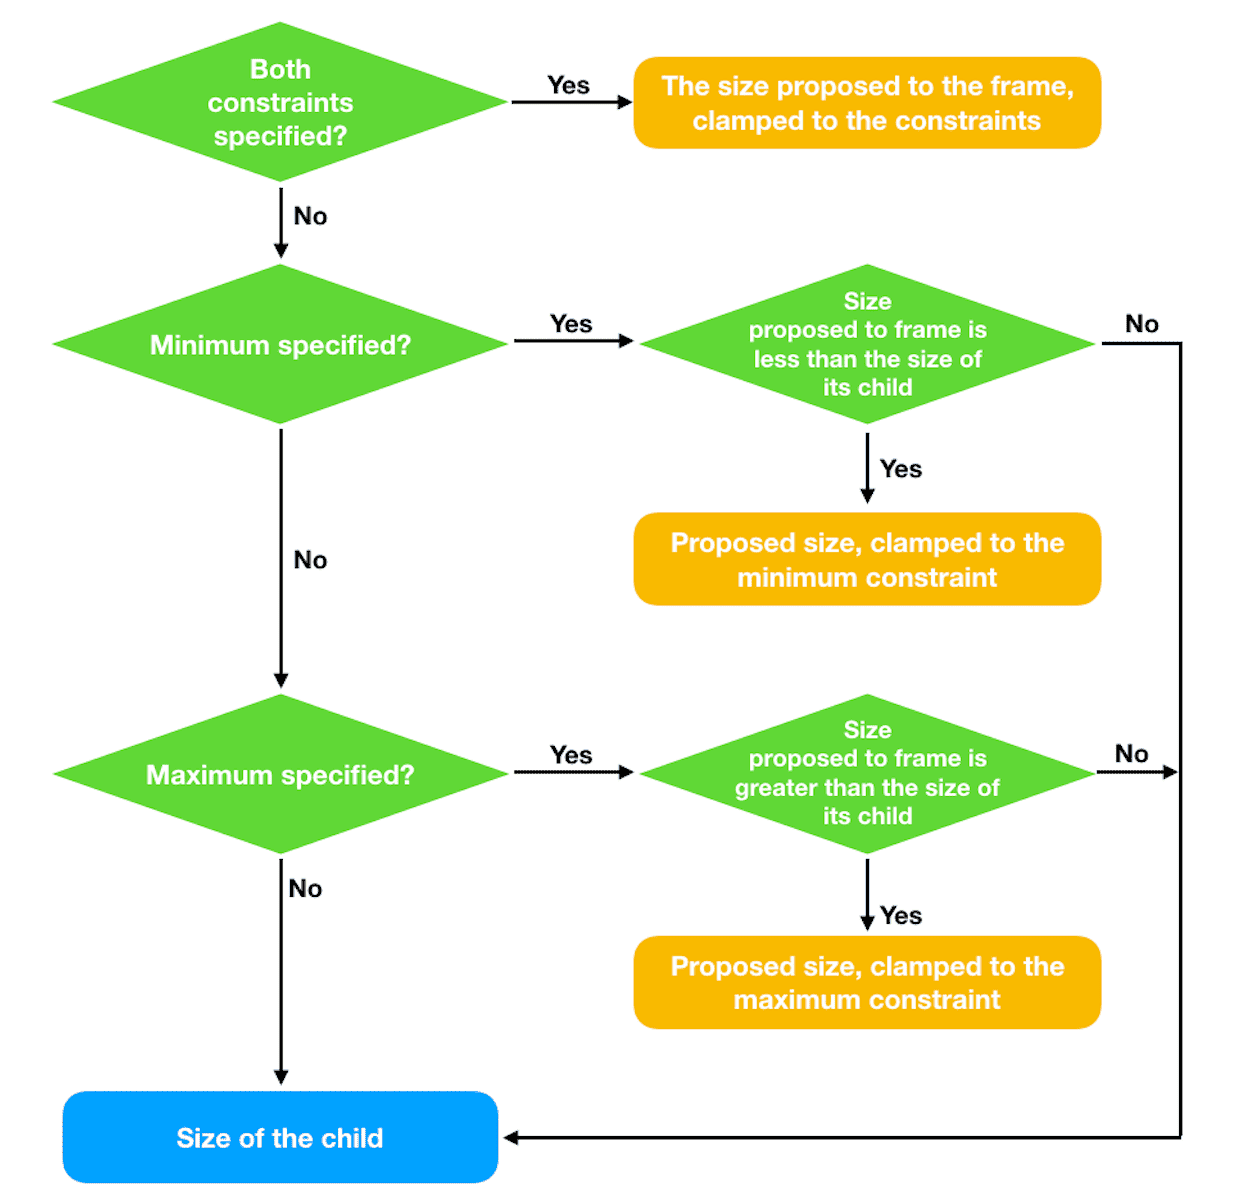
func sizeThatFits(proposal: ProposedViewSize, subviews: Subviews, cache: inout ()) -> CGSize {
    guard subviews.count == 2, let content = subviews.last else { fatalError("Can't use MyFlexFrameLayout directly") }

    var resultWidth: CGFloat = 0
    var resultHeight: CGFloat = 0

    let contentWidth = content.sizeThatFits(proposal).width // 以父视图的建议尺寸为建议尺寸,获取子视图在宽度上的需求尺寸
    // idealWidth 有值,且父视图在宽度上的建议尺寸为未指定模式,需求宽度为 idealWidth
    if let idealWidth, proposal.width == nil {
        resultWidth = idealWidth
    } else if minWidth == nil, maxWidth == nil { // min 和 max 均没有指定,返回子视图在宽度上的需求尺寸
        resultWidth = contentWidth
    } else if let minWidth, let maxWidth { // min 和 max 都有值时
            resultWidth = clamp(min: minWidth, max: maxWidth, source: proposal.width ?? contentWidth)
    } else if let minWidth { // min 有值时,确保需求尺寸不小于最小值
        resultWidth = clamp(min: minWidth, max: maxWidth, source: contentWidth)
    } else if let maxWidth { // max 有值时,确保需求尺寸不大于最大值
        resultWidth = clamp(min: minWidth, max: maxWidth, source: proposal.width ?? contentWidth)
    }

    // 将上面确定的需求宽度作为建议宽度,获取子视图的需求高度
    let contentHeight = content.sizeThatFits(.init(width: proposal.width == nil ? nil : resultWidth, height: proposal.height)).height
    if let idealHeight, proposal.height == nil {
        resultHeight = idealHeight
    } else if minHeight == nil, maxHeight == nil {
        resultHeight = contentHeight
    } else if let minHeight, let maxHeight {
            resultHeight = clamp(min: minHeight, max: maxHeight, source: proposal.height ?? contentHeight)
    } else if let minHeight {
        resultHeight = clamp(min: minHeight, max: maxHeight, source: contentHeight)
    } else if let maxHeight {
        resultHeight = clamp(min: minHeight, max: maxHeight, source: proposal.height ?? contentHeight)
    }

    let size = CGSize(width: resultWidth, height: resultHeight)
    return size
}

// 将值限制在最小和最大之间
func clamp(min: CGFloat?, max: CGFloat?, source: CGFloat) -> CGFloat {
    var result: CGFloat = source
    if let min {
        result = Swift.max(source, min)
    }
    if let max {
        result = Swift.min(source, max)
    }
    return result
}
在 View 扩展中需要判断 min、ideal、max 的值是否满足了升序要求:
public extension View {
    func myFrame(minWidth: CGFloat? = nil, idealWidth: CGFloat? = nil, maxWidth: CGFloat? = nil, minHeight: CGFloat? = nil, idealHeight: CGFloat? = nil, maxHeight: CGFloat? = nil, alignment: Alignment = .center) -> some View {
        // 判断是否 min < ideal < max
        func areInNondecreasingOrder(
            _ min: CGFloat?, _ ideal: CGFloat?, _ max: CGFloat?
        ) -> Bool {
            let min = min ?? -.infinity
            let ideal = ideal ?? min
            let max = max ?? ideal
            return min <= ideal && ideal <= max
        }

        // SwiftUI 官方实现在数值错误的情况下仍会执行,但会在控制台显示错误信息。
        if !areInNondecreasingOrder(minWidth, idealWidth, maxWidth)
            || !areInNondecreasingOrder(minHeight, idealHeight, maxHeight) {
            fatalError("Contradictory frame constraints specified.")
        }

        return modifier(MyFlexFrameLayout(minWidth: minWidth, idealWidth: idealWidth, maxWidth: maxWidth, minHeight: minHeight, idealHeight: idealHeight, maxHeight: maxHeight, alignment: alignment))
    }
}
总结
Layout 协议为我们提供了一个绝佳的可以深入了解 SwiftUI 布局机制的窗口,无论你在未来的工作中是否需要使用 Layout 协议创建自定义布局容器,掌握它都将获得莫大的好处。