在 SwiftUI 的工具箱中,overlay 和 background 是两个极其有用的视图修饰器,它们在多种开发场景中扮演着不可或缺的角色。本文将深入探索这两种修饰器的独特属性,并明确它们与 ZStack 的基本差异,以及适合它们的应用场景。
鉴于
overlay和background在许多情况下具有相似的特质,为了简化讨论,本文将主要使用overlay来代表这两者,除非在特定情况下需要区分讲解。
Overlay:ZStack 的特殊用例?
在一些情况下,开发者堆叠两个视图时可能会发现,无论是采用 ZStack 还是 overlay,最终展现的效果相同。考虑以下示例:
struct SameView: View {
  var body: some View {
    VStack {
      // ZStack
      ZStack {
        blueRectangle
        yellowRectangle
      }
      // overlay
      blueRectangle
        .overlay(yellowRectangle)
    }
  }

  var blueRectangle: some View {
    Rectangle()
      .foregroundStyle(.blue.gradient)
      .frame(width: 200, height: 200)
  }

  var yellowRectangle: some View {
    Rectangle()
      .foregroundStyle(.yellow.gradient)
      .frame(width: 120, height: 120)
  }
}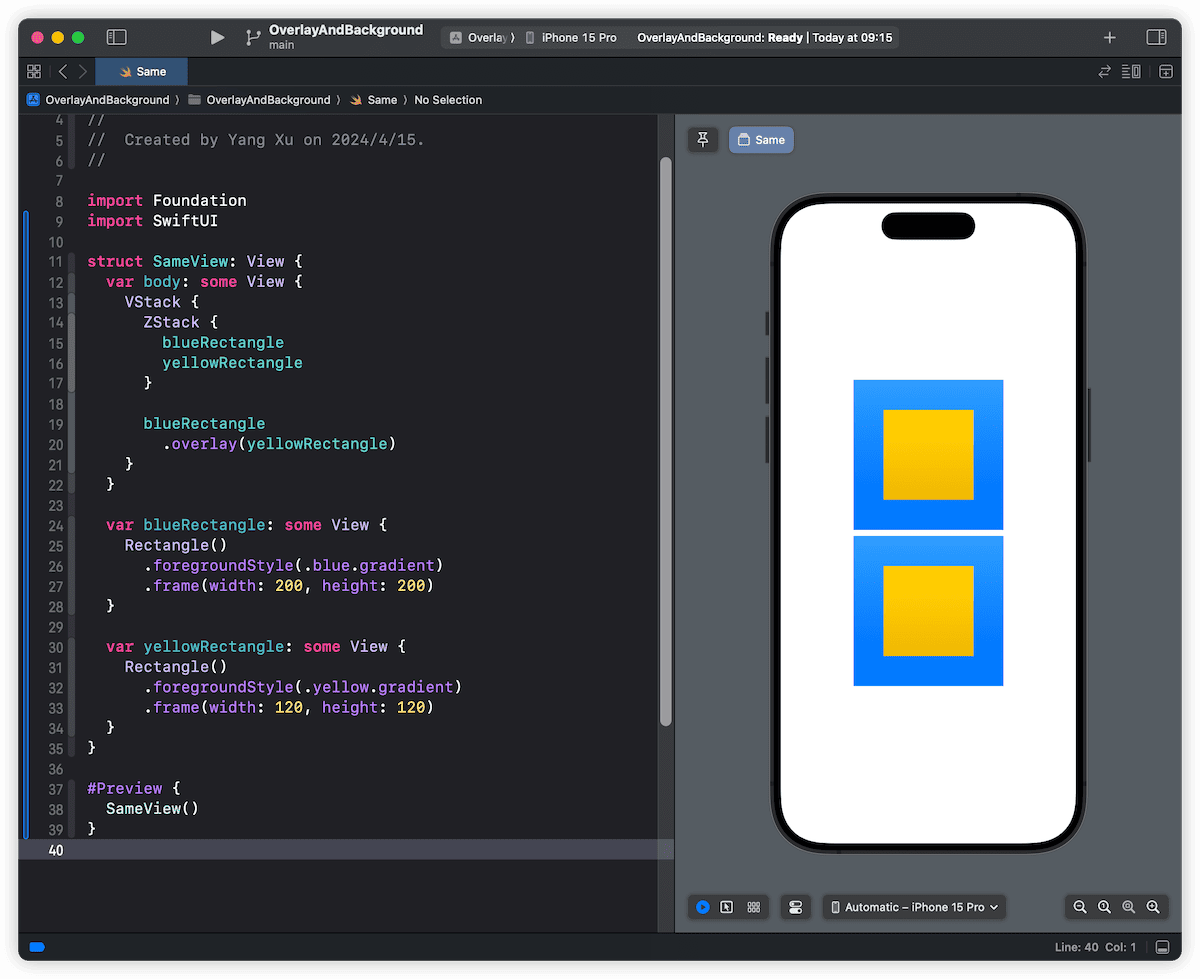
那么,我们能否将 overlay 视为 ZStack 的一个特定用例,即仅支持两层视图堆叠?
答案是否定的。除了在支持视图堆叠的数量和堆叠顺序的修改能力上有所不同,尽管在特定场景下 overlay 和 ZStack 显示出高度相似性,然而,从它们的实现原理到主要用途,两者的设计和功能有着本质的区别,主要体现在以下几点:
- 视图间的关系不同
- 对齐的逻辑不同
- 整体呈现尺寸在布局中的作用不同
对于第一点,开发者还是比较容易理解的,在 ZStack 中,所有视图处于同一层级,由 zIndex 和声明顺序决定显示顺序。而在使用 overlay 的场景中,视图间存在主从关系,overlay 修饰的视图将作为主视图。这种关系的不同,在许多方面造成了两者在功能和语义上的明显区别。
谁与谁对齐
探索 ZStack 和 overlay 如何处理视图对齐时,我们可以通过以下示例理解这两者之间的区别:
// ZStack
ZStack(alignment: .topTrailing) {
  blueRectangle
  yellowRectangle
}

// overlay
blueRectangle
  .overlay(alignment: .topTrailing) {
    yellowRectangle
  }
ZStack 中的 blueRectangle 和 yellowRectangle 是并列关系。在这里,SwiftUI 将在 topTrailing 位置对齐 ZStack 内的所有视图(此例中有两个),并按声明顺序进行堆叠。
overlay 中的 blueRectangle 作为主视图,yellowRectangle 作为从视图。SwiftUI 首先定位 blueRectangle,然后将 yellowRectangle 的 topTrailing 与 blueRectangle 的 topTrailing 对齐。
这听起来可能有些不明所以,但如果我们尝试构建一个具体的视觉效果,两者的区别就变得非常明显。例如,构建一个 200 x 200 的矩形,并在其 topTrailing 和 bottomLeading 位置放置一个半径为 30 的圆形,使圆形的中心点与矩形的角对齐。
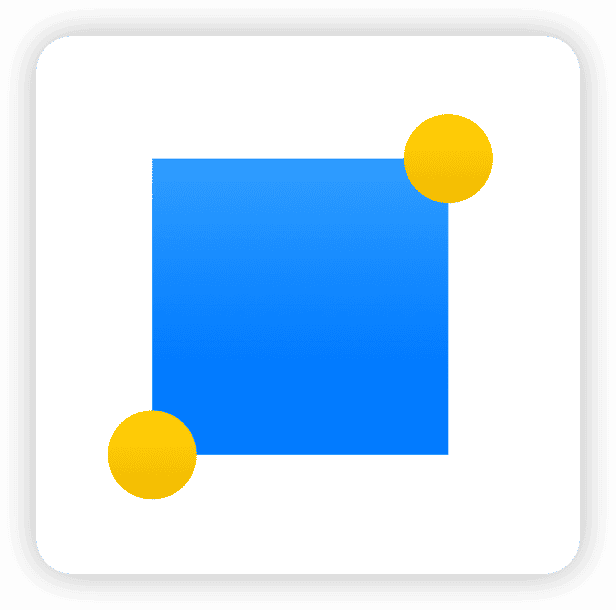
使用 overlay 来描述这个场景将非常清晰和简单:
struct Demo1View: View {
  var body: some View {
    blueRectangle
      .overlay(alignment: .topTrailing) {
        yellowCircle
          .alignmentGuide(.top) { $0[.top] + $0.height / 2 }
          .alignmentGuide(.trailing) { $0[.trailing] - $0.width / 2 }
      }
      .overlay(alignment: .bottomLeading) {
        yellowCircle
          .offset(x: -30, y: 30) // 在清楚视图的具体尺寸情况下
      }
  }

  var blueRectangle: some View {
    Rectangle()
      .foregroundStyle(.blue.gradient)
      .frame(width: 200, height: 200)
  }

  var yellowCircle: some View {
    Circle()
      .foregroundStyle(.yellow.gradient)
      .frame(width: 60, height: 60)
  }
}
而在仅使用一个 ZStack 的方案中,如果视图尺寸未知,通过调整对齐指南(alignmentGuide)或偏移(offset)来定位会变得极其复杂。读者可以尝试使用单个 ZStack 来实现这一需求,以体会其中的挑战。
因此,鉴于 overlay 和 ZStack 在对齐逻辑上的根本不同,当需要以某个视图为主,其他视图以此为基准进行布局时,overlay 和 background 显然是更优的选择。它们不仅使从视图的声明更加清晰,而且使布局更为直观。
想深入了解 SwiftUI 的布局机制,请参考 《SwiftUI 布局——对齐》。
尺寸由谁做主
在 SwiftUI 中,理解各种尺寸概念至关重要。需求尺寸(Required Size)指的是视图在布局系统中期望的大小,这通常是有足够空间的条件下视图的最终尺寸。某个视图的需求尺寸会影响到其余视图的可用空间和布局位置。
尽管单个的 ZStack 或 overlay 复合视图,可能在最终的视觉效果上无异,单它们的需求尺寸却可能大相径庭。
考虑一个简单的需求:在一个矩形的 topTrailing 处摆放一个圆形。
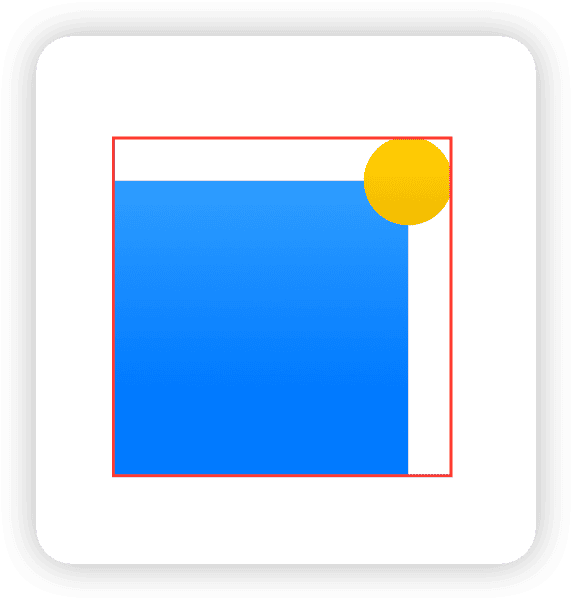
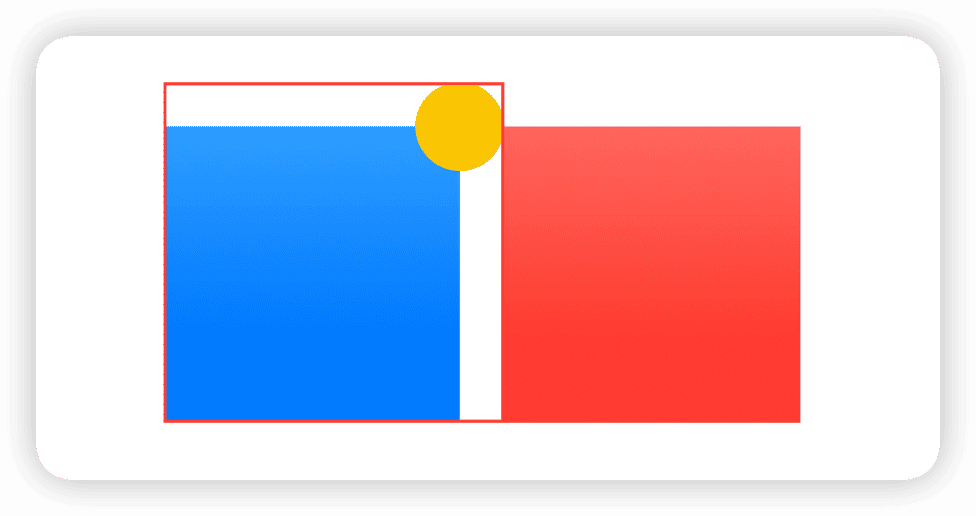
当我们通过 ZStack 加上 alignmentGuide 实现这一效果时,需求尺寸为 230 x 230,即矩形的尺寸加上球的半径。
ZStack(alignment: .topTrailing) {
  blueRectangle
  yellowCircle
    .alignmentGuide(.top){ $0[.top] + $0.height / 2}
    .alignmentGuide(.trailing){ $0[.trailing] - $0.width / 2}
}
.border(.red, width: 2)
这是因为 ZStack 会将其内部所有视图的综合尺寸作为其需求尺寸。而采用 overlay 的方法则完全不同:
blueRectangle
  .overlay(alignment: .topTrailing) {
    yellowCircle
      .alignmentGuide(.top) { $0[.top] + $0.height / 2 }
      .alignmentGuide(.trailing) { $0[.trailing] - $0.width / 2 }
  }
  .border(.red, width: 2)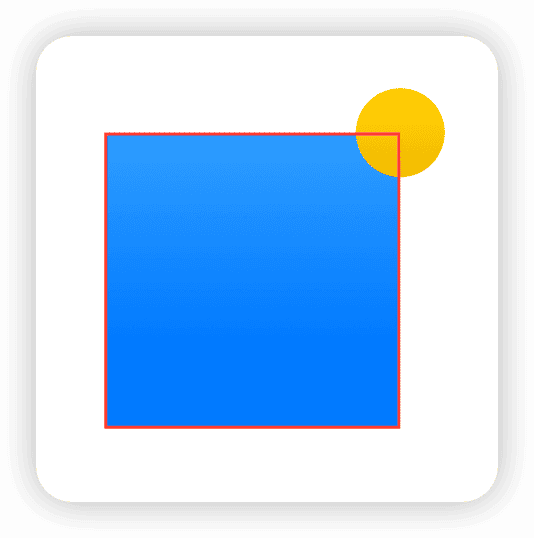
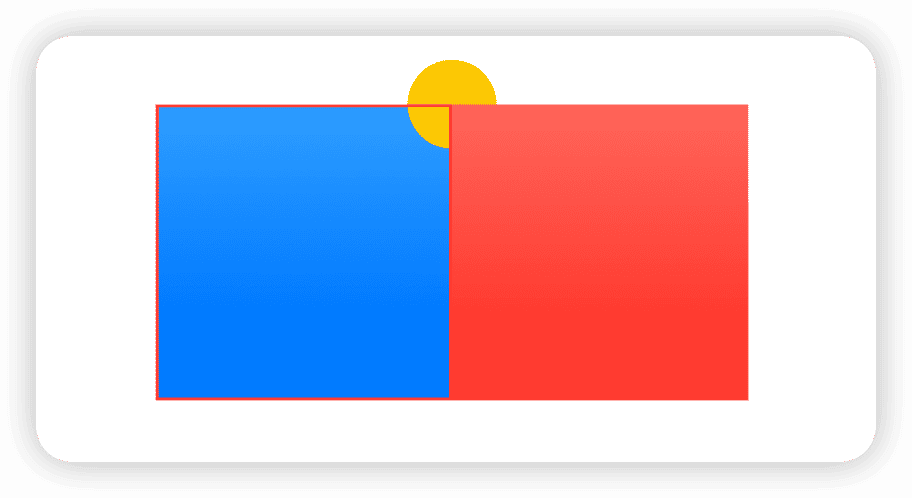
使用 overlay 时,无论嵌入其中( overlay 当中 )的视图有多大,布局系统都只会将主视图的需求尺寸作为整个复合视图的尺寸。
这一特性在该复合视图独立存在时可能无关紧要,但当与其他视图共同布局时,需求尺寸的计算机制的不同将对整体布局产生显著影响。
例如:
// overlay
HStack(alignment: .bottom, spacing: 0) {
      blueRectangle
        .overlay(alignment: .topTrailing) {
          yellowCircle
            .alignmentGuide(.top) { $0[.top] + $0.height / 2 }
            .alignmentGuide(.trailing) { $0[.trailing] - $0.width / 2 }
        }
        .border(.red, width: 2)
      Rectangle()
        .foregroundStyle(.red.gradient)
        .frame(width: 200, height: 200)
    }
// ZStack
HStack(alignment:.bottom,spacing: 0) {
      ZStack(alignment: .topTrailing) {
        blueRectangle
        yellowCircle
          .alignmentGuide(.top){ $0[.top] + $0.height / 2}
          .alignmentGuide(.trailing){ $0[.trailing] - $0.width / 2}
      }
      .border(.red, width: 2)
      Rectangle()
        .foregroundStyle(.red.gradient)
        .frame(width: 200, height: 200)
    }
如果我们希望在不同的位置(topTrailing 和 bottomLeading)摆放圆形,并希望这些圆形的占用空间被包含在需求尺寸中,那么使用多个 ZStack 可能是更佳的选择,尤其当视图的具体尺寸未知时:
ZStack(alignment: .bottomLeading) {
  ZStack(alignment: .topTrailing) {
    blueRectangle
    yellowCircle
      .alignmentGuide(.top) { $0[.top] + $0.height / 2 }
      .alignmentGuide(.trailing) { $0[.trailing] - $0.width / 2 }
  }
  yellowCircle
    .alignmentGuide(.bottom) { $0[.bottom] - $0.height / 2 }
    .alignmentGuide(.leading) { $0[.leading] + $0.width / 2 }
}
.border(.red, width: 2)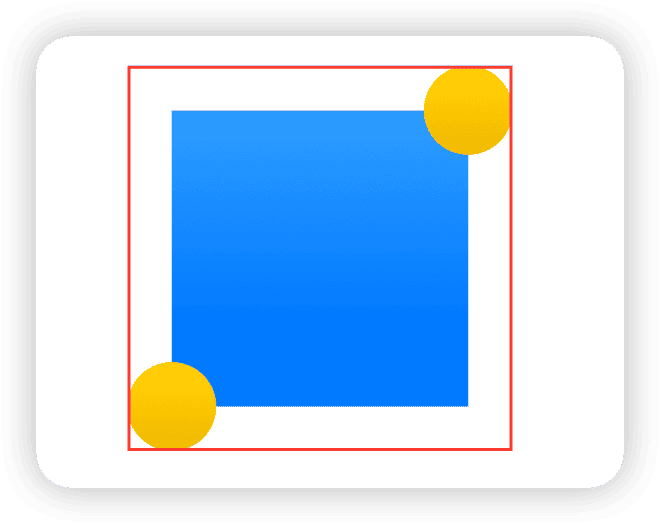
虽然这种声明方式较 overlay 更为复杂,但为了正确反映需求尺寸,此方法无疑是有效的。
想了解更多关于 SwiftUI 尺寸的知识,以及为什么在
ZStack中使用offset不会改变需求尺寸,请阅读 SwiftUI 布局 —— 尺寸(上) 和 SwiftUI 布局 —— 尺寸(下)。
Overlay 是 GeometryReader 的最佳伙伴
由于 overlay 和 background 在布局中与主视图保持一种主从关系,它们常被用作获取主视图几何信息的首选工具:
blueRectangle
  .background(
    GeometryReader{ proxy in
      Color.clear // 创建于主视图尺寸一致的空白视图
        .task(id:proxy.size){
          size = proxy.size
        }
    }
  )
利用 overlay 和 background 不改变复合视图需求尺寸的特性,我们可以在其中绘制超出主视图尺寸的内容,同时获取这些内容的尺寸信息,而不影响整体布局。这使得在视图尺寸超出主视图范围时,其对整体布局的影响被有效隔离。
下面是一个实际应用示例,在这个示例中,我使用这一技术在 SwiftUI 中根据视图的高度动态调整 sheet 的高度。通过 background 预先获取即将展示的 sheet 视图的高度,并据此调整 presentationDetents:
struct AdaptiveSheetModifier<SheetContent: View>: ViewModifier {
  @Binding var isPresented: Bool
  @State private var subHeight: CGFloat = 0
  var sheetContent: SheetContent

  init(isPresented: Binding<Bool>, @ViewBuilder _ content: () -> SheetContent) {
    _isPresented = isPresented
    sheetContent = content()
  }

  func body(content: Content) -> some View {
    content
      .background(
        sheetContent // 在 background 中预先绘制 sheet 视图的内容,不会影响 content 的需求尺寸
          .background( // 在另一个 background 获取预先绘制的视图尺寸
            GeometryReader { proxy in
              Color.clear
                .task(id: proxy.size.height) {
                  subHeight = proxy.size.height
                }
            }
          )
          .hidden() // 隐藏这个预先绘制的视图
      )
      .sheet(isPresented: $isPresented) {
        sheetContent
          .presentationDetents([.height(subHeight)])
      }
      .id(subHeight)
  }
}
可以 在这里 查看完整代码。使用该方法后的效果如下:
这段代码展示了如何有效利用 overlay 和 background 的特性来优化 SwiftUI 应用中的动态布局需求。
请阅读 GeometryReader :好东西还是坏东西? ,了解更多有关
GeometryReader的使用技巧。
主视图的唯一性
在 SwiftUI 中,使用多个视图修饰器对单一视图进行修饰时,会产生一个庞大且复杂的类型层级。以以下代码为例,我们有一个矩形视图,上面叠加了两个不同颜色的圆形:
Rectangle().foregroundStyle(.blue)
  .frame(width: 200, height: 200)
  .overlay(
    Circle().foregroundStyle(.yellow)
      .frame(width: 60, height: 60)
  )
  .overlay(
    Circle().foregroundStyle(.red)
      .frame(width: 40, height: 40)
  )
此代码生成的类型如下:
ModifiedContent<
  ModifiedContent<
    ModifiedContent<
      ModifiedContent<
        Rectangle, _ForegroundStyleModifier<Color>
      >, _FrameLayout
    >, _OverlayModifier<
      ModifiedContent<
        ModifiedContent<
          Circle, _ForegroundStyleModifier<Color>
        >, _FrameLayout
      >
    >
  >, _OverlayModifier<
    ModifiedContent<
      ModifiedContent<
        Circle, _ForegroundStyleModifier<Color>
      >, _FrameLayout
    >
  >
>
类型表明,最外层的 overlay 是作用于包括 Rectangle 和第一个 overlay 在内的复合视图上。尽管内部的类型实现看起来复杂,开发者在编写代码时可以完全忽略这些细节。无论对视图应用了多少层 overlay 或 background,它们都将该视图视为主视图。开发者只需关注 background 或 overlay 的声明顺序即可。
例如,在以下声明中:
RootView()
  .overlay(A())
  .background(D())
  .overlay(B())
  .background(C())
最终的渲染顺序会是:
C -> D -> RootView -> A -> B通过灵活使用 overlay 和 background,我们可以大大简化复杂视图结构的管理,并使视图的修改和维护变得更加便捷。
Background 的 SafeArea 溢出特性
SwiftUI 为 background 提供了几种构造方法,其中一个特别值得开发者注意:
public func background<S>(_ style: S, ignoresSafeAreaEdges edges: Edge.Set = .all) -> some View where S : ShapeStyle这个构造方法允许遵守 ShapeStyle 协议的背景视图,通过 ignoresSafeAreaEdges 参数控制其是否延伸到安全区边缘。这一功能在处理全屏视图或需要特别处理安全区的布局时尤为有用。
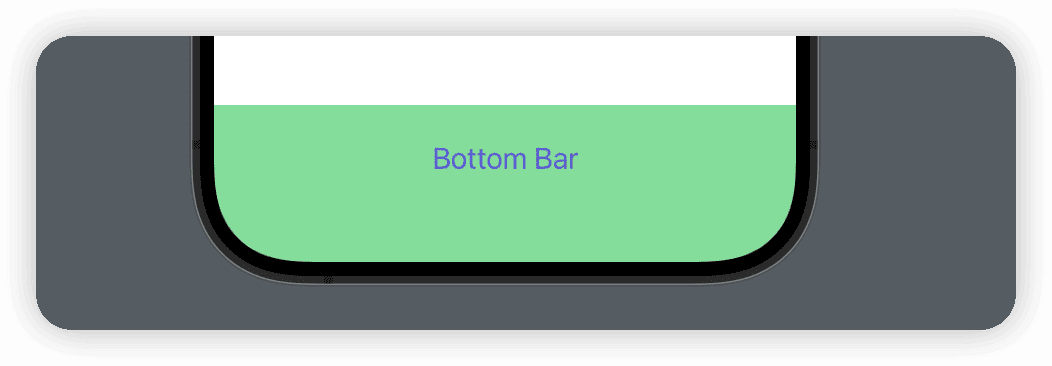
例如,在文章 掌握 SwiftUI 的 Safe Area 中,我们展示了如何利用这一特性,使得通过 safeAreaInset 声明的底部状态栏在全屏设备上可以完全填充底部安全区,而无需任何额外调整:
Color.white
  .safeAreaInset(edge: .bottom, spacing: 0) {
    Text("Bottom Bar")
      .font(.title3)
      .foregroundColor(.indigo)
      .frame(minWidth: 0, maxWidth: .infinity, minHeight: 0, maxHeight: 40)
      .padding()
      .background(.green.opacity(0.6))
  }
由于 ignoresSafeAreaEdges 默认值为 all(意味着允许在任何方向上填充安全区),当开发者不希望背景扩展到特定的安全区时,可以明确指定排除的边缘:
struct SafeAreaView: View {
  var body: some View {
    VStack {
      Text("Hello World")
    }
    .frame(maxWidth: .infinity, maxHeight: .infinity)
    .background(.indigo, ignoresSafeAreaEdges: [.top]) // 排除掉顶部的安全区域
  }
}
这一功能的灵活应用能够显著提升布局的适应性和视觉效果。
总结
本文探索了 SwiftUI 中 overlay 和 background 的关键特性。尽管在多种场景中,不同的修饰器和布局容器似乎能实现相似的效果,但由于每种工具都有其独特的设计目标和底层实现,从而决定了各自不同的最佳使用场景。深入理解这些工具的工作原理是至关重要的,因为可以帮助我们在面临具体布局挑战时,能够选取最适合的解决方案。
通过本文的讨论,我们希望读者能够更好地理解这些布局工具的强大功能,并学会如何在实际开发中灵活应用它们以优化界面设计。