In the Part 1, we covered the basics of creating, configuring, Quick Look, and live views in Xcode Playground. In this article, we will delve deeper into Xcode Playground and focus on topics such as code assistance, resource management, exploring packages and Xcode projects using Playground.
Code Assistance and Resources
Package Structure and File Addition in Xcode Playground
Xcode Playground projects do not rely on project configuration files, and Page, code assistance, resource files, and access permissions are all managed through the directory structure within the .playground package.
Single Page Scenario
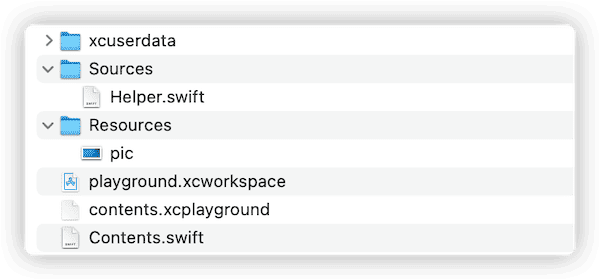
After creating a new Xcode Playground project, the default package file structure is as follows (right-click on the Playground project file and select Show Package Contents):

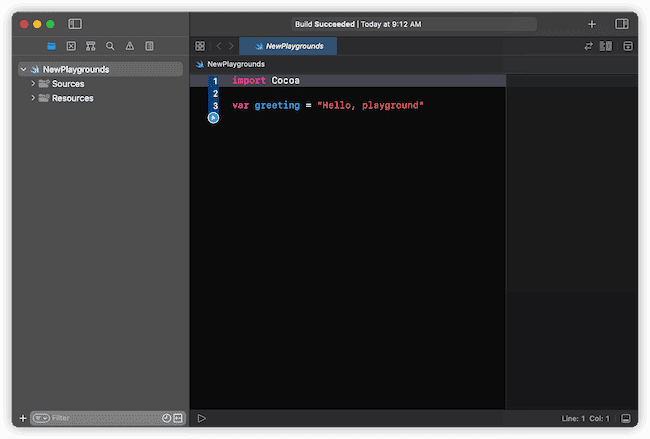
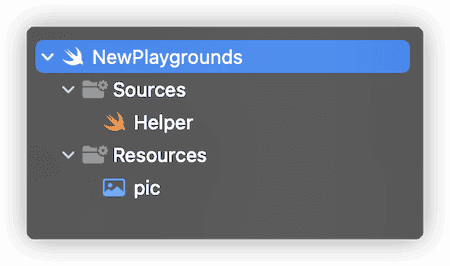
A newly created project only has one Page, and Xcode Playground will merge the content of the Page with the Playground project. Contents.swift is the main code content of the current single Page. Although Sources and Resources are displayed in the Xcode navigation bar, both currently have no content, so no directory is created for them in the .playground package.
The Sources directory is where auxiliary code (also known as shared code) is stored. Developers usually save Swift code files containing custom types, preset methods, test snippets, custom Quick Look mentioned earlier, custom real-time view types, and other content in the Sources directory.
There are several ways to add auxiliary code, such as dragging the code files directly into the Sources project in Xcode, copying the code files to the Sources directory in Finder, or right-clicking on Sources to create a new Swift code file directly.
The Resources directory is used to store the main code of the Page (Contents.swift) and various resource files needed in the auxiliary code, such as images, sounds, JSON, Assets, etc. The way to add them is similar to adding auxiliary code.
Resource files can only be saved in the Resources directory or its subdirectories, and auxiliary code can only be saved in the Sources directory or its subdirectories.
When we add content to the Sources or Resources directory, Playground will automatically create corresponding directories in the .playground package.
When there are Multiple Pages
Compared to an Xcode Playground project with only one page, the directory structure will undergo significant changes when there are multiple pages.
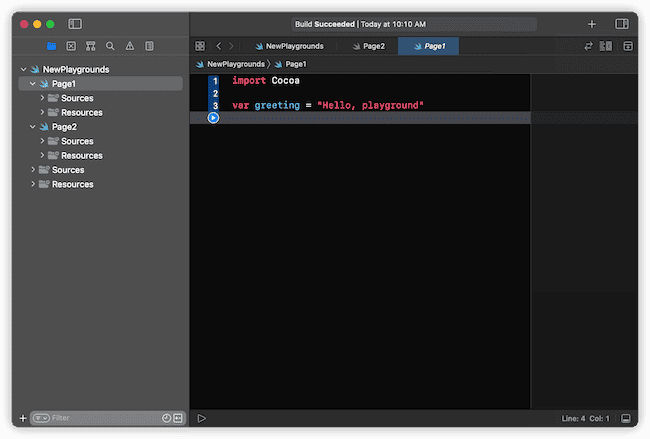
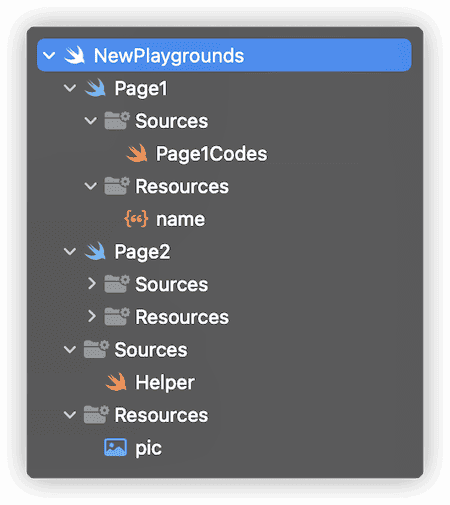
After adding a new Page to the Playground project created in the previous section, the Playground project (NewPlaygrounds) and the Page will be displayed separately. We named the original Page as Page1 and the new Page as Page2.
You can now see this in the Xcode navigation bar. Under the project hierarchy (NewPlaygrounds), there are Sources and Resources, and each Page also contains its own Sources and Resources. At this point, the structure of the .playground package will look like this:
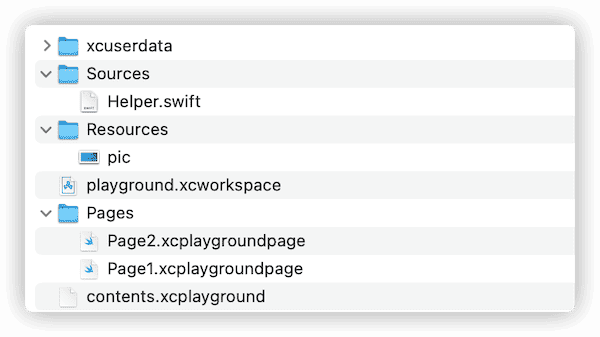
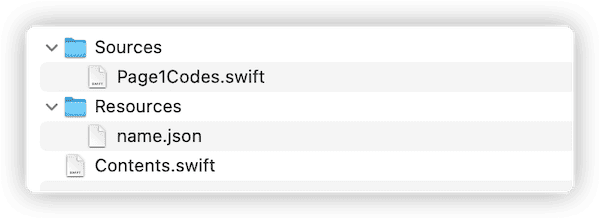
Previously, the Contents.swift file under the root directory disappeared. A Pages directory was added, and two .xcplaygroundPage package files corresponding to the page names were added to it. Further inspection of the .xcplaygroundpage package contents reveals that each has a Contents.swift (the main code file for the page).
Auxiliary code and resource files were added to Page1 in Xcode, and the contents of the Page1.xcplaygroundpage package will also change.
Things to note:
- When adding a new Page, the auxiliary code and resource files added initially in the single Page state will be preserved in the Sources and Resources directories at the project level.
- When deleting a Page in the multi-Page state, even if only one Page is left, the directory structure will not revert back to the state when the Playground project was created (single Page), and will still maintain the directory structure in the multi-Page state.
Management and Calling of Auxiliary Code
In Xcode Playground, each Page can be considered as an independent mini app (with no relation between them), and each Sources directory is also regarded as a Module.
Using the project created above as an example:
- The Sources at the project level will be compiled into the NewPlaygrounds_Sources (project name +
_Sources) module, and the Sources of Page1 will be compiled into the Page1_PageSources (page name +_PageSources) module. - The Playground will implicitly import NewPlaygrounds_Sources for the auxiliary code of Page1.
- The Playground will implicitly import NewPlaygrounds_Sources and Page1_PagesSources modules for the primary code (Contents.swift) of Page1.
In simple terms, the auxiliary code of the entire Page can call the auxiliary code of the project, and the primary code of each Page can call the auxiliary code of the project as well as the auxiliary code of the current Page.
Because it is based on the management of Modules, only the code defined as public can be called by code not in the same module.
Add the following method to the Helper.swift file in the Sources directory at the project level:
import Foundation

public func playgroundName() -> String {
    "NewPlaygrounds"
}
Adding the following method in Page1Code.swift file located in the Sources directory of Page1:
import Foundation

public func pageName() -> String {
    playgroundName() + " Page1"
}
Within the main code of Page1, you can directly call the public code of the project’s helper code module or the Page1 helper code module:
let playgourndName = playgroundName()
let currentName = pageName()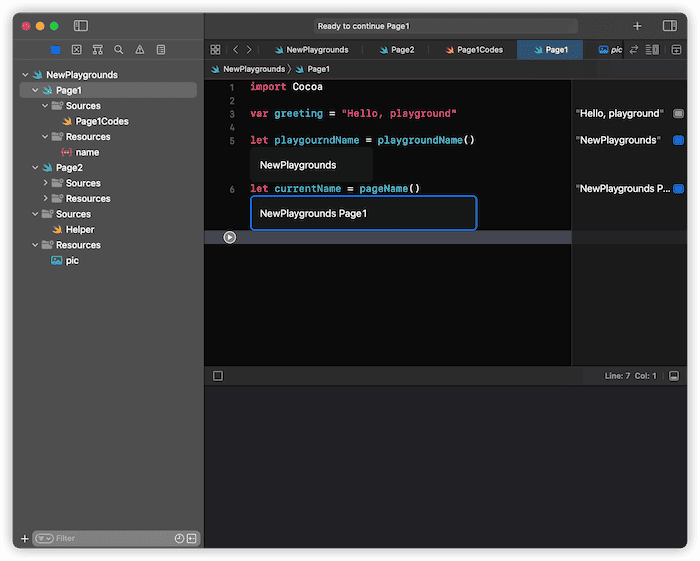
Playground will implicitly import the necessary modules for us, so there is no need to import them manually. Of course, you can also manually import the corresponding modules in different code to deepen your understanding.
Unlike the main code of the Page, the auxiliary code does not support the line-by-line execution and Quick Look functions of the Playground. Before running the main code of the Page, Playground will first complete the compilation of the auxiliary code (automatically).
Other points to note about the auxiliary code are:
- The main code or auxiliary code of one Page cannot call the auxiliary code of another Page.
- Since each Page can set the running environment separately (iOS or macOS), the auxiliary code should be compatible with the running environment. Especially when a project contains Pages with different running environments, it is necessary to ensure that the auxiliary code of the project can run on different platforms.
Organization and Points to Note for Resource Files
Resources are organized in the same directory structure as the auxiliary code, divided into resources that can be shared among Playground projects and resources exclusive to each Page.
Resource files saved in the project’s root directory can be used by the main code and auxiliary code of each Page. Resources saved in the Resources directory of a Page can only be used by the main code and auxiliary code of that Page.
When executing the code of a Page, Playground does not separate the project resources and Page resources. Instead, it creates a directory to summarize resources for each Page, and creates links (aliases) to the resources available to that Page. Therefore, if a project resource file has the same name as a Page-specific resource file, Playground will not be able to support both resources at the same time.
Because Playground summarizes all resources accessible to the current Page into one directory, both project resources and Page-specific resources can be accessed using Bundle.main in the main code or auxiliary code of the Page.
The following code can obtain the summary directory of the available resources for Page1:
let url = Bundle.main.url(forResource: "pic", withExtension: "png")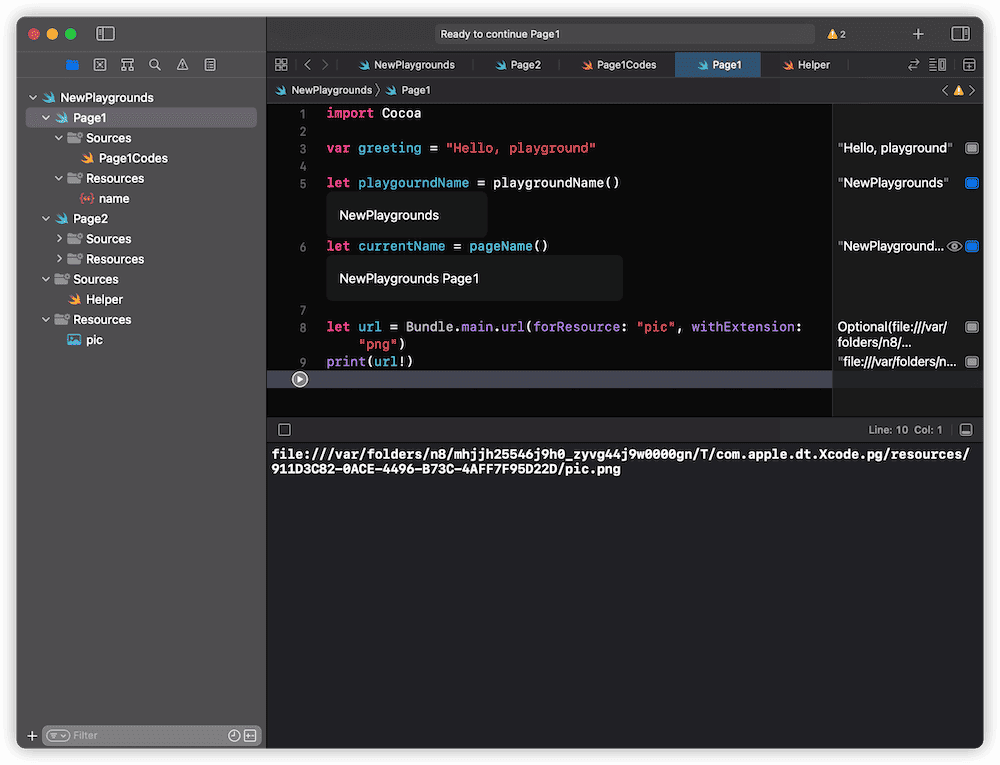

name.json is an exclusive resource for Page1, while pic.png is a project resource. They are all centralized (therefore, if there is a name conflict, only the content of the exclusive resource can be used).
Assets files (.xcassets) are slightly special. Each Page can only support one Assets file. If the exclusive resources of the Page do not include Assets, the Page can use the Assets in the project resources. If the Page resources contain Assets, regardless of the name of the Assets in the project resources, they will be ignored.
Currently, there is a bug in Playground when handling resource file renaming and deletion (at least in Xcode 12 and Xcode 13). If a resource file is renamed in Xcode, Playground will create a new alias for the new name in the directory where the alias is saved, but will not delete the alias for the original name. If the resource file is deleted, the corresponding alias file will not be deleted. Therefore, even if the resource name does not match the name called in the code (the original name is still used in the code), the file can still be obtained. Currently, there is no way to reset this alias directory. If necessary, you can locate and manually delete invalid alias files in the directory.
In Swift Playground, it is not possible to add resources separately for each Page. All resources will be placed in the Resources directory at the project level. If there is a need to add resources for a single Page, they can be added in Xcode or Finder first, and then opened in Swift Playground.
Playground will preprocess (compile) certain specific format resources, such as .xcassets and .mlmodel. The processed resources can be configured and managed directly in Playground.
How to use localization files (mainly for Swift Playgrounds)
Similar to the localization management method of SPM, just create a directory for the required language (such as en.lproj and zh-CN.lproj) in the resource file directory, and then add the corresponding language’s string files and resource files to the directory.
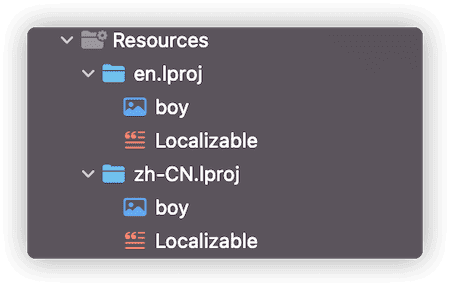
When Swift Playgrounds executes the code of a page, it will call the correct resources based on the current system settings.
There is no convenient environment setting function provided in Xcode Playground. Developers can use UITraitCollection to make some settings for the iOS simulator in Xcode Playground.
How to test Core Data code
If you want to learn and test various features of Core Data in Playground, pay attention to the following:
- Playground does not support the configuration file format
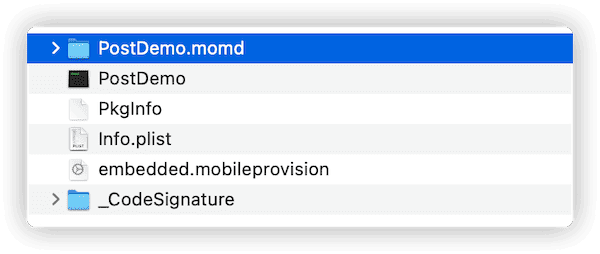
.xcdatamodeld. You need to first create a Core Data project in Xcode, edit the.xcdatamodeldfile as needed, and compile the project. Then, copy the.momdfile from the compiled app bundle to the resource directory of Playground.
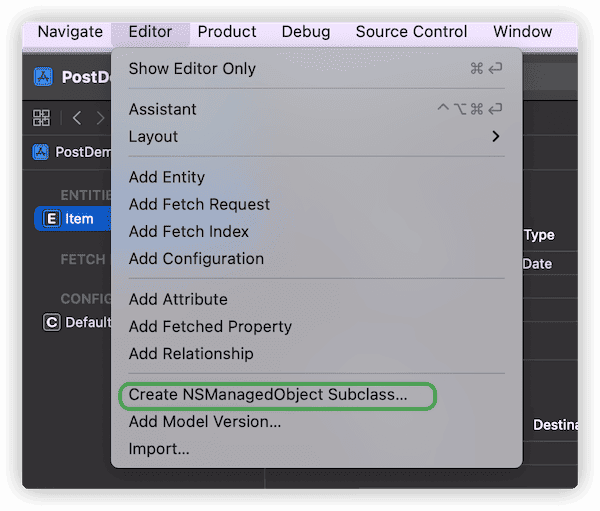
- Playground does not support automatic generation of managed object definitions. You can use “Create NSManagedObject Subclass” in Xcode project to generate corresponding code, and then copy the code to the auxiliary code section of Playground (in case of simple definitions, you can also write the code manually).
Document
Adding Renderable Annotation Documents in Code
Compared to standard Xcode projects, Playgrounds can render specific annotation documents in the main code page.
Adding renderable annotation documents in a Playground is very simple, just add : after the standard comment identifier.。
import Foundation
/*:
# Title
## Title2
### Title3
* Line 1
* Line 2
*/
//: **Bold** *Italic*
//:[肘子的 Swift 记事本](https://fatbobman.com)
//:
/*:
// 代码片段
func test() -> Stirng {
print("Hello")
}
*/
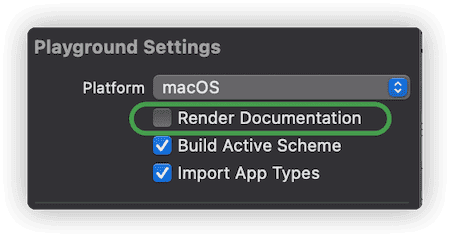
print("Hello world")In Xcode, enable or disable documentation rendering by clicking on the Render Documentation option on the right side.
After enabling, the code above will be displayed in the following style:
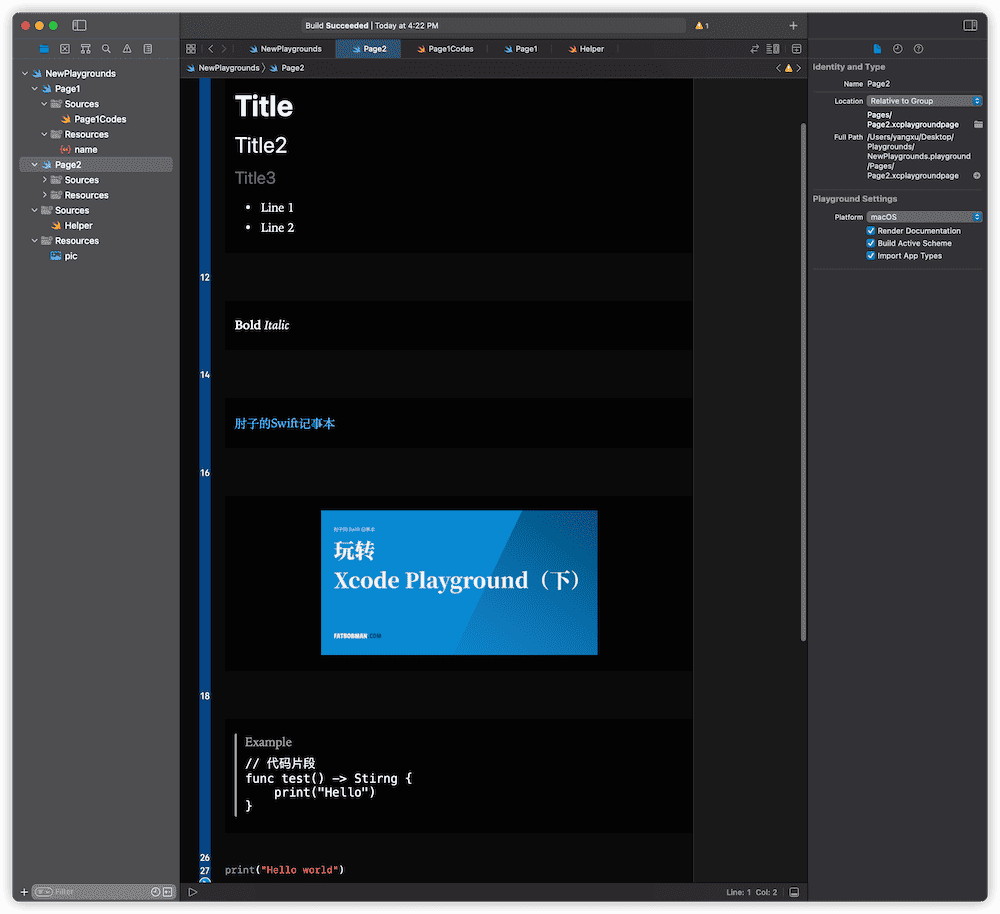
The document rendering feature in Swift Playgrounds will always be enabled and cannot be turned off.
For more information on renderable annotated code, refer to Apple’s official documentation.
How to Navigate Between Multiple Pages
In the situation of multiple pages, navigation between them can be achieved through annotations in the main code of each page.
Forward and Backward Navigation
The following code enables forward and backward navigation in the order of the navigation bar.
//: [Previous](@previous)

import Foundation

var greeting = "Hello, playground"

//: [Next](@next)
Rendered state
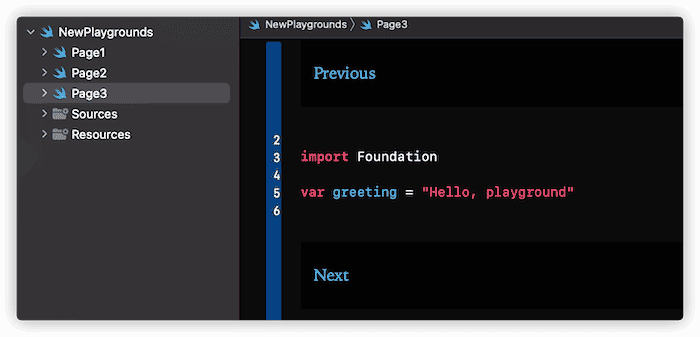
Clicking Previous on Page3 will take you to Page2. However, clicking Next will not change anything (because Page3 is already the last page).
Navigate to a specific Page
You can navigate to a specific page by directly specifying the page name.
import Foundation

var greeting = "Hello, playground"

//: [页面 1](Page1)

//: [页面 2](Page2)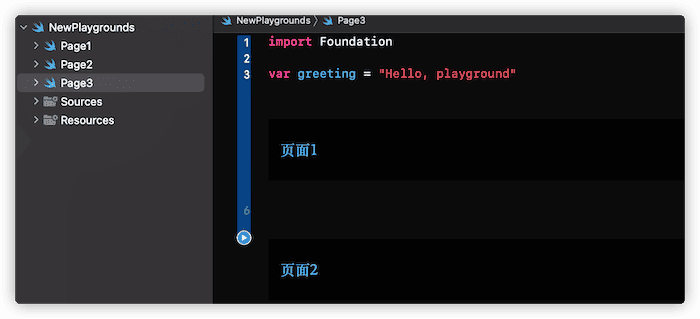
How to Hide Code (Swift Playgrounds Only)
Swift Playgrounds has strong entertainment and educational properties, and provides several special annotation methods to enhance its capabilities in courseware production and presentation. Initially, these annotations could only be used in .playgroundbook, but now they can also be used in .playground.
The purpose of hiding code is to only display the code that users need to understand in the Swift Playground code area. Hide other code that users don’t need to be concerned with for the time being (it will still be executed, but just not displayed).
//#-hidden-code
import SwiftUI
import PlaygroundSupport
var text = "Hello world"
let view = Text(text).foregroundColor(.red)
PlaygroundPage.current.setLiveView(view)
//#-end-hidden-code

text = "New World"
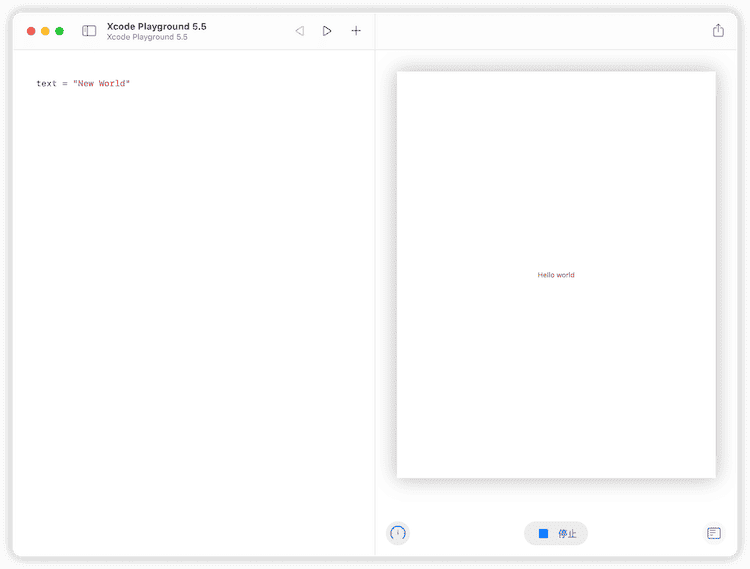
Only the last line of code will be displayed in Swift Playground above. The code between //#-hidden-code and //#-end-hidden-code will be hidden.
How to set up editable code areas (Swift Playgrounds Only)
By setting editable areas in Page code, users will only be able to modify code within the specified editing area.
//#-hidden-code
import SwiftUI
import PlaygroundSupport
var text = "Hello world"
let view = Text(text).foregroundColor(.red)
PlaygroundPage.current.setLiveView(view)
//#-end-hidden-code

//#-editable-code
text = "New World"
//#-end-editable-code
// 修改字体
view.font(.title)
Use //#-editable-code and //#-end-editable-code to set editable areas.
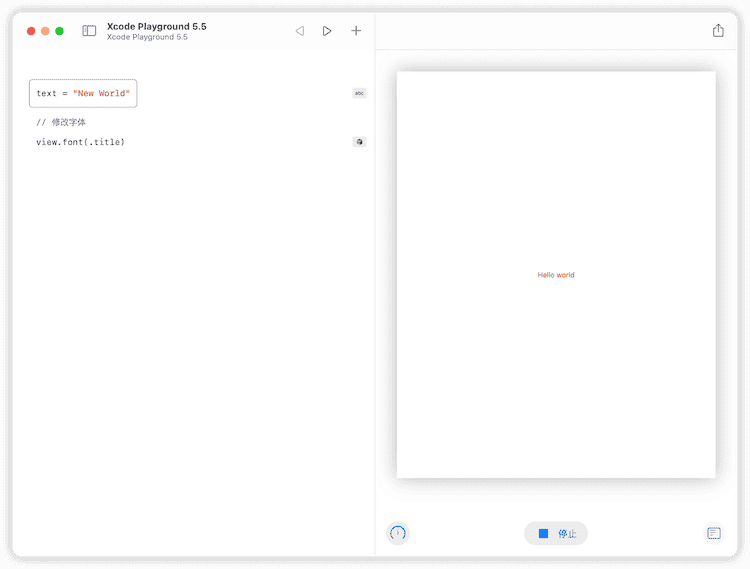
Users can only modify the code within the rectangular box. The code outside the editable area, such as view.font(.title) below, is displayed but cannot be modified.
Hiding code and setting modification areas is extremely important in creating interactive documents. It is hoped that Xcode Playground will support the above annotations as soon as possible.
Explore Packages and Projects with Xcode Playground
Starting with Xcode 12, Apple has taken the collaboration between Playground and Xcode to a new level. Through deep integration between the two, Xcode Playground makes it easy to call and test code and resources in SPM libraries, Xcode projects, and WorkSpaces.
Playground in SPM
Library developers add Playground projects to libraries managed by SPM to provide interactive documentation and examples to help users quickly understand how to use the library.
In the WWDC session, Apple’s Playground project developers hope that future third-party Swift libraries will come with an interactive Playground-based documentation.
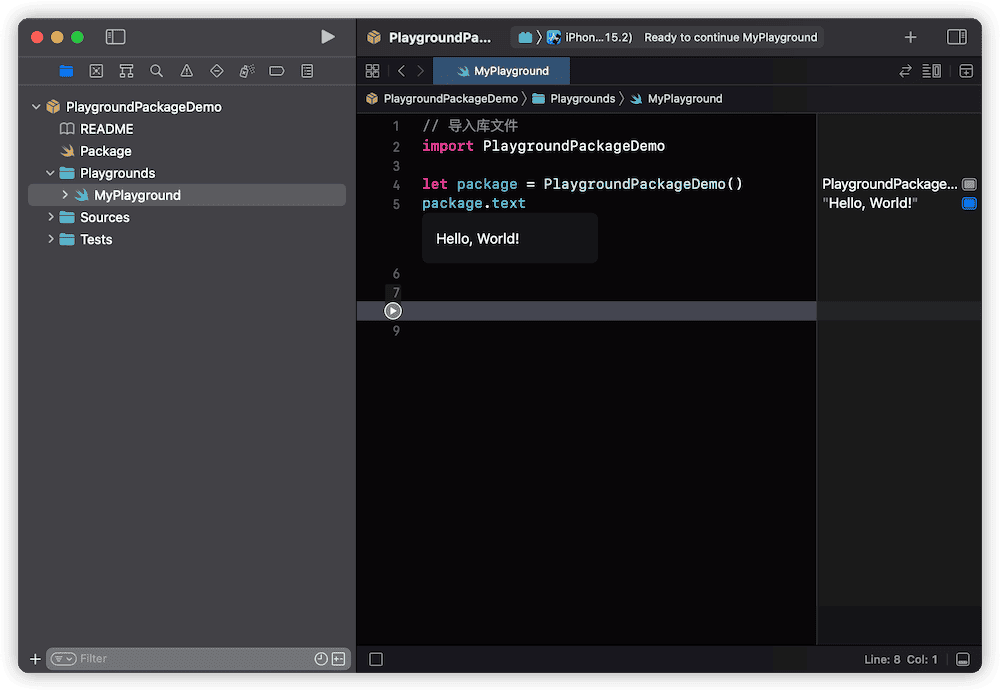
Adding a Playground to a library is very simple – just add a Playground project (.playground) anywhere.
Usage Notes:
- Library files need to be imported in Playground code.
- Only code marked as public in the library can be called.
- Resources in the library cannot be called.
- Code that calls resources in the library cannot be used.
- Before executing Playground code, the correct Target must be selected (Target should match the runtime environment set in Playground).
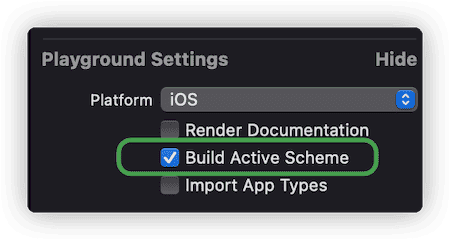
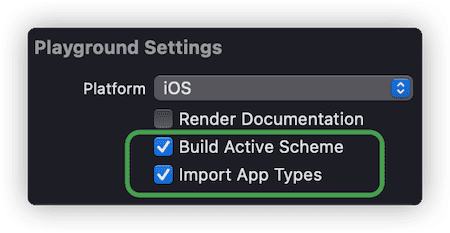
- Enable Build Active Scheme to automatically compile library files when switching Targets.
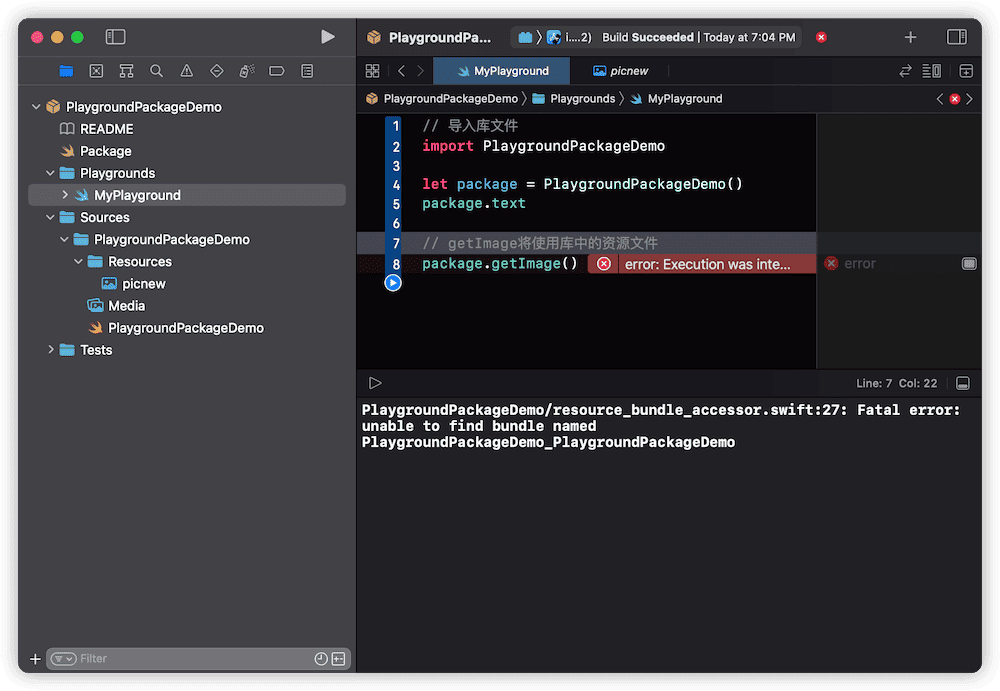
Compared to the other points, the fourth point is slightly more difficult to understand. When Playground executes Page code, it will compile the library first, but it does not set the correct resource bundle for the library. If the code in the library tries to call library resources, an error will occur. Currently, this only applies to code that does not need to call library resource files.
Playground with Project
Usage Notes:
- Without enabling Import App Types, you must import the project in order to call the code that is publicly accessible in the project.
- With Import App Types enabled, you can call the code in the project without importing it (excluding Private).
- You can call third-party packages imported in the project.
- You cannot directly use the resources in the project.
- You can indirectly access the resources in the project by calling the code that uses the project resources.
- Before executing Playground code, you need to select the correct Target (Target should match the running environment set in Playground).
- Enable Build Active Scheme to automatically compile the library file when switching targets.
- Before executing Playground code, make sure the current Target has been compiled.
Compared to Playground in SPM, the differences include:
- With Import App Type enabled, you can use the code in the project directly (without public).
- You can import other third-party packages used in the current Target.
- You can indirectly access the resources in the project by calling the code in the project.
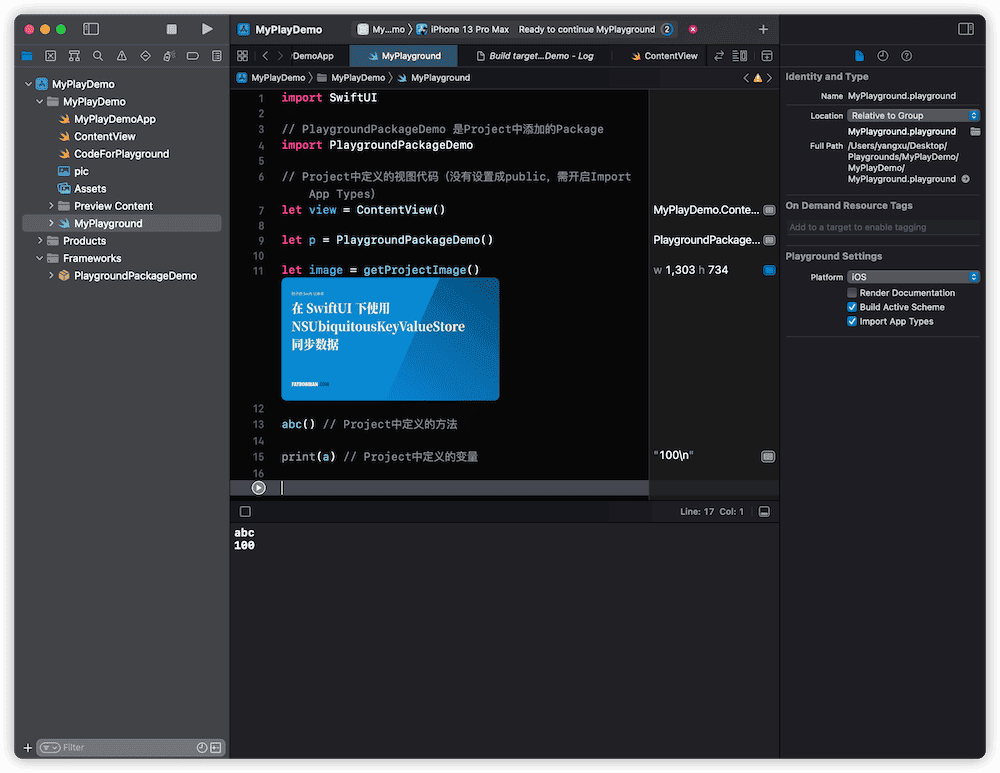
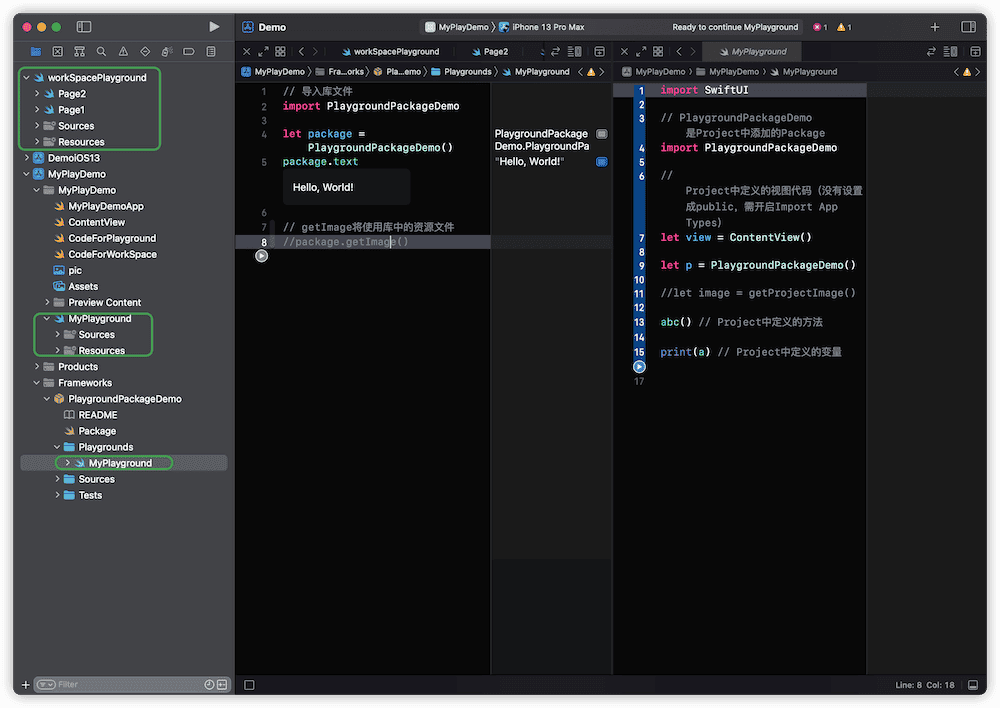
In the following diagram, the project MyPlayDemo contains the following code (methods and variables are not public):
import Foundation
import UIKit

func abc() {
    print("abc")
}

let a = 100

// 读取项目 Assets 中的图片
func getProjectImage() -> UIImage? {
    UIImage(named: "abc")
}
In Playground, there is no need to import the project name, you can directly use the code in the project (Import App Types must be enabled).
PlaygroundPackageDemo is the package added in the current Target and can also be imported directly into Playground.
Playground with WorkSpace
Sometimes, you may want to create a Playground in a WorkSpace to test multiple projects or frameworks.
Considerations when using Playground in WorkSpace:
- Only the code of one project in the workspace can be executed in each Page.
- Each Page can import compiled Packages from the workspace that are compatible with the current Page’s runtime environment (Packages can be imported from different projects).
- Project resources cannot be used directly.
- Project resources can be indirectly accessed through project code.
- Only public code can be called.
- Before executing the code on the current Page, ensure that all imported projects and libraries have been compiled.
- Before executing the code on the current Page, switch the Target to the compatible Target of the imported project.
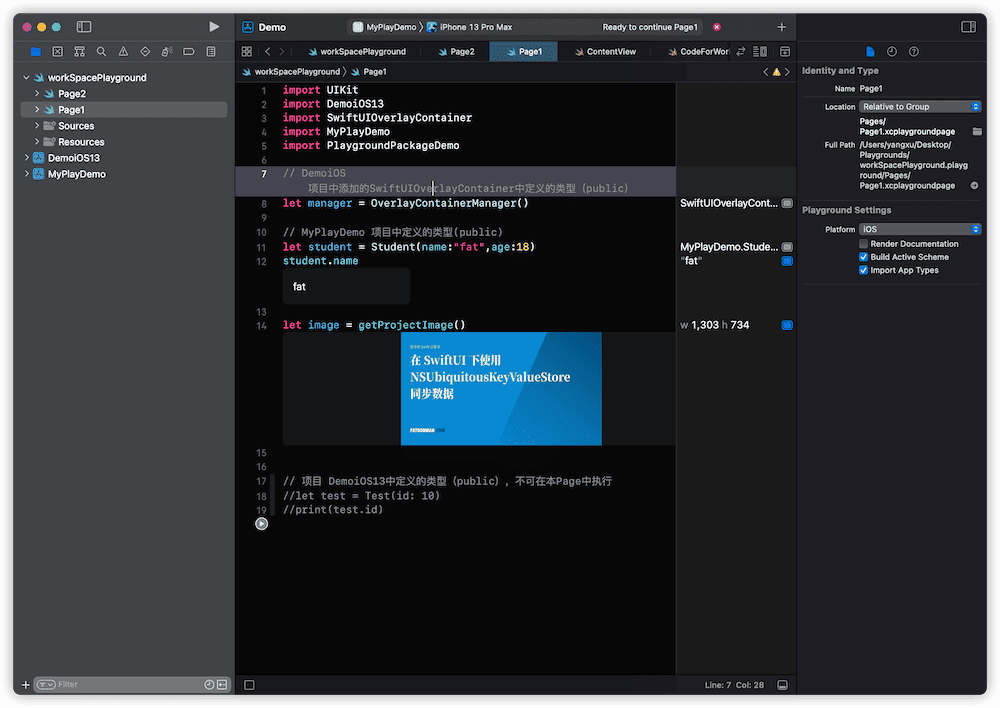
In the above image, there are two projects in WorkSpace (DemoiOS 13 and MyPlayDemo).
Page1 imports the MyPlayDemo project, as well as its dependency PlaygroundPackageDemo, project DemoiOS13, and SwiftUIOverlayContainer (a dependency of project DemoiOS 13).
However, only the code from one project can be executed (but the code of dependencies from another project can be executed).
Playground in SPM, Project, and WorkSpace do not conflict, and you can directly execute any level of Playground project.
Using third-party libraries in Swift Playgrounds
Swift Playgrounds does not support adding third-party libraries directly to .playground. However, you can partially support third-party libraries by copying the code from the third-party library’s Source directory to the Sources directory of the playground.
This approach only applies to third-party libraries that do not use library resources.
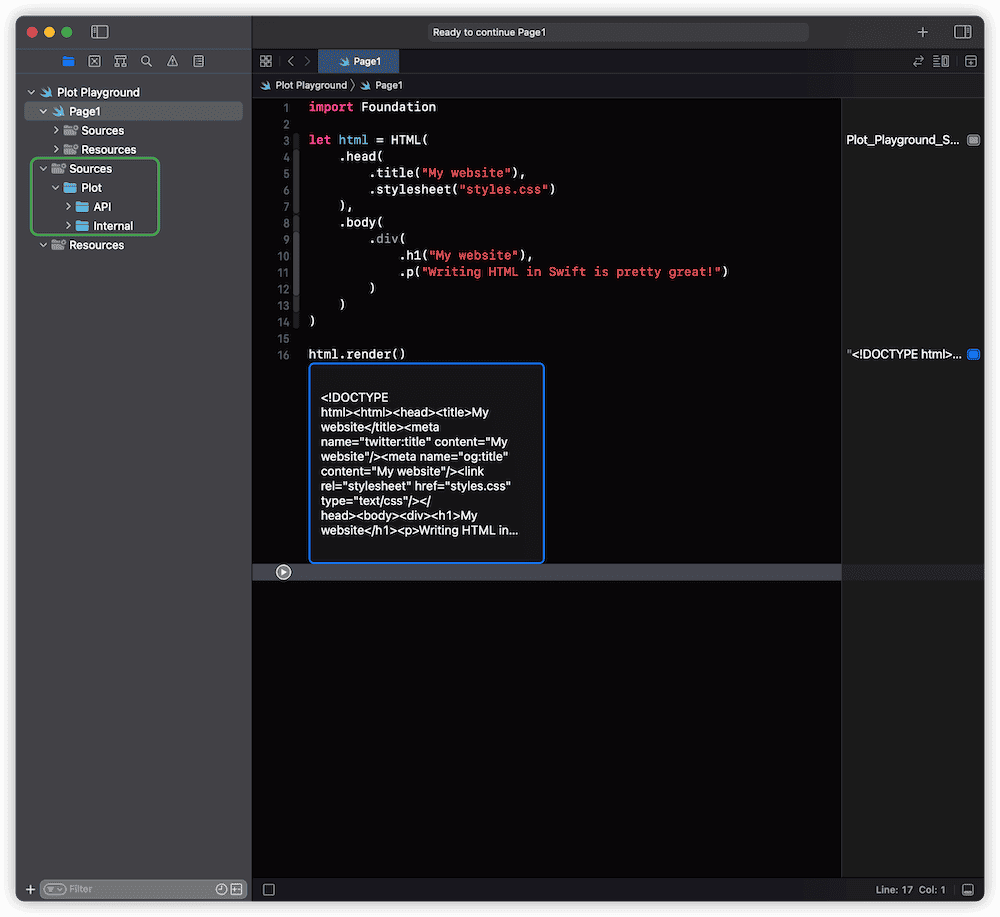
In the above image, the code for the Plot library was copied to the Playground project’s Sources directory. All Pages can directly call the Plot API without importing it.
Conclusion
Do not underestimate Xcode Playground, as it has far greater capabilities and efficiency than you can imagine.