Table is a table control provided for the macOS platform in SwiftUI 3.0, allowing developers to quickly create interactive multi-column tables. At WWDC 2022, Table was extended to the iPadOS platform, giving it a larger space to operate. This article will introduce the usage of Table, analyze its features, and how to implement similar functionality on other platforms.
List with Column (Row) Features
In the definition of Table, there is a clear concept of rows (Row) and columns (Column). However, compared to the grid containers in SwiftUI (LazyVGrid, Grid), Table is essentially closer to a List. Developers can consider Table as a List with column features.
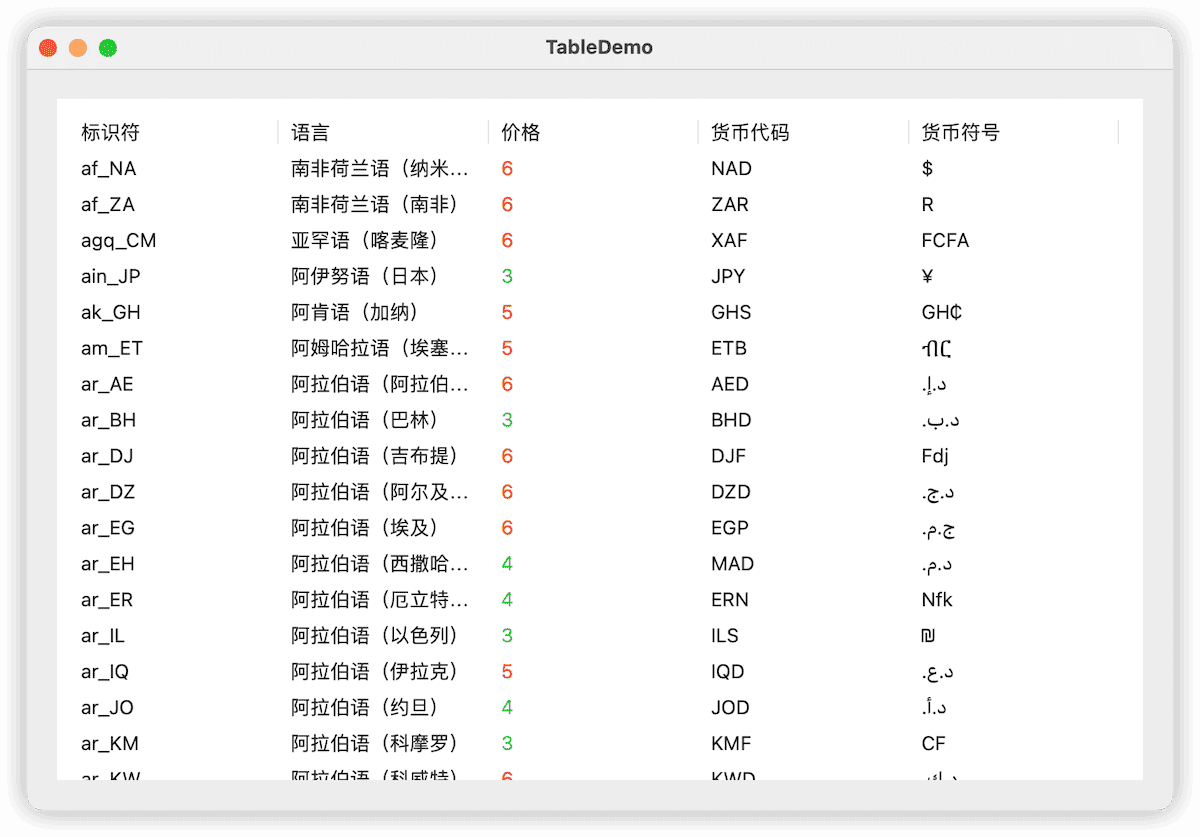
The above image shows a table created using List about Locale information, with each row displaying data related to Locale. The creation code is as follows:
struct LocaleInfoList: View {
    @State var localeInfos: [LocaleInfo] = []
    let titles = ["标识符", "语言", "价格", "货币代码", "货币符号"]
    var body: some View {
        List {
            HStack {
                ForEach(titles, id: \.self) { title in
                    Text(title)
                        .frame(minWidth: 0, maxWidth: .infinity, alignment: .leading)
                    Divider()
                }
            }

            ForEach(localeInfos) { localeInfo in
                HStack {
                    Group {
                        Text(localeInfo.identifier)
                        Text(localeInfo.language)
                        Text(localeInfo.price.formatted())
                            .foregroundColor(localeInfo.price > 4 ? .red : .green)
                        Text(localeInfo.currencyCode)
                        Text(localeInfo.currencySymbol)
                    }
                    .lineLimit(1)
                    .frame(minWidth: 0, maxWidth: .infinity, alignment: .leading)
                }
            }
        }
        .task {
            localeInfos = prepareData()
        }
    }
}

struct LocaleInfo: Identifiable, Hashable {
    var id: String {
        identifier
    }

    let identifier: String
    let language: String
    let currencyCode: String
    let currencySymbol: String
    let price: Int = .random(in: 3...6)
    let updateDate = Date.now.addingTimeInterval(.random(in: -100000...100000))
    var supported: Bool = .random()

    func hash(into hasher: inout Hasher) {
        hasher.combine(id)
    }
}

// Generate Demo Data
func prepareData() -> [LocaleInfo] {
    Locale.availableIdentifiers
        .map {
            let cnLocale = Locale(identifier: "zh-cn")
            let locale = Locale(identifier: $0)
            return LocaleInfo(
                identifier: $0,
                language: cnLocale.localizedString(forIdentifier: $0) ?? "",
                currencyCode: locale.currencyCode ?? "",
                currencySymbol: locale.currencySymbol ?? ""
            )
        }
        .filter {
            !($0.currencySymbol.isEmpty || $0.currencySymbol.isEmpty || $0.currencyCode.isEmpty)
        }
}
The following is the code for creating the same table using Table:
struct TableDemo: View {
    @State var localeInfos = [LocaleInfo]()
    var body: some View {
        Table {
            TableColumn("标识符", value: \.identifier)
            TableColumn("语言", value: \.language)
            TableColumn("价格") {
                Text("\($0.price)")
                    .foregroundColor($0.price > 4 ? .red : .green)
            }
            TableColumn("货币代码", value: \.currencyCode)
            TableColumn("货币符号", value: \.currencySymbol)
        } rows: {
            ForEach(localeInfos) {
                TableRow($0)
            }
        }
        .task {
            localeInfos = prepareData()
        }
    }
}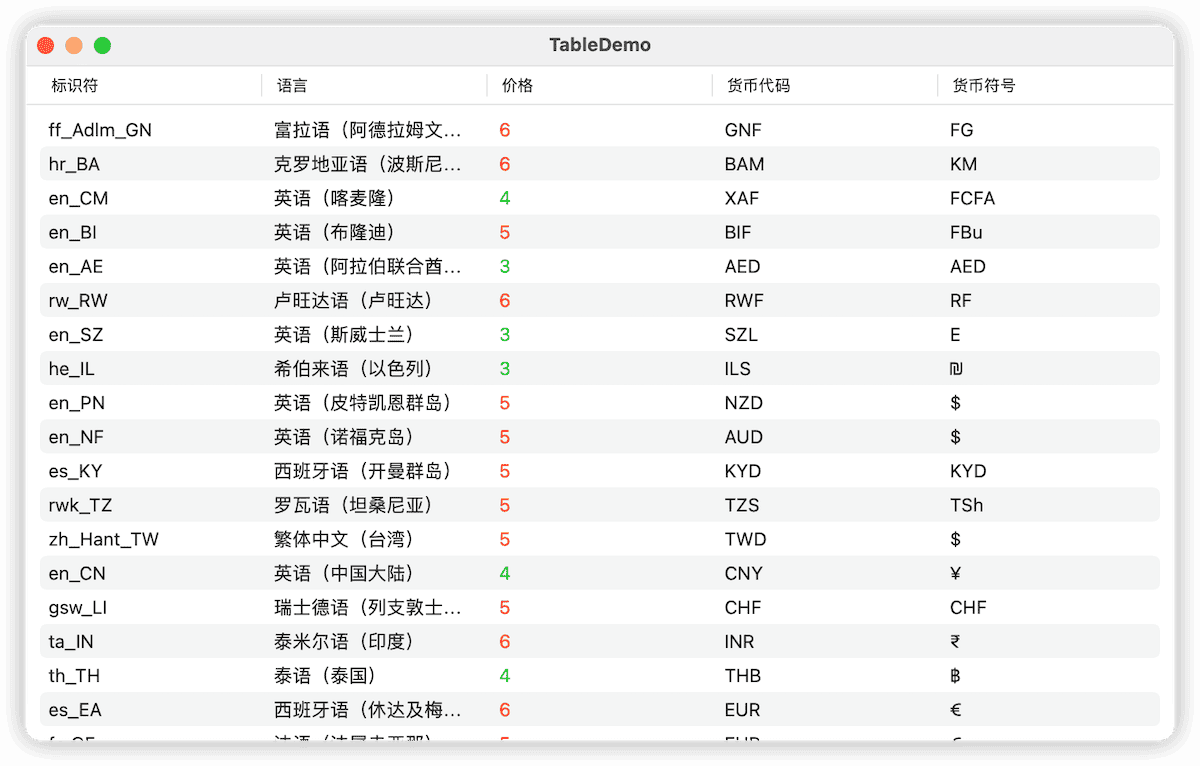
Compared to the List version, the code is not only less in quantity and clearer in expression, but we also gain a fixed title bar. Like List, Table also has a constructor method that directly references data, and the above code can be further simplified as:
struct TableDemo: View {
    @State var localeInfos = [LocaleInfo]()
    var body: some View {
        Table(localeInfos) { // Directly referencing the data source
            TableColumn("Identifier", value: \.identifier)
            TableColumn("Language", value: \.language)
            TableColumn("Price") {
                Text("\($0.price)")
                    .foregroundColor($0.price > 4 ? .red : .green)
            }
            TableColumn("Currency Code", value: \.currencyCode)
            TableColumn("Currency Symbol", value: \.currencySymbol)
        }
        .task {
            localeInfos = prepareData()
        }
    }
}
In the first test version of SwiftUI 4.0 (Xcode 14.0 beta (14 A 5228 q)), Table’s performance on iPadOS is poor, with many bugs. For example: the title row overlaps with the data row (first row); the first column in the title row does not display; scrolling is not smooth and certain behaviors (row height) are inconsistent with the macOS version, etc.
Similarities between Table and List:
- Similar declarative logic
- Unlike LazyVGrid (LazyHGrid) and Grid, which tend to place data elements in a cell, Table and List are more accustomed to presenting data elements in the form of rows (displaying different properties of data in one row)
- In Table, data is lazily loaded, and the behavior of onAppear and onDisappear in row views (TableColumn) is consistent with List
- Table and List are not real layout containers; they do not support view rendering features (ImageRenderer) like LazyVGrid, Grid, VStack, etc.
Column Width and Row Height
Column Width
In Table, we can set the column width in the column settings:
Table(localeInfos) {
    TableColumn("Identifier", value: \.identifier)
    TableColumn("Language", value: \.language)
        .width(min: 200, max: 300)  // Set width range
    TableColumn("Price") {
        Text("\($0.price)")
            .foregroundColor($0.price > 4 ? .red : .green)
    }
    .width(50) // Set specific width
    TableColumn("Currency Code", value: \.currencyCode)
    TableColumn("Currency Symbol", value: \.currencySymbol)
}
Other columns whose width is not specified (Identifier, Currency Code, Currency Symbol) will be evenly divided according to the remaining horizontal size in the Table. On macOS, users can change the spacing between columns by dragging the column separator line.
Like List, Table has built-in vertical scrolling support. On macOS, if the content (row width) in Table exceeds the width of the Table, Table will automatically enable horizontal scrolling support.
If the amount of data is small and can be fully displayed, developers can use scrollDisabled(true) to disable the built-in scrolling support.
Row Height
On macOS, the row height in Table is locked. Regardless of the actual height requirements of the content in the cell, Table will always maintain the system’s default row height.
TableColumn("价格") {
    Text("\($0.price)")
        .foregroundColor($0.price > 4 ? .red : .green)
        .font(.system(size: 64))
        .frame(height:100)
In iPadOS, Table automatically adjusts the row height based on the height of the cells.

It is currently unclear whether this behavior is an intentional design or a bug.
Spacing and Alignment
Since Table is not a true grid layout container, it does not provide settings for row and column spacing or alignment.
Developers can change the alignment of the content within a cell (but cannot yet change the alignment of the title) using the frame modifier:
TableColumn("Currency Code") {
    Text($0.currencyCode)
        .frame(minWidth: 0, maxWidth: .infinity, alignment: .trailing)
}
In Table, if the property type displayed in a column is String and does not require additional settings, a simplified KeyPath-based syntax can be used:
TableColumn("Currency Code", value:\.currencyCode)However, if the property type is not String, or if additional settings (such as font, color, etc.) are needed, the TableColumn must be defined using a trailing closure (as in the above example of Currency Code).
Style
SwiftUI provides several style choices for Table, but unfortunately, currently only .inset is available for iPadOS.
Table(localeInfos) {
   // Define TableColumn ...
}
.tableStyle(.inset(alternatesRowBackgrounds:false))-
inset
The default style (all previous screenshots in this article are of the inset style), available for both macOS and iPadOS. On macOS, it is equivalent to
inset(alternatesRowBackgrounds: true), and on iPadOS, it is equivalent toinset(alternatesRowBackgrounds: false). -
inset (alternatesRowBackgrounds: Bool)
Only for macOS, it can be set to enable alternating row backgrounds for visual distinction.
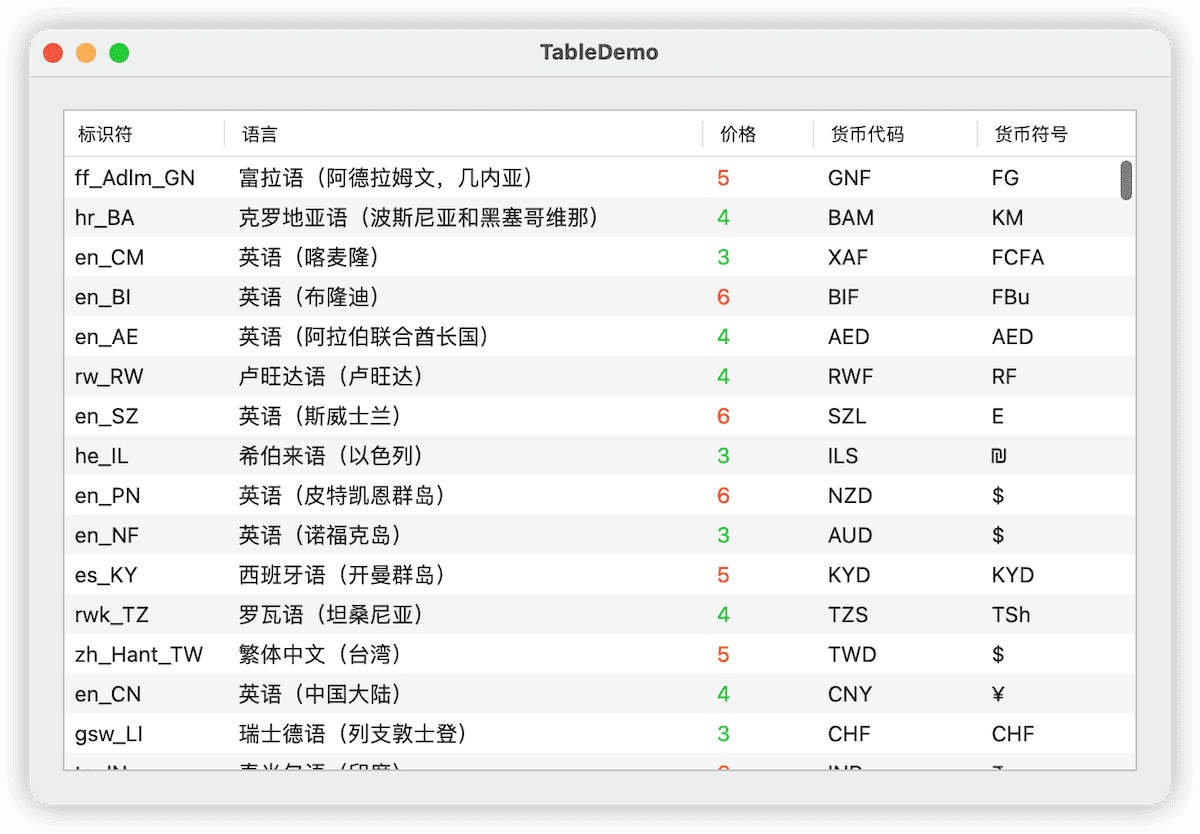
-
bordered
Only for macOS, adds borders to the Table.
-
bordered (alternatesRowBackgrounds: Bool)
Only for macOS, it can be set to enable alternating row backgrounds for visual distinction.
Perhaps in later beta versions, SwiftUI will expand more styles to the iPadOS platform.
Row Selection
Enabling row selection in Table is very similar to how it’s done in List:
struct TableDemo: View {
    @State var localeInfos = [LocaleInfo]()
    @State var selection: String?
    var body: some View {
        Table(localeInfos, selection: $selection) {
           // Define TableColumn ...
        }
    }
}
It’s important to note that Table requires the type of the bound variable to match the id type of the data (which needs to adhere to the Identifiable protocol). For instance, in this case, the id type of LocaleInfo is String.
@State var selection: String?  // For single selection
@State var selections: Set<String> = []  // For multiple selections, LocaleInfo must conform to Hashable protocol
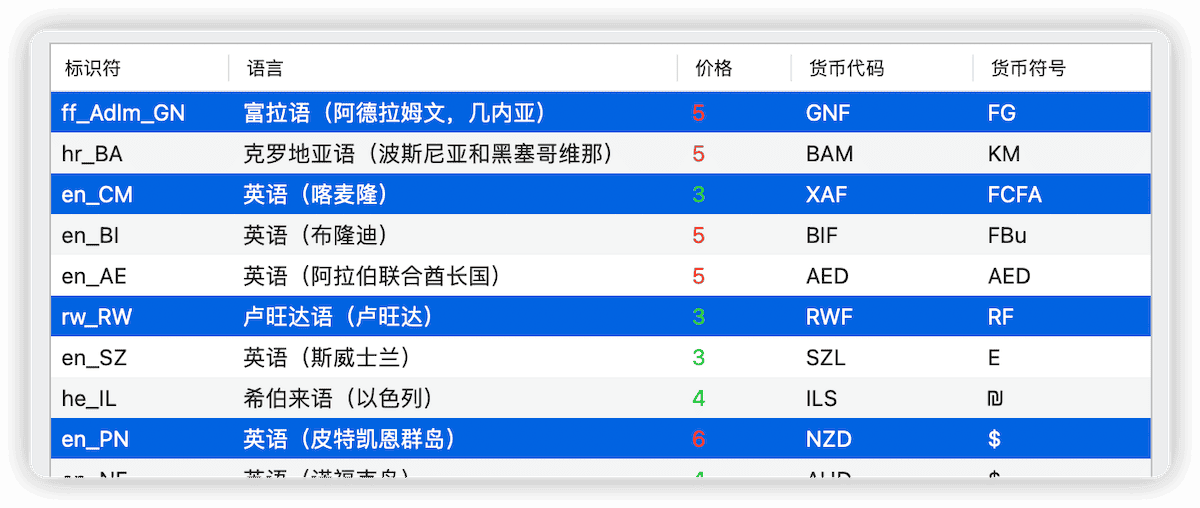
The image below shows the scenario after enabling multiple selections:
Sorting
Another core functionality of Table is the efficient implementation of multi-attribute sorting.
struct TableDemo: View {
    @State var localeInfos = [LocaleInfo]()
    @State var order: [KeyPathComparator<LocaleInfo>] = [.init(\.identifier, order: .forward)] // Sorting criteria
    var body: some View {
        Table(localeInfos, sortOrder: $order) { // Bind sorting criteria
            TableColumn("Identifier", value: \.identifier)
            TableColumn("Language", value: \.language)
                .width(min: 200, max: 300)
            TableColumn("Price", value: \.price) {
                Text("\($0.price)")
                    .foregroundColor($0.price > 4 ? .red : .green)
            }
            .width(50)
            TableColumn("Currency Code", value: \.currencyCode)
            TableColumn("Currency Symbol", value: \.currencySymbol)
        }
        .onChange(of: order) { newOrder in
            withAnimation {
                localeInfos.sort(using: newOrder) // Re-sort data when sorting criteria changes
            }
        }
        .task {
            localeInfos = prepareData()
            localeInfos.sort(using: order) // Initialize sorting
        }
        .scenePadding()
    }
}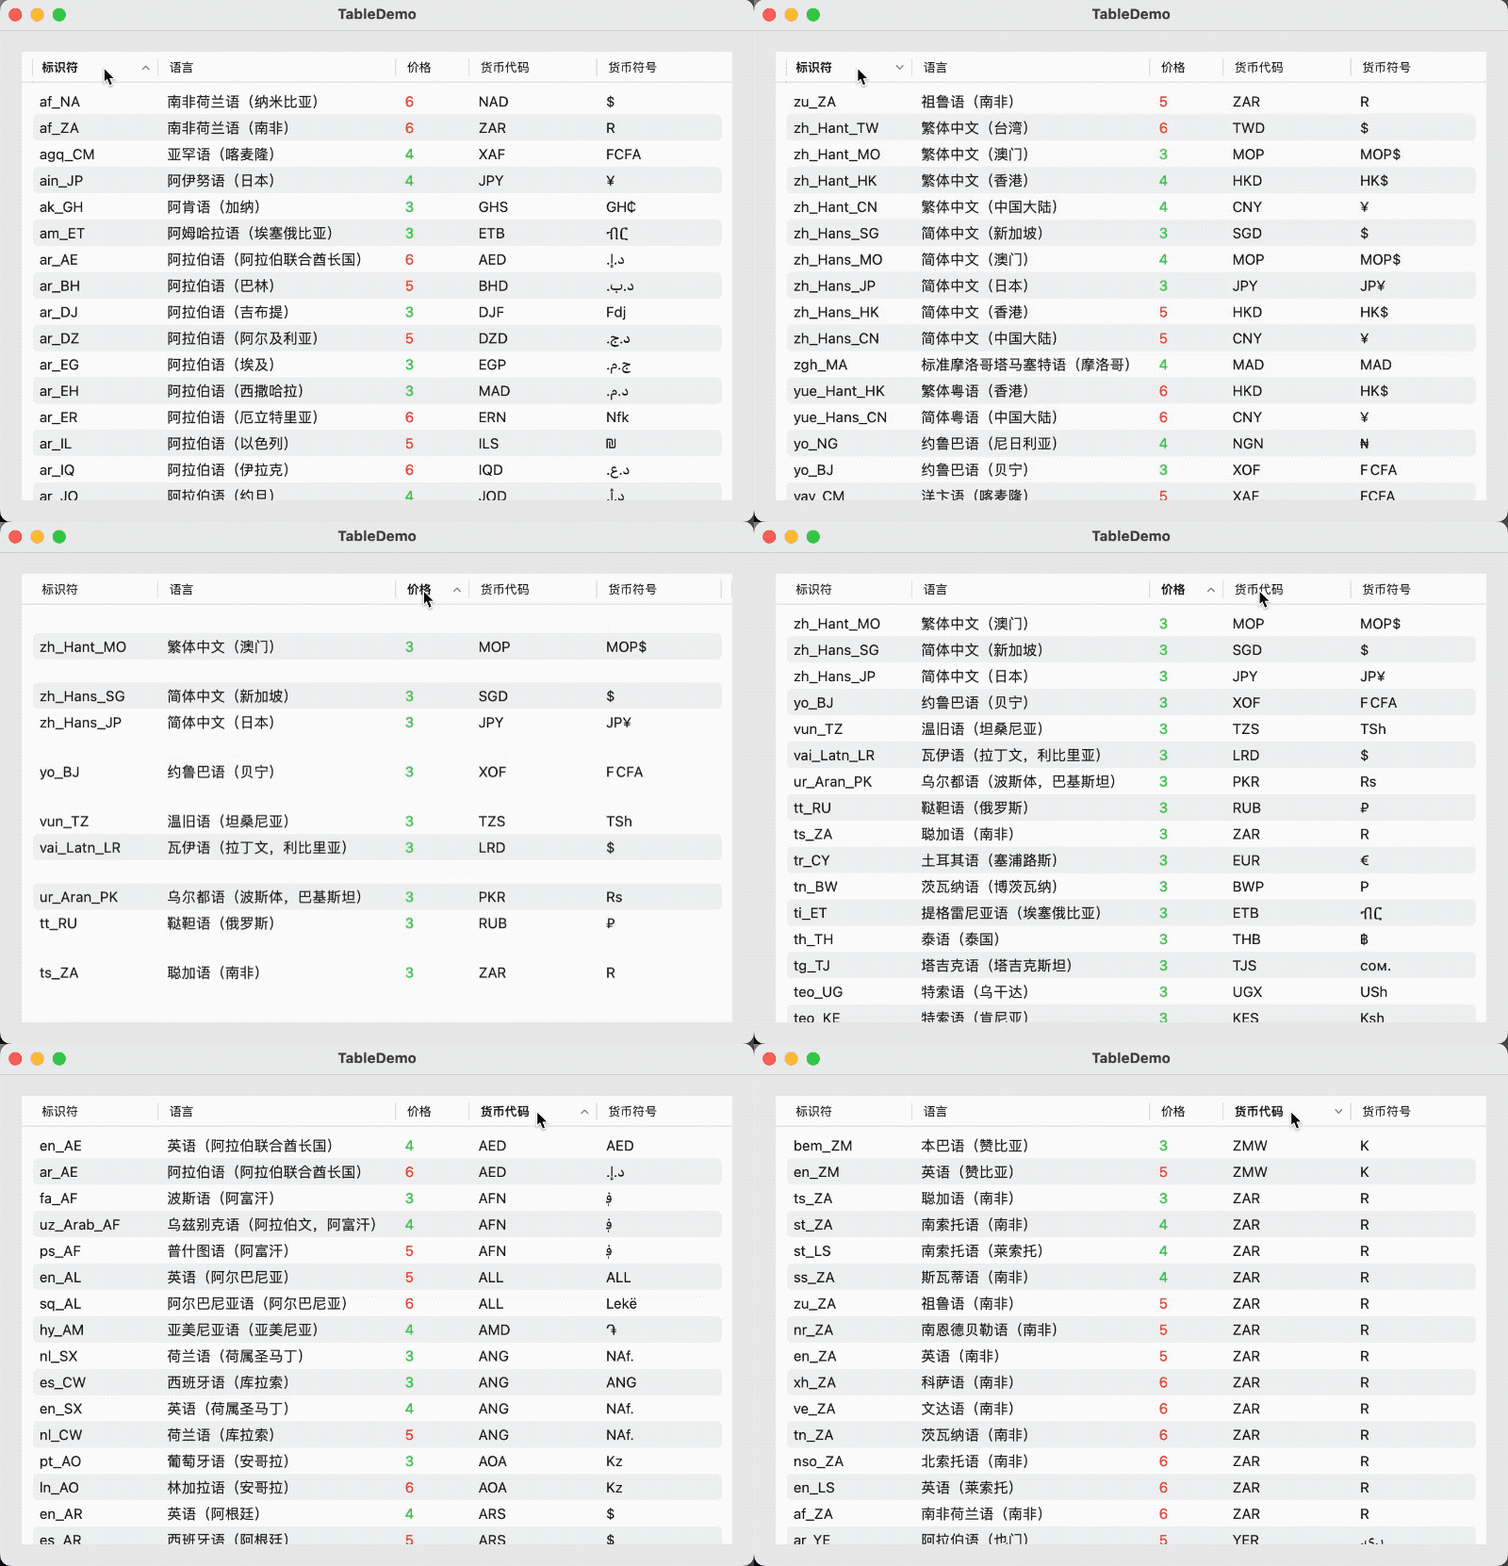
Table itself does not modify the data source. When a Table binds a sorting variable, clicking on a sortable column header will automatically change the content of the sorting variable. Developers still need to monitor changes in the sorting variable to sort.
Table requires the sorting variable to be an array that conforms to the SortComparator. In this example, we directly use the KeyPathComparator type provided by Swift.
If you don’t want a column to support sorting, simply avoid using the TableColumn constructor method that includes the value parameter, for example:
TableColumn("Currency Code", value: \.currencyCode) // Enable sorting based on this property
TableColumn("Currency Code"){ Text($0.currencyCode) } // Do not enable sorting based on this property

// Avoid using the following syntax when not binding a sorting variable. The application will not compile (and you will almost not receive an error prompt)
TableColumn("Price", value: \.currencyCode) {
    Text("\($0.price)")
        .foregroundColor($0.price > 4 ? .red : .green)
}
In the current beta version 14A5228q, enabling sorting on a column with a Bool property type will cause the application to fail to compile.
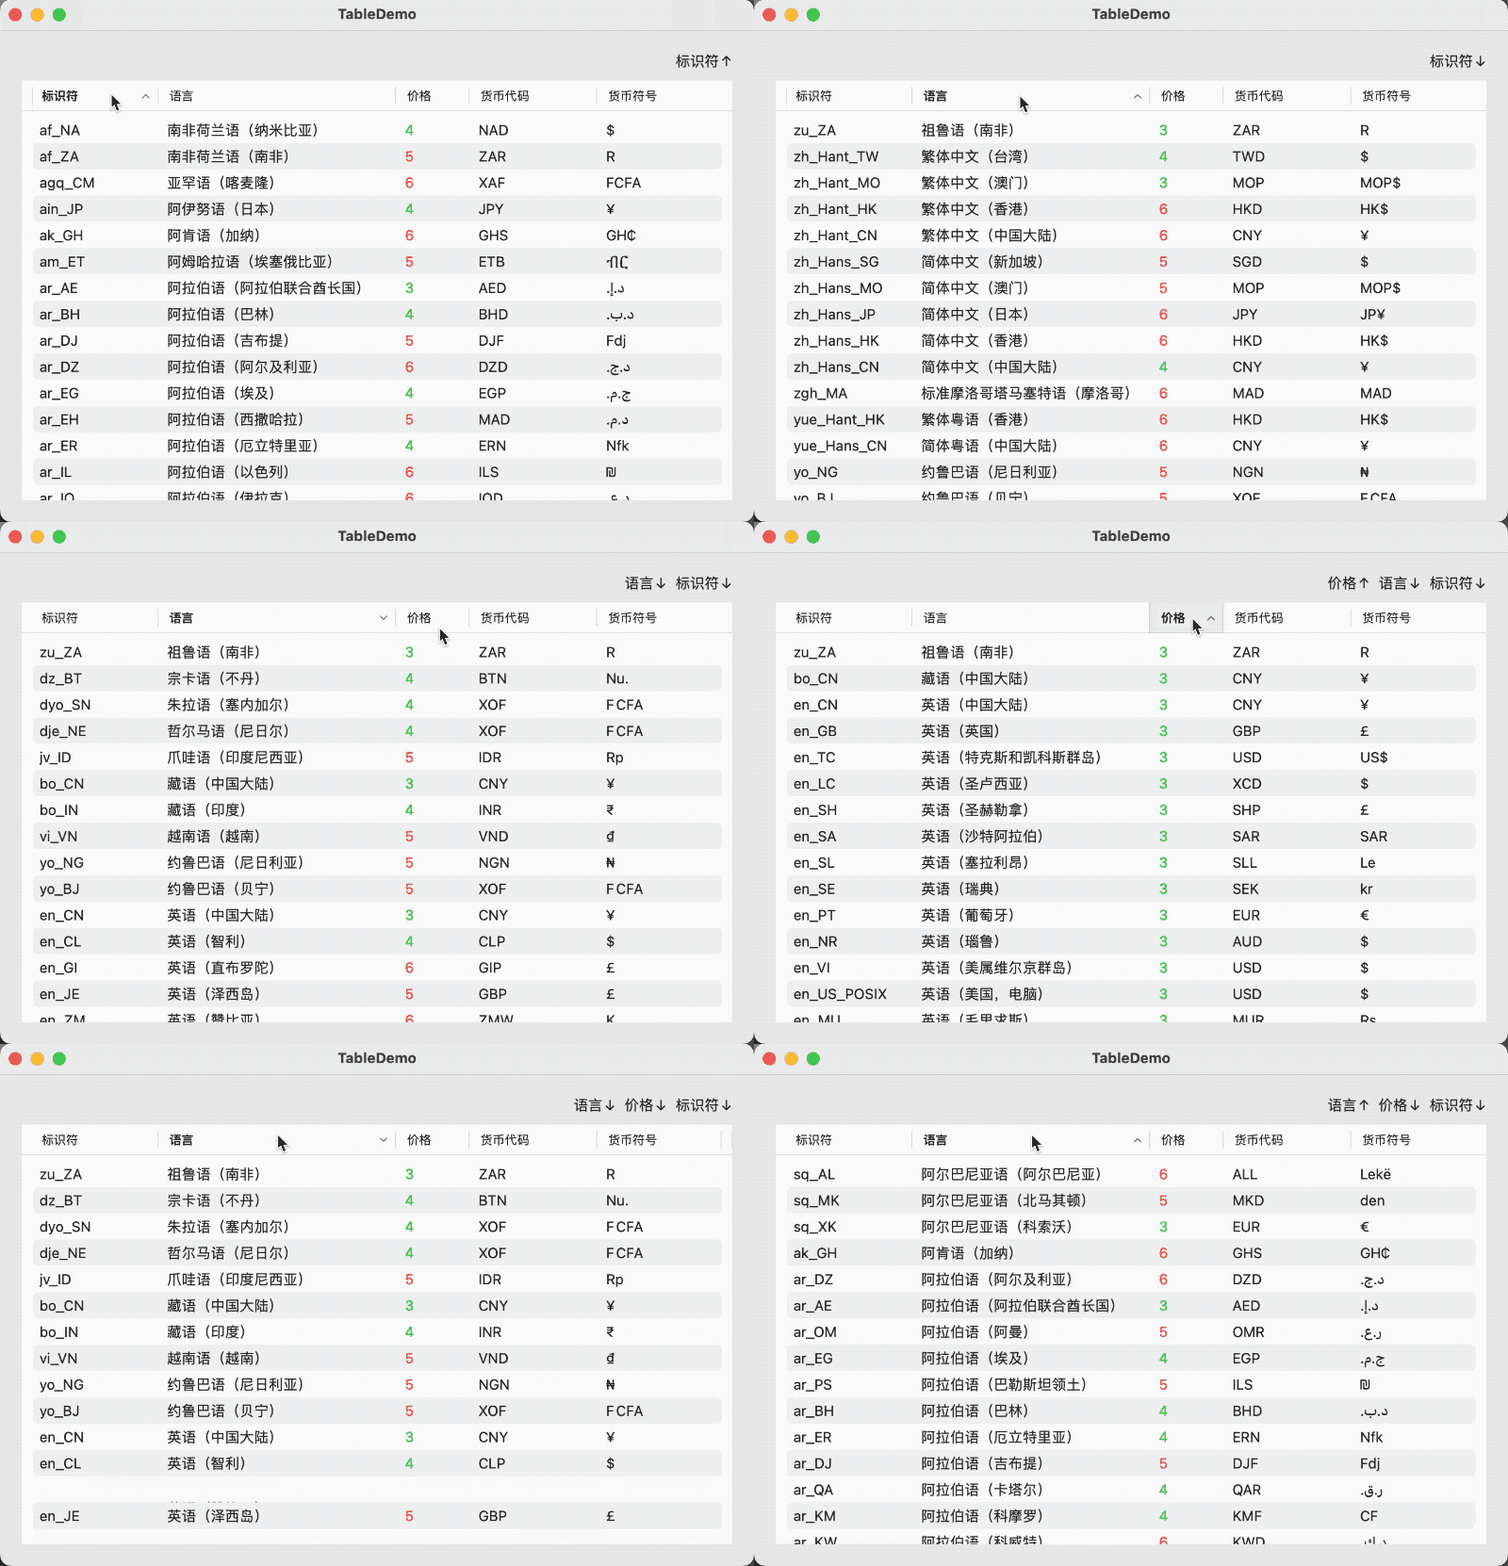
Although only one column header shows the sorting direction after clicking on a sortable column header, in fact, Table will add or organize the sorting order of the sorting variables based on the user’s clicking order. The following code clearly reflects this:
struct TableDemo: View {
    @State var localeInfos = [LocaleInfo]()
    @State var order: [KeyPathComparator<LocaleInfo>] = [.init(\.identifier, order: .forward)]
    var body: some View {
        VStack {
            sortKeyPathView() // Display the current sorting order
                .frame(minWidth: 0, maxWidth: .infinity, alignment: .trailing)
            Table(localeInfos, sortOrder: $order) {
                TableColumn("Identifier", value: \.identifier)
                TableColumn("Language", value: \.language)
                    .width(min: 200, max: 300)
                TableColumn("Price", value: \.price) {
                    Text("\($0.price)")
                        .foregroundColor($0.price > 4 ? .red : .green)


                }
                .width(50)
                TableColumn("Currency Code", value: \.currencyCode)
                TableColumn("Currency Symbol", value: \.currencySymbol)
            }
        }
        .onChange(of: order) { newOrder in
            withAnimation {
                localeInfos.sort(using: newOrder)
            }
        }
        .task {
            localeInfos = prepareData()
            localeInfos.sort(using: order)
        }
        .scenePadding()
    }

    func sortKeyPath() -> [String] {
        order
            .map {
                let keyPath = $0.keyPath
                let sortOrder = $0.order
                var keyPathString = ""
                switch keyPath {
                case \LocaleInfo.identifier:
                    keyPathString = "Identifier"
                case \LocaleInfo.language:
                    keyPathString = "Language"
                case \LocaleInfo.price:
                    keyPathString = "Price"
                case \LocaleInfo.currencyCode:
                    keyPathString = "Currency Code"
                case \LocaleInfo.currencySymbol:
                    keyPathString = "Currency Symbol"
                case \LocaleInfo.supported:
                    keyPathString = "Supported"
                case \LocaleInfo.updateDate:
                    keyPathString = "Date"
                default:
                    break
                }

                return keyPathString + (sortOrder == .reverse ? "↓" : "↑")
            }
    }

    @ViewBuilder
    func sortKeyPathView() -> some View {
        HStack {
            ForEach(sortKeyPath(), id: \.self) { sortKeyPath in
                Text(sortKeyPath)
            }
        }
    }
}
If you are concerned about performance issues with multi-attribute sorting (when dealing with large data volumes), you can use only the most recently created sorting condition:
.onChange(of: order) { newOrder in
    if let singleOrder = newOrder.first {
        withAnimation {
            localeInfos.sort(using: singleOrder)
        }
    }
}
When converting a SortComparator to a SortDescription (or NSSortDescription) for use with Core Data, do not use a Compare algorithm that Core Data does not support.
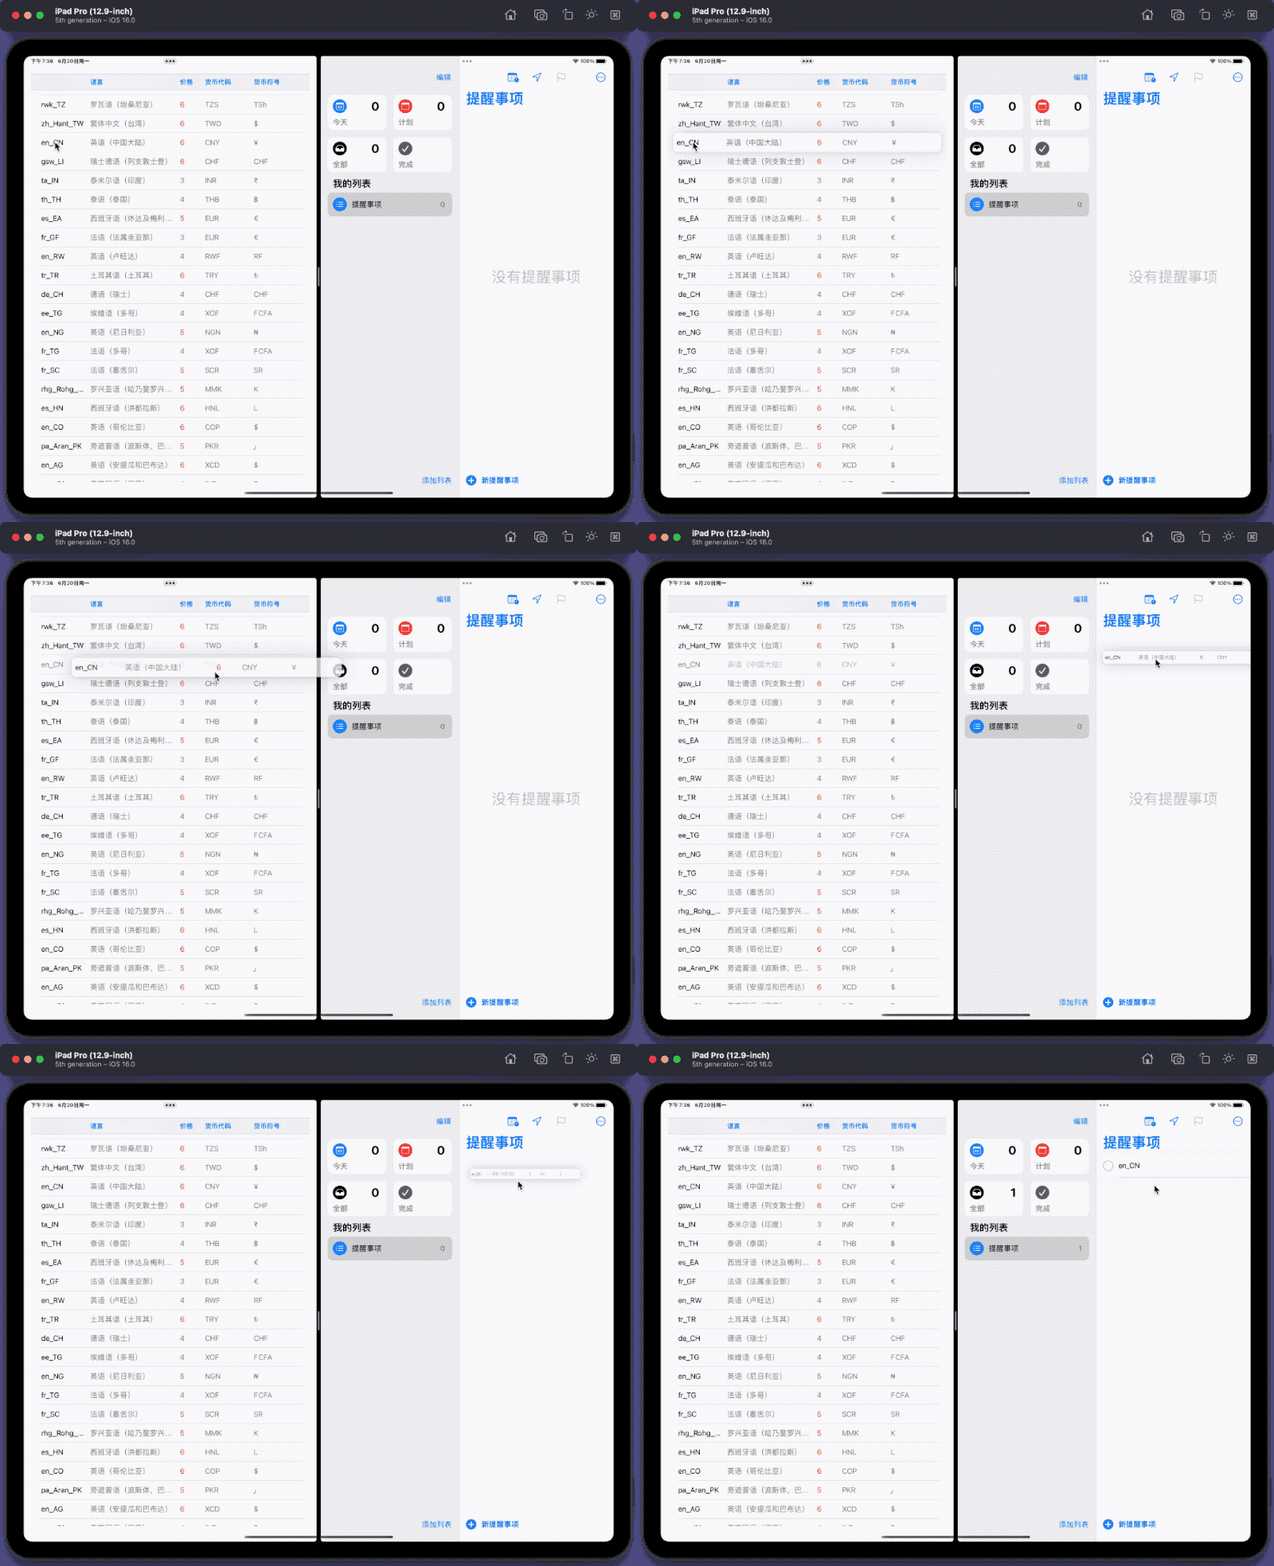
Drag and Drop
Table supports drag and drop at the row level. When enabling drag support, the simplified definition of Table cannot be used:
Table {
    TableColumn("Identifier", value: \.identifier)
    TableColumn("Language", value: \.language)
        .width(min: 200, max: 300)
    TableColumn("Price", value: \.price) {
        Text("\($0.price)")
            .foregroundColor($0.price > 4 ? .red : .green)
    }
    .width(50)
    TableColumn("Currency Code", value: \.currencyCode)
    TableColumn("Currency Symbol", value: \.currencySymbol)
} rows: {
    ForEach(localeInfos) { localeInfo in
        TableRow(localeInfo)
            .itemProvider {  // Enable Drag
                NSItemProvider(object: localeInfo.identifier as NSString)
            }
    }
}
Interactivity
In addition to row selection and drag-and-drop, Table also supports setting up context menus for rows (macOS 13+, iPadOS 16+):
ForEach(localeInfos) { localeInfo in
    TableRow(localeInfo)
        .contextMenu{
            Button("Edit"){}
            Button("Delete"){}
            Button("Share"){}
        }
}
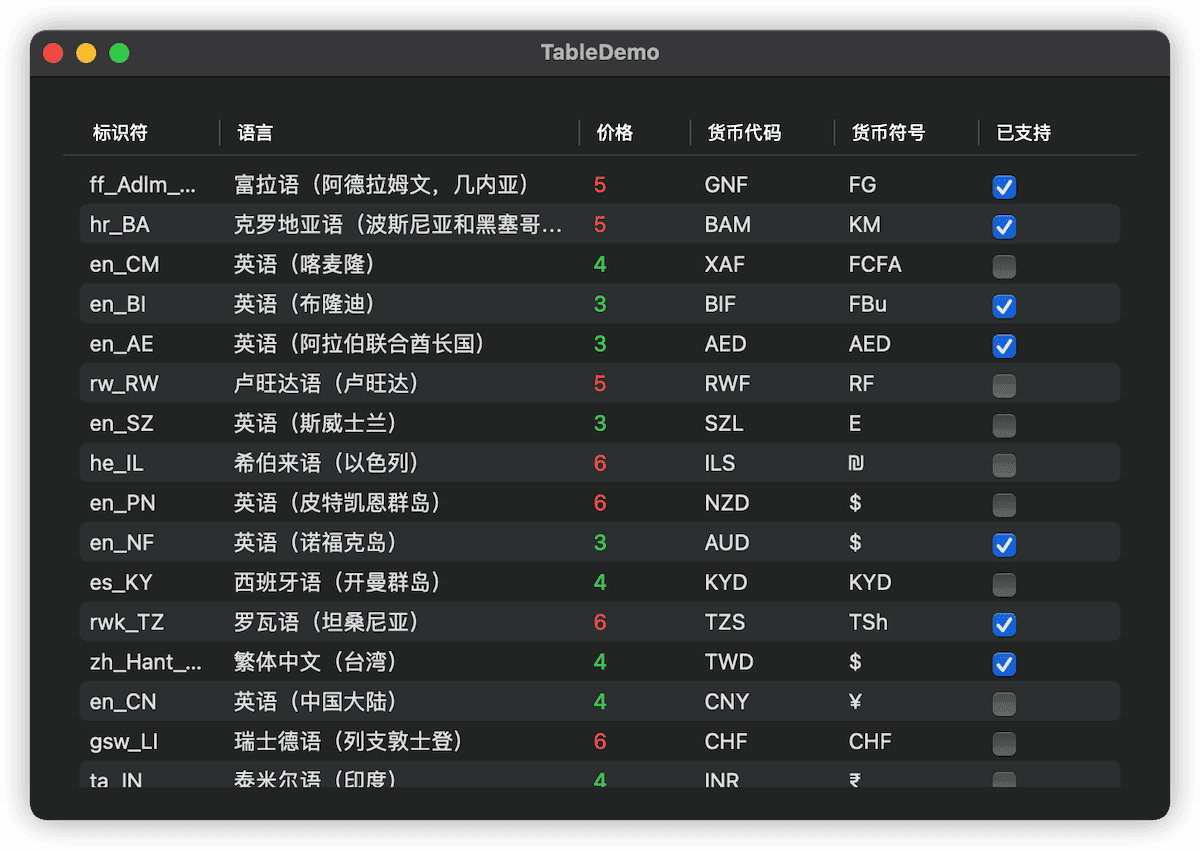
Creating interactive cells will greatly enhance the user experience of the table.
struct TableDemo: View {
    @State var localeInfos = [LocaleInfo]()
    var body: some View {
        VStack {
            Table(localeInfos) {
                TableColumn("Identifier", value: \.identifier)
                TableColumn("Language", value: \.language)
                    .width(min: 200, max: 300)
                TableColumn("Price") {
                    Text("\($0.price)")
                        .foregroundColor($0.price > 4 ? .red : .green)
                }
                .width(50)
                TableColumn("Currency Code", value: \.currencyCode)
                TableColumn("Currency Symbol", value: \.currencySymbol)
                TableColumn("Supported") {
                    supportedToggle(identifier: $0.identifier, supported: $0.supported)
                }
            }
        }
        .lineLimit(1)
        .task {
            localeInfos = prepareData()
        }
        .scenePadding()
    }

    @ViewBuilder
    func supportedToggle(identifier: String, supported: Bool) -> some View {
        let binding = Binding<Bool>(
            get: { supported },
            set: {
                if let id = localeInfos.firstIndex(where: { $0.identifier == identifier }) {
                    self.localeInfos[id].supported = $0
                }
            }
        )
        Toggle(isOn: binding, label: { Text("") })
    }
}
Pioneer or Martyr?
If you write code using Table in Xcode, there’s a high chance you’ll encounter issues with auto-suggestions not working. There might even be cases where the application fails to compile without clear error messages (the error occurs inside Table).
The main reason for these issues is that Apple did not adopt the common writing methods of other SwiftUI controls (native SwiftUI containers or wrapping UIKit controls). Instead, they innovatively used a result builder to write their own DSL for Table.
Perhaps due to the inefficiency of Table’s DSL (too many generics, too many constructors, two builders in one Table), the current version of Xcode struggles with handling Table code.
Additionally, since the definition of Table’s DSL is incomplete (lacking containers like Group), it currently supports only up to ten columns of data (for more details, refer to ViewBuilder Research: Creating a ViewBuilder imitation).
Perhaps learning from the lessons of Table’s DSL, SwiftUI Charts (also based on result builders) introduced at WWDC 2022 performs significantly better in Xcode than Table.
It is hoped that Apple will apply the lessons learned from Charts to Table, preventing pioneers from becoming martyrs.
Creating Tables on Other Platforms
Although Table can run on iPhones with iOS 16, it only displays the first column of data and is therefore not practically meaningful.
If you want to implement table functionality on platforms where Table is not supported or not fully supported (like iPhone), choose an appropriate alternative based on your needs:
-
For large data volumes that require lazy loading:
List, LazyVGrid
-
For row-based interactive operations (drag and drop, context menus, selection):
List (GridRow in Grid is not a true row)
-
For view rendering (saving as an image):
LazyVGrid, Grid
-
For fixed header rows:
List, LazyVGrid, Grid (e.g., using matchedGeometryEffect)
Conclusion
If you want to create interactive tables in SwiftUI with less code and clearer expression, consider trying Table. It is also hoped that Apple will improve the development efficiency of Table in Xcode in future versions and add more native features to Table.