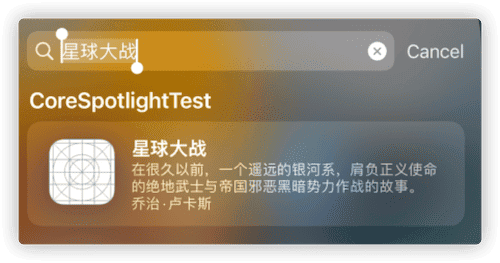
This article explains how to add your application’s Core Data to the Spotlight index using NSCoreDataSpotlightDelegate (version from WWDC 2021), making it easier for users to find and increasing your app’s visibility.
Basics
Spotlight
Since its introduction to iOS in 2009, after more than a decade of development, Spotlight has evolved from an official app search feature of the Apple system into a comprehensive functionality portal. User reliance on and usage of Spotlight has been continuously increasing.
Displaying data from your application in Spotlight can significantly increase the app’s visibility.
Core Spotlight
Starting with iOS 9, Apple introduced the Core Spotlight framework, allowing developers to add their app’s content to the Spotlight index for easy unified searching by users.
To create a Spotlight index for items in your app, the following steps are needed:
- Create a CSSearchableItemAttributeSet (attribute set) object, setting appropriate metadata (attributes) for the item you want to index.
- Create a CSSearchableItem (searchable item) object to represent the item. Each CSSearchableItem has a unique identifier for later reference (updating, deleting, rebuilding).
- Optionally, assign a domain identifier to the item, allowing you to organize multiple items together for easier management.
- Associate the created attribute set (CSSearchableItemAttributeSet) with the searchable item (CSSearchableItem).
- Add the searchable item to the system’s Spotlight index.
Developers also need to update the Spotlight index promptly when items in the app are modified or deleted, ensuring users always get valid search results.
NSUserActivity
NSUserActivity provides a lightweight way to describe your app’s state for later use. Create this object to capture information about what the user is doing, such as viewing app content, editing a document, browsing a web page, or watching a video.
When a user finds your app’s content data (searchable item) in Spotlight and clicks on it, the system launches the app and passes it an NSUserActivity object corresponding to the searchable item (activityType is CSSearchableItemActionType). The app can use the information in this object to restore itself to an appropriate state.
For example, if a user searches for an email in Spotlight and clicks on the result, the app will navigate directly to that email and display its details.
Process
Combining the above introductions to Core Spotlight and NSUserActivity, let’s briefly review the process with code snippets:
Creating a Searchable Item
import CoreSpotlight

let attributeSet = CSSearchableItemAttributeSet(contentType: .text)
attributeSet.displayName = "Star Wars"
attributeSet.contentDescription = "A story of Jedi Knights fighting against the evil forces of the Empire in a galaxy far, far away."

let searchableItem = CSSearchableItem(uniqueIdentifier: "starWar", domainIdentifier: "com.fatbobman.Movies.Sci-fi", attributeSet: attributeSet)
Adding to the Spotlight Index
        CSSearchableIndex.default().indexSearchableItems([searchableItem]){ error in
            if let error = error {
                print(error.localizedDescription)
            }
        }
Application Receiving NSUserActivity from Spotlight
SwiftUI life cycle
        .onContinueUserActivity(CSSearchableItemActionType){ userActivity in
            if let userinfo = userActivity.userInfo as? [String:Any] {
                let identifier = userinfo["kCSSearchableItemActivityIdentifier"] as? String ?? ""
                let queryString = userinfo["kCSSearchQueryString"] as? String ?? ""
                print(identifier,queryString)
            }
        }

// Output : starWar Star Wars
UIKit life cycle
    func scene(_ scene: UIScene, continue userActivity: NSUserActivity) {
        if userActivity.activityType == CSSearchableItemActionType {
            if let userinfo = userActivity.userInfo as? [String:Any] {
                let identifier = userinfo["kCSSearchableItemActivityIdentifier"] as? String ?? ""
                let queryString = userinfo["kCSSearchQueryString"] as? String ?? ""
                print(identifier,queryString)
            }
        }
    }
Updating the Spotlight Index
The method for updating the index is the same as for adding new items, but it’s crucial to keep the uniqueIdentifier consistent.
        let attributeSet = CSSearchableItemAttributeSet(contentType: .text)
        attributeSet.displayName = "Star Wars (Revised Edition)"
        attributeSet.contentDescription = "A tale of Jedi Knights battling against the dark forces of the Empire in a distant galaxy, long ago."
        attributeSet.artist = "George Lucas"

        let searchableItem = CSSearchableItem(uniqueIdentifier: "starWar", domainIdentifier: "com.fatbobman.Movies.Sci-fi", attributeSet: attributeSet)

        CSSearchableIndex.default().indexSearchableItems([searchableItem]){ error in
            if let error = error {
                print(error.localizedDescription)
            }
        }
Deleting Spotlight Indexes
- Delete items with a specific
uniqueIdentifier:
        CSSearchableIndex.default().deleteSearchableItems(withIdentifiers: ["starWar"]){ error in
            if let error = error {
                print(error.localizedDescription)
            }
}- Delete items with a specific domain identifier:
CSSearchableIndex.default().deleteSearchableItems(withDomainIdentifiers: ["com.fatbobman.Movies.Sci-fi"]){_ in }Deleting by domain identifier is recursive. The code above will delete all items in the Sci-fi group, while the following code will remove all movie data in the application:
CSSearchableIndex.default().deleteSearchableItems(withDomainIdentifiers: ["com.fatbobman.Movies"]){_ in }- Delete all index data in the application:
        CSSearchableIndex.default().deleteAllSearchableItems{ error in
            if let error = error {
                print(error.localizedDescription)
            }
        }
Implementing NSCoreDataCoreSpotlightDelegate
NSCoreDataCoreSpotlightDelegate provides a set of methods that support the integration of Core Data with Core Spotlight, significantly simplifying the task of creating and maintaining Core Data in Spotlight for developers.
In WWDC 2021, NSCoreDataCoreSpotlightDelegate was further upgraded. Through persistent history tracking, developers no longer need to manually maintain data updates and deletions. Any changes in Core Data will be promptly reflected in Spotlight.
Data Model Editor
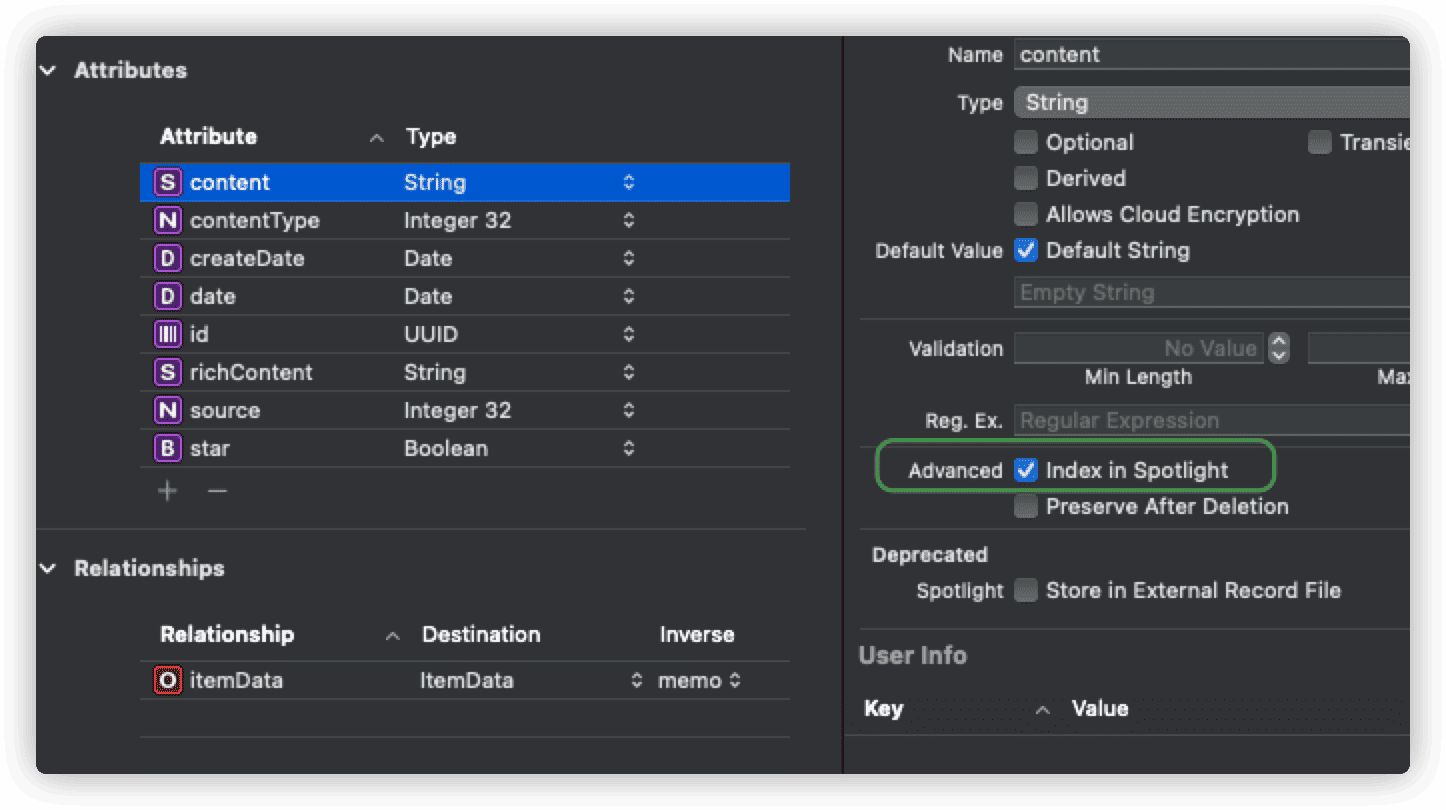
To index Core Data in Spotlight, you first need to mark the entities to be indexed in the data model editor.
- Only marked entities will be indexed.
- Indexing is triggered only when the properties of marked entities change.

For example, if you have several entities in your app and only want to index Movie, updating the index only when Movie’s title and description change, you just need to enable Index in Spotlight for title and description in the Movie entity.
Xcode 13 deprecated Store in External Record File and removed setting DisplayName in Data Model Editor.
NSCoreDataCoreSpotlightDelegate
When a marked entity record is updated (created, modified), Core Data calls the attributeSet method in NSCoreDataCoreSpotlightDelegate to try to get the corresponding searchable item and update the index.
public class DemoSpotlightDelegate: NSCoreDataCoreSpotlightDelegate {
    public override func domainIdentifier() -> String {
        return "com.fatbobman.CoreSpotlightDemo"
    }

    public override func attributeSet(for object: NSManagedObject) -> CSSearchableItemAttributeSet? {
        if let note = object as? Note {
            let attributeSet = CSSearchableItemAttributeSet(contentType: .text)
            attributeSet.identifier = "note." + note.viewModel.id.uuidString
            attributeSet.displayName = note.viewModel.name
            return attributeSet
        } else if let item = object as? Item {
            let attributeSet = CSSearchableItemAttributeSet(contentType: .text)
            attributeSet.identifier = "item." + item.viewModel.id.uuidString
            attributeSet.displayName = item.viewModel.name
            attributeSet.contentDescription = item.viewModel.descriptioinContent
            return attributeSet
        }
        return nil
    }
}- If your application needs to index multiple entities, you need to determine the specific type of managed object first in
attributeSet, then create the corresponding searchable item data. - For specific data, even if marked as indexable, it can be excluded from the index by returning nil in attributeSet.
- It’s advisable to set the identifier in a way that
correlates with your record (identifier is metadata, not the uniqueIdentifier of CSSearchableItem), making it easier to use it in later code.
- If a domain identifier is not specifically designated, the system defaults to using the Core Data persistent store identifier.
- When a data record is deleted from the application, Core Data automatically removes its corresponding searchable item from Spotlight.
CSSearchableItemAttributeSet has many available metadata properties. For example, you can add thumbnails (
thumbnailData) or allow users to directly dial phone numbers from the record (setphoneNumbersandsupportsPhoneCallrespectively). For more information, see the official documentation.
CoreDataStack
To enable NSCoreDataCoreSpotlightDelegate in Core Data, there are two prerequisites:
- The persistence store type must be SQLite.
- Persistent History Tracking must be enabled.
Thus, your Core Data Stack should use code similar to the following:
class CoreDataStack {
    static let shared = CoreDataStack()

    let container: NSPersistentContainer
    let spotlightDelegate:NSCoreDataCoreSpotlightDelegate

    init() {
        container = NSPersistentContainer(name: "CoreSpotlightDelegateDemo")
        guard let description = container.persistentStoreDescriptions.first else {
                    fatalError("###\(#function): Failed to retrieve a persistent store description.")
        }

        // Enable Persistent History Tracking
        description.setOption(true as NSNumber, forKey: NSPersistentStoreRemoteChangeNotificationPostOptionKey)
        description.setOption(true as NSNumber, forKey: NSPersistentHistoryTrackingKey)

        container.loadPersistentStores(completionHandler: { (storeDescription, error) in
            if let error = error as NSError? {
                fatalError("Unresolved error \(error), \(error.userInfo)")
            }
        })

        // Create the index delegate
        self.spotlightDelegate = NSCoreDataCoreSpotlightDelegate(forStoreWith: description, coordinator: container.persistentStoreCoordinator)

        // Start automatic indexing
        spotlightDelegate.startSpotlightIndexing()
    }
}
For applications already in production, the first launch after adding NSCoreDataCoreSpotlightDelegate will automatically add eligible (marked) data to the Spotlight index.
Note: The above code only enables Persistent History Tracking and does not regularly clean up expired data. Over time, this can lead to data bloat and reduced performance. For more on Persistent History Tracking in Core Data, read Using Persistent History Tracking in CoreData.
Stopping and Deleting Indexes
To rebuild the index, you should first stop and then delete the index.
       stack.spotlightDelegate.stopSpotlightIndexing()
       stack.spotlightDelegate.deleteSpotlightIndex{ error in
           if let error = error {
                  print(error)
           }
       }
Alternatively, you can use the methods described above to delete index contents more precisely using CSSearchableIndex.
onContinueUserActivity
NSCoreDataCoreSpotlight uses the managed object’s URI as the uniqueIdentifier when creating CSSearchableItem. Therefore, when a user clicks on a search result in Spotlight, we can retrieve this URI from the userinfo of the NSUserActivity passed to the application.
Since the NSUserActivity passed to the application only provides limited information (contentAttributeSet is empty), we can only rely on this URI to determine the corresponding managed object.
SwiftUI offers a convenient method onContinueUserActivity to handle the system-provided NSUserActivity.
import SwiftUI
import CoreSpotlight
@main
struct CoreSpotlightDelegateDemoApp: App {
    let persistenceController = PersistenceController.shared

    var body: some Scene {
        WindowGroup {
            ContentView()
                .environment(\.managedObjectContext, persistenceController.container.viewContext)
                .onContinueUserActivity(CSSearchableItemActionType, perform: { na in
                    if let userinfo = na.userInfo as? [String:Any] {
                        if let identifier = userinfo["kCSSearchableItemActivityIdentifier"] as? String {
                            let uri = URL(string:identifier)!
                            let container = persistenceController.container
                            if let objectID = container.persistentStoreCoordinator.managedObjectID(forURIRepresentation: uri) {
                            if let note = container.viewContext.object(with: objectID) as? Note {
                                // Switch to the state corresponding to note
                            } else if let item = container.viewContext.object(with: objectID) as? Item {
                               // Switch to the state corresponding to item
                            }
                        }
                    }
                })
        }
    }
}- Retrieve the
uniqueIdentifier(Core Data data URI) from thekCSSearchableItemActivityIdentifierkey in userinfo. - Convert the URI to NSManagedObjectID.
- Obtain the managed object using objectID.
- Set the application to the corresponding state based on the managed object.
Personally, I’m not a fan of embedding logic for handling NSUserActivity into view code. If you prefer handling NSUserActivity in UIWindowSceneDelegate, refer to the usage in Core Data with CloudKit: Sharing Data in the iCloud.
CSSearchQuery
CoreSpotlight also offers a way to query Spotlight within the application. By creating a CSSearchQuery, developers can search for data already indexed by their application in Spotlight.
    func getSearchResult(_ keyword: String) {
        let escapedString = keyword.replacingOccurrences(of: "\\", with: "\\\\").replacingOccurrences(of: "\"", with: "\\\"")
        let queryString = "(displayName == \"*" + escapedString + "*\"cd)"
        let searchQuery = CSSearchQuery(queryString: queryString, attributes: ["displayName", "contentDescription"])
        var spotlightFoundItems = [CSSearchableItem]()
        searchQuery.foundItemsHandler = { items in
            spotlightFoundItems.append(contentsOf: items)
        }

        searchQuery.completionHandler = { error in
            if let error = error {
                print(error.localizedDescription)
            }
            spotlightFoundItems.forEach { item in
                //  do something
            }
        }

        searchQuery.start()
}- The search keyword needs to be safely processed, with escaping of
\. - The
queryStringfollows a similar format to NSPredicate. For example, the code above searches for data wheredisplayNamecontains the keyword, case and diacritic insensitive. For more details, see the official documentation. - The
attributesspecify which properties of the CSSearchableItem (e.g., out of ten metadata contents, only two are returned in the settings) are needed. - When search results are found, the
foundItemsHandlerclosure is called. - Once configured, start the query with
searchQuery.start().
For applications using Core Data, querying directly through Core Data might be a better approach.
Considerations
Expiration Date
By default, the expiration date (expirationDate) for a CSSearchableItem is set to 30 days. This means if data is added to the index and undergoes no changes (i.e., updates to the index) within 30 days, it will no longer be searchable in Spotlight after this period.
There are two solutions to this:
-
Regularly rebuild the Spotlight index of Core Data data.
This involves stopping the index, deleting the index, and then restarting the index.
-
Add an expiration date metadata to CSSearchableItemAttributeSet.
Normally, we can set an expiration date for NSUserActivity and associate it with CSSearchableItemAttributeSet. However, in NSCoreDataCoreSpotlightDelegate, only CSSearchableItemAttributeSet can be set.
The official documentation does not explicitly mention the expiration date attribute for CSSearchableItemAttributeSet, so the following method’s efficacy cannot be guaranteed indefinitely.
        if let note = object as? Note {
            let attributeSet = CSSearchableItemAttributeSet(contentType: .text)
            attributeSet.identifier = "note." + note.viewModel.id.uuidString
            attributeSet.displayName = note.viewModel.name
            attributeSet.setValue(Date.distantFuture, forKey: "expirationDate")
            return attributeSet
        }
Using
setValueautomatically sets_kMDItemExpirationDatein CSSearchableItemAttributeSet to4001-01-01, and Spotlight will set the_kMDItemExpirationDatetime as theexpirationDateof NSUserActivity.
Fuzzy Search
Spotlight supports fuzzy search. For example, entering xingqiu might display “Star Wars” in the search results. However, Apple has not provided the capability for fuzzy searches in CSSearchQuery. If you want to offer a Spotlight-like experience within your app, it is better to implement it through your own code in Core Data.
Additionally, Spotlight’s fuzzy search only works with displayName, not contentDescription.
Character Limit
Metadata in CSSearchableItemAttributeSet is meant to describe records and is not suitable for storing large amounts of data. Currently, the maximum number of characters supported for contentDescription is 300. If your content is extensive, it’s best to extract the most useful information for the user.
Limit on Number of Searchable Items
The number of searchable items for an app should be kept within a few thousand. Exceeding this limit can severely affect search performance.
Conclusion
It is hoped that more applications will recognize the importance of Spotlight and make their way to this essential entry point for device applications.