SwiftUI offers powerful layout capabilities, but these operations are performed between views. When we want to mix text and images within a Text view, a different approach and set of operations are required compared to layout views. This article will first introduce some knowledge related to Text and, through a practical example, outline the methods to achieve text and image mixing within Text in SwiftUI.
Update June 2024: At WWDC 2024, SwiftUI introduced the
TextRendererprotocol, providing us with a new solution. I have included it as the fourth approach at the end of the article.
Single and Multiple Texts
In SwiftUI, Text is one of the most frequently used components, handling nearly all text display operations. As SwiftUI evolves, the capabilities of Text continue to expand. Besides basic textual content, it also supports AttributedString, Image (to a limited extent), and Formatter among other types.
If a Text view cannot display all its content within a given recommended width, it will wrap the text to multiple lines to ensure content integrity, provided the height allows it (either unrestricted height or line numbers). A key requirement for this feature is that line wrapping occurs within a single Text view. In the code below, although we arrange Text views horizontally in a layout container, SwiftUI treats them as multiple Text views (a group), applying line wrapping to each separately:
struct TempView: View {
    let str = "The way that can be told is not the eternal Way; the name that can be named is not the eternal Name."
    var body: some View {
        HStack {
            Text(str)
        }
        .padding()
    }
}
SwiftUI offers two methods to combine multiple Text views into a single Text:
- By using
LocalizedStringKeyinterpolation:
HStack {
    let a = Text(str)
    let b = Text(str)
    let c = Text(str)
    Text("\(a) \(b) \(c)")
}
We can add not only Text but also Image, Date, and many other types through interpolation. Wei Wang extensively discussed this in the article “Interpolation and Localization in SwiftUI’s Text”.
Note: From the second interpolated
Textelement onwards, a space must be added before the interpolation symbol\(, otherwise display anomalies occur (this has been a bug across multiple versions). Try changing the code fromText("\(a) \(b) \(c)")toText("\(a)\(b)\(c)")to replicate this error.
- By using the addition operator:
HStack {
    let a = Text(str)
    let b = Text(str)
    let c = Text(str)
    a + b + c
}
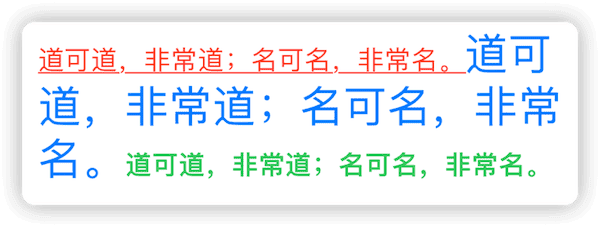
Addition operations can only occur between Text types. This means that when configuring parts of a Text, we can only use modifiers that do not change the Text type (this principle also applies to merges done via interpolation), such as:
HStack {
    let a = Text(str)
        .foregroundColor(.red) // Text-specific version, does not change Text type
        .underline() // Does not change Text type
//      .background(Color.yellow) // Background is a modifier for the View protocol, changes Text type, and cannot be used
    let b = Text(str)
        .foregroundColor(.blue)
        .font(.title)
    let c = Text(str)
        .foregroundColor(.green)
        .bold()
    a + b + c
}
If you frequently need to create complex text compositions, you can simplify the process by creating a result builder:
@resultBuilder
enum TextBuilder {
    static func buildBlock(_ components: Text...) -> Text {
        components.reduce(Text(""), +)
    }
}
With this builder, we can more clearly and quickly assemble complex texts:
@TextBuilder
func textBuilder() -> Text {
    Text(str)
        .foregroundColor(.red)
        .underline()
    Text(str)
        .foregroundColor(.blue)
        .font(.title)
    Text(str)
        .foregroundColor(.green)
        .bold()
}
For more about result builders, read the article “ViewBuilder Research: Mastering Result Builders”. Note: Starting with Xcode 26, the approach of using the addition operator on Text has been officially deprecated.
Using SF Symbols in Text
SF Symbols is a generous gift from Apple to developers, allowing nearly free use of a vast library of professionally designed icons within the Apple ecosystem. As of 2022, SF Symbols boasts over 4,000 symbols, each available in nine weights and three scales, and can automatically align with text labels.
In SwiftUI, we display SF Symbols using the Image view and can apply various modifiers to configure them:
Image(systemName: "ladybug")
    .symbolRenderingMode(.multicolor) // Specifies the rendering mode, a modifier specific to `Image`, does not change the type of `Image`
    .symbolVariant(.fill) // Sets the variant, a modifier applicable to the View protocol, changes the type of `Image`
    .font(.largeTitle) // A modifier applicable to View, not specific to `Text`
SF Symbols are seamlessly integrated with Apple’s system font San Francisco, and Text treats them as regular text during layout. The two methods described above are applicable for adding SF Symbols to Text:
let bug = Image(systemName: "ladybug.fill") // To maintain type stability, the symbolVariant changes the `Image` type, so we include the variant directly in the name
    .symbolRenderingMode(.multicolor) // Specifies the rendering mode, a modifier specific to `Image`, does not change the type
let bugText = Text(bug)
    .font(.largeTitle) // A `Text` specific version, does not change the type of `Text`

// Using interpolation
Text("Hello \(bug)") // Using `Image` type in interpolation, since `font` changes the type of `Image`, the size of `bug` cannot be individually modified

Text("Hello \(bugText)") // Using `Text` in interpolation, `font` (a `Text` specific modifier) does not change the type of `Text`, allowing individual adjustment of `bug`'s size

// Using the addition operator
Text("Hello ") + bugText 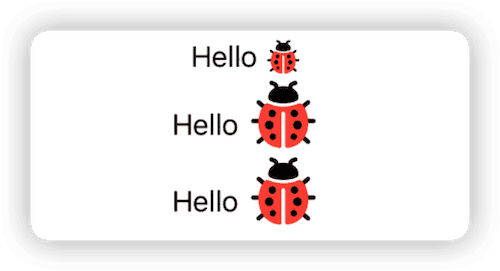
It’s clear that the functionality to directly use the Image type within Text is primarily provided for SF Symbols. Where possible, combining Text + SF Symbols to achieve text-image mixing is the best solution.
struct SymbolInTextView: View {
    @State private var value: Double = 0
    private let message = Image(systemName: "message.badge.filled.fill")
        .renderingMode(.original)
    private let wifi = Image(systemName: "wifi")
    private var animatableWifi: Image {
        Image(systemName: "wifi", variableValue: value)
    }

    var body: some View {
        VStack(spacing:50) {
            VStack {
                Text(message).font(.title) + Text("Text mixed with SF Symbols. \(wifi) Text treats the interpolated images as part of the text.") + Text(animatableWifi).foregroundColor(.blue)
            }
        }
        .task(changeVariableValue)
        .frame(width:300)
    }

    @Sendable
    func changeVariableValue() async {
        while !Task.isCancelled {
            if value >= 1 { value = 0 }
            try? await Task.sleep(nanoseconds: 1000000000)
            value += 0.25
        }
    }
}
Although we can use the SF Symbols app to modify or create custom symbols, due to limitations in color, scale, and more, SF Symbols often cannot meet all needs. In such cases, we need to use actual Image views for text-image mixing.
VStack {
    let logo = Image("logo")  // logo is an 80 x 28 size image, with the default height for title being 28

    Text("Welcome to visit \(logo)!")
        .font(.title)

    Text("Welcome to visit \(logo)!")
        .font(.body)
}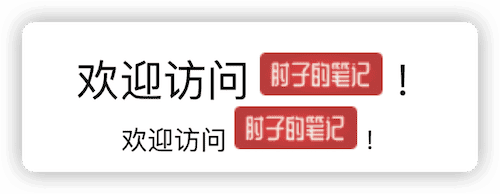
When using real Image (not SF Symbols) in Text, the Text can only render images at their original size (SVG
, PDF use annotated sizes), and the image size does not change with the font size.
Moreover, because the textBaseline of an Image (not SF Symbols) by default aligns with its bottom, this causes misalignment with other text when mixed within Text. We can adjust this using the Text specific version of the baselineOffset modifier.
let logo = Text(Image("logo")).baselineOffset(-3) // A `Text` version of the modifier, does not change `Text` type, using `alignmentGuide` for modifications changes the type

Text("Welcome to visit \(logo)!")
    .font(.title)
For more about baseline alignment, read the article “Alignment in SwiftUI: Everything You Need to Know”.
To reiterate, we can only use modifiers that do not change the type of Text or Image. Modifiers like frame, scaleEffect, scaleToFit, alignmentGuide, which change the type state, will prevent text interpolation and addition operations!
Thus, to perfectly match views with text, we need to prepare views of varying sizes for different text sizes.
Dynamic Type (Automatic Font Scaling)
Apple has consistently endeavored to enhance user experience within its ecosystem, considering factors such as the distance between users and their displays, visibility, motion, and ambient lighting conditions. To this end, Apple has introduced the Dynamic Type feature to improve content readability.
Dynamic Type allows users to adjust the size of text displayed on their devices. It helps those who need larger text for better readability and accommodates those who prefer smaller text to display more information on the screen. Applications that support Dynamic Type also offer a more consistent reading experience for users.
Users can change the text size for individual or all apps via the Control Center or by navigating to Settings → Accessibility → Display & Text Size → Larger Text.
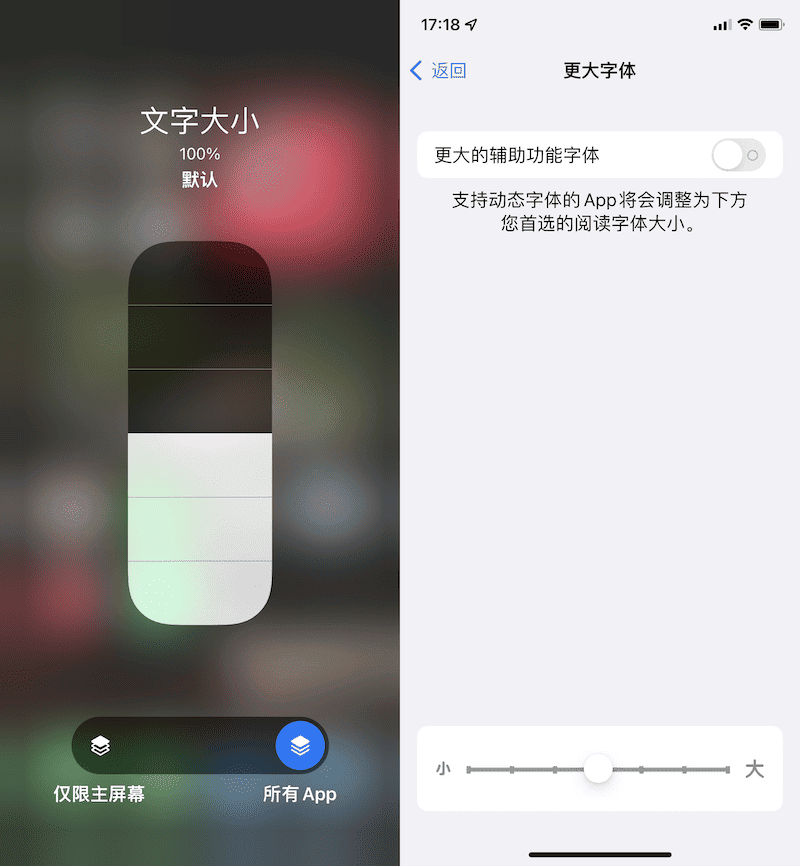
Starting with Xcode 14, developers can quickly check how views appear under different Dynamic Types in the preview.
Text("Welcome to visit \(logo)!")
    .font(.title)  // The size of the title varies with different dynamic modes.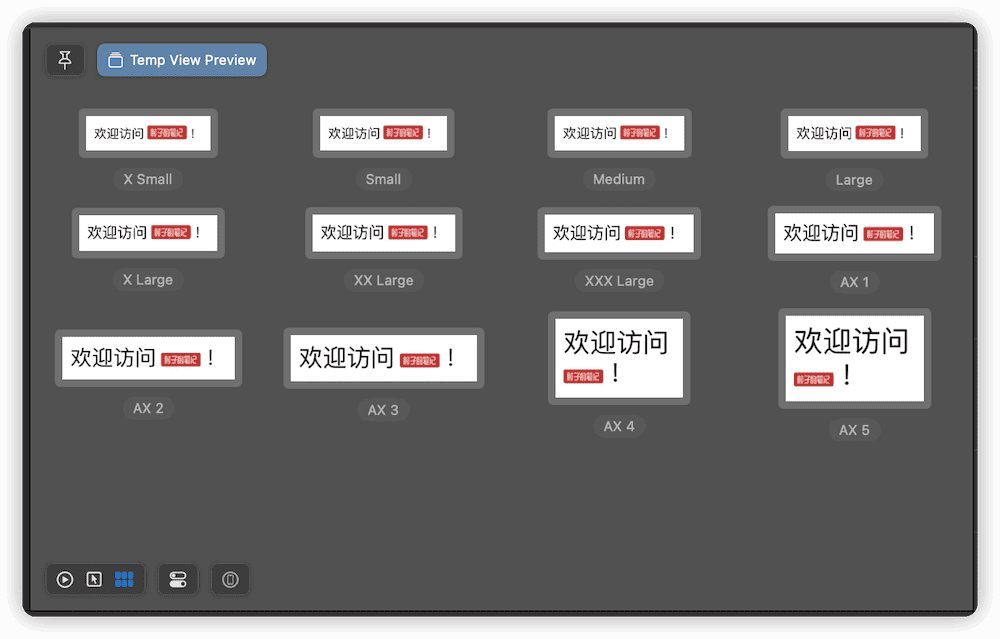
In SwiftUI, unless specifically configured otherwise, the size of all fonts will change with the dynamic type. As shown in the image above, dynamic type only affects text; the size of images within Text does not change.
When using Text for text-image mixing, if the images cannot adapt to text size changes, the results will be as shown in the image above. Therefore, we must find a way to make image sizes also adapt automatically to dynamic type changes.
The @ScaledMetric property wrapper provided by SwiftUI allows for values that automatically scale with dynamic types. The relativeTo parameter aligns the scaling value with the size variation curve of a specific text style.
@ScaledMetric(relativeTo: .body) var imageSize = 17 Different text styles (Text Style) have unique size variation curves in response to dynamic type changes. For more details, please read Apple’s design documentation.
struct TempView: View {
    @ScaledMetric(relativeTo:.body) var height = 17 // Default height for the body style
    var body: some View {
        VStack {
            Image("logo")
                .resizable()
                .aspectRatio(contentMode: .fit)
                .frame(height: height)

            Text("Welcome to visit!")
                .font(.body)
        }
        .padding()
    }
}
The code above links the height of the image to the .body text style size through ScaledMetric, so when the dynamic type changes, the size of the image adjusts accordingly.
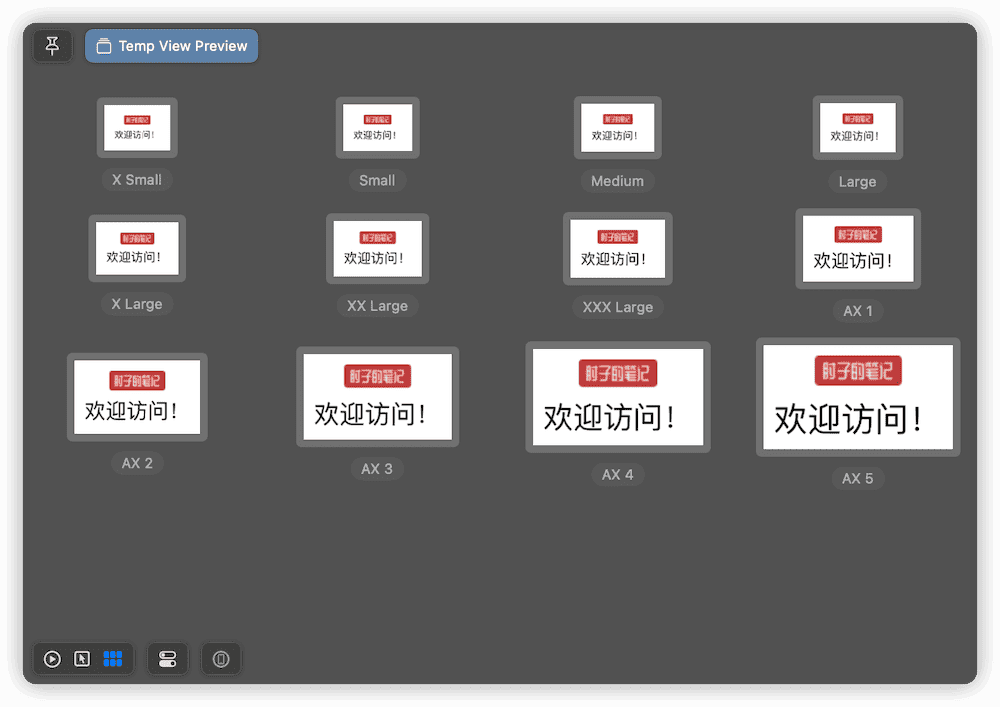
Unfortunately, since frame changes the type of Image, we cannot embed an image that has been dynamically resized with frame into Text to achieve dynamic text-image mixing.
Using .dynamicTypeSize(DynamicTypeSize.xSmall...DynamicTypeSize.xxxLarge) allows the view to change only within the specified dynamic type range.
Setting a custom size with .font(custom(_ name: String, size: CGFloat)) will automatically adjust the font size when the dynamic type changes.
Using .font(custom(_ name: String, size: CGFloat, relativeTo textStyle: Font.TextStyle)) links the custom font size to the dynamic type size variation curve of a predefined text style.
Using .font(custom(_ name: String, fixedSize: CGFloat)) makes the custom-sized font ignore dynamic type changes, maintaining a constant size.
A Challenge with Text-Image Mixing
A few days ago in a chat room, a friend asked if SwiftUI could achieve the layout effect shown in the image below, which combines tags (supermarket labels) with product descriptions. I initially replied that it would not be a problem, but I realized upon further consideration that the situation was not so simple.

- The use of rounded backgrounds for the tags means that solutions based on AttributedString are excluded.
- The specific size and content of the tags mean that solutions based on custom SF Symbols are excluded.
- Mixing text and images in Text, considering how to handle changes in dynamic type (it’s not feasible to pre-generate images of so many sizes).
- Whether it is possible to solve the current problem without using pre-fabricated label images (using dynamic views).
In the following sections, I will provide three approaches and corresponding code to implement the current requirements using different methods.
Due to space limitations, the following text will not provide a detailed explanation of the example code. I recommend you read the content in conjunction with the example code provided with this article. Running the example code from Xcode, dynamically created images might not display immediately (this is an issue with Xcode). Running it directly from the simulator or a real device will not have this delay.
Approach One: Direct Use of Images in Text
Solution Strategy for Approach One
Since providing images of different sizes for various dynamic types can satisfy the requirements for text-image mixing in Text, Approach One is based on this. It involves automatically scaling the given pre-fabricated images proportionally as the dynamic type changes.
- Obtain label images from an application or the internet.
- Scale the images to match the size of the associated text style when the dynamic type changes.
VStack(alignment: .leading, spacing: 50) {
    TitleWithImage(title: "佳农 马来西亚冷冻 猫山王浏览果肉 D197", fontStyle: .body, tagName: "JD_Tag")
    TitleWithImage(title: "佳农 马来西亚冷冻 猫山王浏览果肉 D197", fontStyle: .body, tagName: "JD_Tag")
        .environment(\.sizeCategory, .extraExtraExtraLarge)
}
Considerations for Approach One
- To ensure quality after scaling, SVG format is used in the example.
- Given that SwiftUI’s image scaling modifiers change types, scaling operations will use UIGraphicsImageRenderer for UIImage.
extension UIImage {
    func resized(to size: CGSize) -> UIImage {
        return UIGraphicsImageRenderer(size: size).image { _ in
            draw(in: CGRect(origin: .zero, size: size))
        }
    }
}- Since
UIFont.preferredFontis used to obtain the size of the Text Style, the Text Style parameter uses the UIFont.TextStyle type. - The initial height of the Image is aligned with the given Text Style, and changes in size are kept synchronized using @ScaledMetric.
let uiFont = UIFont.preferredFont(forTextStyle: fontStyle)
pointSize = uiFont.pointSize
textStyle = Font.TextStyle.convert(from: fontStyle)
_fontSize = ScaledMetric(wrappedValue: pointSize, relativeTo: textStyle)- Use
.font(.custom("", size: pointSize, relativeTo: textStyle))to set the font size and link it to the specified Text Style. - Properly use the task modifier to ensure that size scaling operations are performed in the background, reducing the impact on the main thread.
@Sendable
func resizeImage() async {
    if var image = UIImage(named: tagName) {
        let aspectRatio = image.size.width / image.size.height
        let newSize = CGSize(width: aspectRatio * fontSize, height: fontSize)
        image = image.resized(to: newSize)
        tagImage = Image(uiImage: image)
    }
}

.task(id: fontSize, resizeImage)- Modify the text baseline of the image using baselineOffset. Offset values should be fine-tuned according to different dynamic types (the example code uses a fixed value due to my laziness).
Pros and Cons of Approach One
-
The approach is simple and easy to implement.
-
As images need to be pre-fabricated, it is not suitable for scenarios with a variety of frequently changing tags.
-
In cases where vector images cannot be used, high-resolution original images are required to ensure the quality after scaling, which can lead to more system burden.
Approach Two: Using Overlays on Text
Solution Strategy for Approach Two
- Instead of using pre-fabricated images, create labels through SwiftUI views.
- Create a blank placeholder image based on the size of the label view.
- Add the placeholder image to Text for mixing.
- Position the label view at the leadingTop using an overlay on top of the placeholder image.
TitleWithOverlay(title: "佳农 马来西亚冷冻 猫山王浏览果肉 D197", tag: "京东超市", fontStyle: .body)

TitleWithOverlay(title: "佳农 马来西亚冷冻 猫山王浏览果肉 D197", tag: "京东超市", fontStyle: .body)
    .environment(\.sizeCategory, .extraExtraExtraLarge)
Considerations for Approach Two
- Use
fixedSizeto prevent the label view from responding to dynamic type changes. The size of text within the label view, TagView, is completely controlled by TitleWithOverlay.
Text(tag)
.font(.custom("", fixedSize: fontSize))- Use
alignmentGuideto finely adjust the position of the label view to align with the text in Text. Similar to Approach One, it is ideal to fine-tune offset, padding, fontSize, etc., according to dynamic type (the author did not fine-tune, but the final result is acceptable).
TagView(tag: tag, textStyle: textStyle, fontSize: fontSize - 6, horizontalPadding: 5.5, verticalPadding: 2)
.alignmentGuide(.top, computeValue: { $0[.top] - fontSize / 18 })- When the fontSize (current text size under dynamic type) changes, update the size of the label view.
Color.clear
    .task(id:fontSize) { // Use task(id:)
        tagSize = proxy.size
}- When the size of the label view, tagSize, changes, recreate the placeholder image.
.task(id: tagSize, createPlaceHolder)- Properly use the task modifier to ensure that the operation to create the placeholder image is performed in the background thread, reducing the impact on the main thread.
extension UIImage {
    @Sendable
    static func solidImageGenerator(_ color: UIColor, size: CGSize) async -> UIImage {
        let format = UIGraphicsImageRendererFormat()
        let image = UIGraphicsImageRenderer(size: size, format: format).image { rendererContext in
            color.setFill()
            rendererContext.fill(CGRect(origin: .zero, size: size))
        }
        return image
    }
}

@Sendable
func createPlaceHolder() async {
    let size = CGSize(width: tagSize.width, height: 1) // Only horizontal placement is needed, height is sufficient
    let uiImage = await UIImage.solidImageGenerator(.clear, size: size)
    let image = Image(uiImage: uiImage)
    placeHolder = Text(image)
}
Pros and Cons of Approach Two
- No need for pre-fabricated images.
- The content and complexity of tags are no longer limited.
- Only suitable for the specific case of tags at the top left corner; once the position of the tags changes, this approach becomes ineffective (it is difficult to align in other positions using overlays).
Approach Three: Converting Views to Images and Inserting into Text
Solution Strategy for Approach Three
- Similar to Approach Two, do not use pre-fabricated images, instead create labels using SwiftUI views.
- Convert the label view into an image and mix it into Text.
TitleWithDynamicImage(title: "佳农 马来西亚冷冻 猫山王浏览果肉 D197", tag: "京东超市", fontStyle: .body)

TitleWithDynamicImage(title: "佳农 马来西亚冷冻 猫山王浏览果肉 D197", tag: "京东超市", fontStyle: .body)
    .environment(\.sizeCategory, .extraExtraExtraLarge)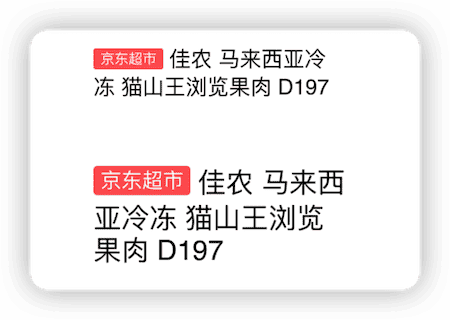
Considerations for Approach Three
- Ensure that the conversion of views to images is performed in a background process.
@Sendable
func createImage() async {
    let tagView = TagView(tag: tag, textStyle: textStyle, fontSize: fontSize - 6, horizontalPadding: 5.5, verticalPadding: 2)
    tagView.generateSnapshot(snapshot: $tagImage)
}- During the image conversion process, set the correct scale value to ensure image quality.
func generateSnapshot(snapshot: Binding<Image>) {
    Task {
        let renderer = await ImageRenderer(content: self)
        await MainActor.run {
            renderer.scale = UIScreen.main.scale // Set the correct scale value
        }
        if let image = await renderer.uiImage {
            snapshot.wrappedValue = Image(uiImage: image)
        }
    }
}
Pros and Cons of Approach Three
- No need for pre-fabricated images.
- The content and complexity of tags are no longer limited.
- There is no need to restrict the position of the tags; they can be placed at any position within Text.
- The example code utilizes SwiftUI 4’s ImageRenderer to perform the view-to-image conversion, therefore it is only supported on iOS 16+.
In older versions of SwiftUI, the conversion of views to images can be accomplished using UIHostingController wrapped around the view within UIKit. However, since UIHostingController can only run on the main thread, this type of conversion has a significant impact on the main thread, so use it with discretion.
Approach Four: TextRenderer
At WWDC 2024, SwiftUI introduced the
TextRendererprotocol, granting developers new capabilities to adjust the rendering ofTextcomponents and enabling the realization of many effects previously unimaginable. For a detailed explanation of theTextRendererfunctionality, please read the article Creating Stunning Dynamic Text Effects with TextRenderer.
The three solutions discussed previously all aim to embed a custom rounded rectangle background within a given Text. With the TextRenderer protocol, this requirement can now be achieved with unprecedented simplicity.
The following code demonstrates how to create an implementation of TextRenderer. It identifies Runs containing the TagAttribute and draws a rounded rectangle background for them:
struct TagAttribute: TextAttribute {}

struct TagEffect: TextRenderer {
  let tagBackgroundColor: Color

  function draw(layout: Text.Layout, in context: inout GraphicsContext) {
    for run in layout.flattenedRuns {
      if run[TagAttribute.self] != nil {
        let rect = run.typographicBounds.rect
        let copy = context
        // Draw the tag's background
        let shape = RoundedRectangle(cornerRadius: 5).path(in: rect)
        copy.fill(shape, with: .color(tagBackgroundColor))
      }
      context.draw(run)
    }
  }
}
With TextRendererer, we can format text as usual (including tags and main text) and add TagAttribute specifically to tags. By applying TagEffect, we can easily achieve the desired effect:
struct TagEffectDemo: View {
  let tagCount: Int
  let tag: LocalizedStringResource
  let title: LocalizedStringResource
  let fontSize: CGFloat
  let tagBackgroundColor: Color
  let tagFontColor: Color
  var body: some View {
    let tagPlaceholderText = Text(" \(tag) ")
      .monospaced()
      .font(.system(size: fontSize, weight: .heavy))
      .foregroundStyle(tagFontColor)
      .customAttribute(TagAttribute())

    Text("\(tagPlaceholderText) \(title)")
      .font(.system(size: fontSize))
      .textRenderer(
        TagEffect(
          tagBackgroundColor: tagBackgroundColor
        )
      )
  }
}

#Preview {
  TagEffectDemo(
    tagCount: 6,
    tag: .init("JOIN"),
    title: .init("Get weekly handpicked updates on Swift and SwiftUI!"),
    fontSize: 16,
    tagBackgroundColor: .red,
    tagFontColor: .white
  )
  .frame(width: 160)
}
For the current needs, TextRenderer offers the highest flexibility and excellent performance. Its only drawback is that it currently only supports iOS 18 and above (it may become backward compatible to iOS 17 in the future).
Conclusion
After reading this article, you might first think that SwiftUI is somewhat cumbersome, requiring so many steps to achieve what seems like a simple requirement. However, using the existing methods to solve such practical problems is also a challenge and fun in its own right—at least for me.