Since the inception of the Swift language, XCTest has been the preferred testing framework for the majority of Swift developers. However, deeply rooted in Objective-C, its API design heavily borrows from the traditions of that language, failing to fully reflect the modern best practices of Swift programming. In some respects, this has even become a barrier to further development. To overcome these limitations, Apple officially introduced Swift Testing at WWDC 2024—a new testing framework specifically designed for the Swift language. This framework has been integrated into Xcode 16 and positioned as the official testing tool of choice. In this article, we will delve into the features, usage, and unique aspects of the Swift Testing framework, analyzing how it helps developers write test codes faster (Swifter) and more in line with Swift programming habits (Swifty).
Configuring and Using Swift Testing
This chapter will guide you through setting up and running Swift Testing in different environments, as well as how to write your first test case.
Integrating Swift Testing in Xcode Projects
Swift Testing has been seamlessly integrated into Xcode 16, becoming the officially recommended testing framework. When creating a new project, you can easily select Swift Testing as the default framework, as shown in the following image:
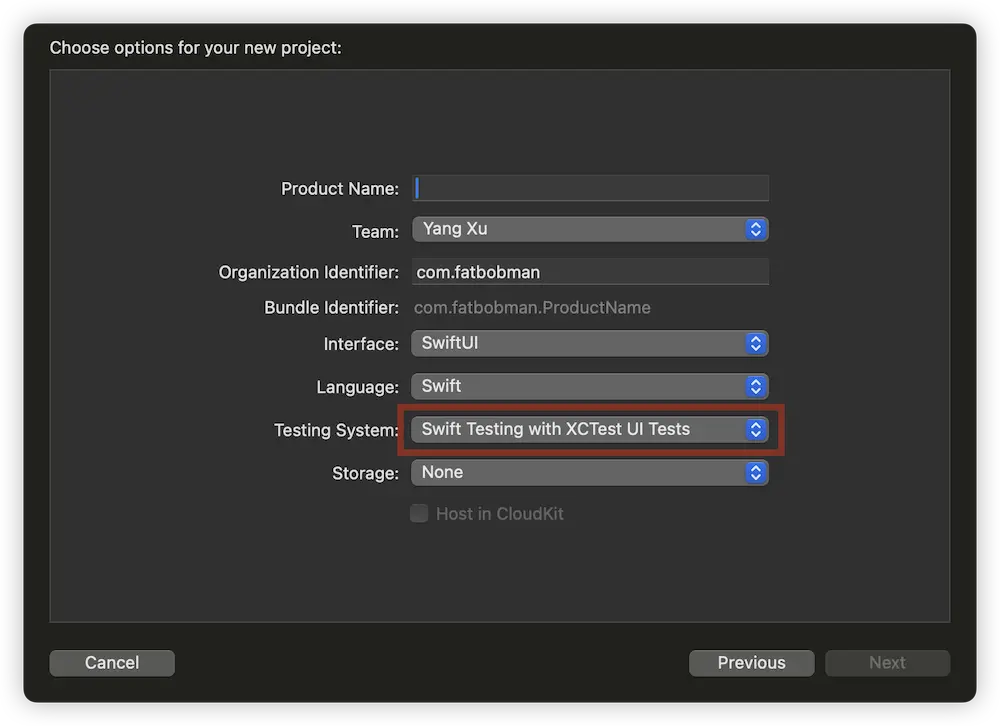
As a component of the Swift 6 toolchain, Swift Testing can be used directly without the need for additional dependency declarations, greatly simplifying the configuration process.
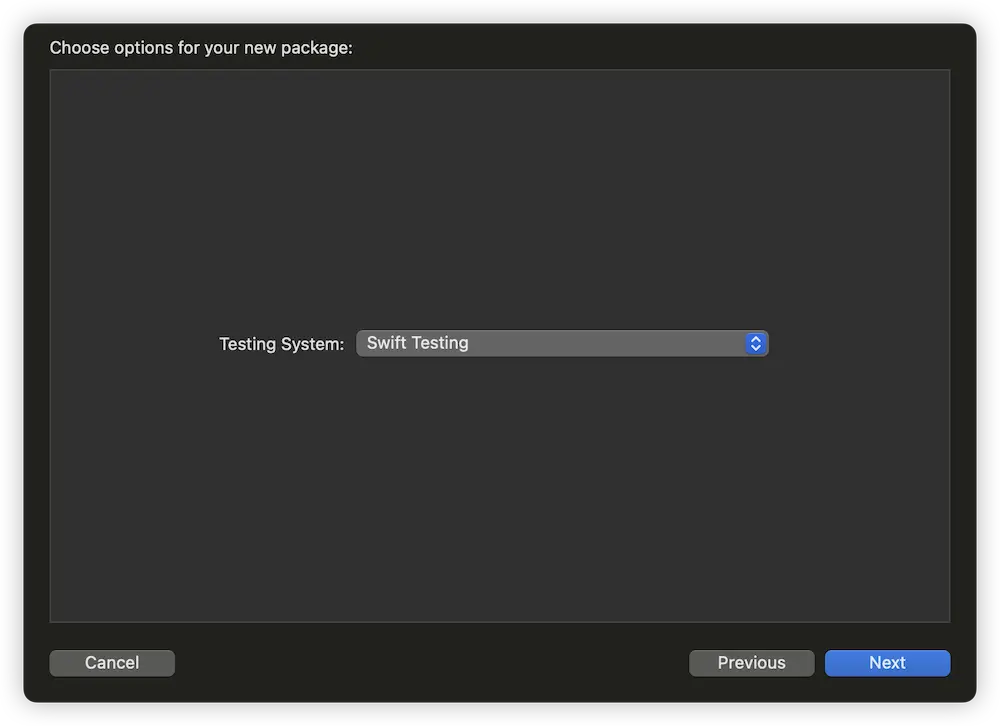
Swift Testing also offers direct support for Swift Packages. When creating a new package, you can directly choose the Swift Testing framework:
Configuring Swift Testing in VSCode
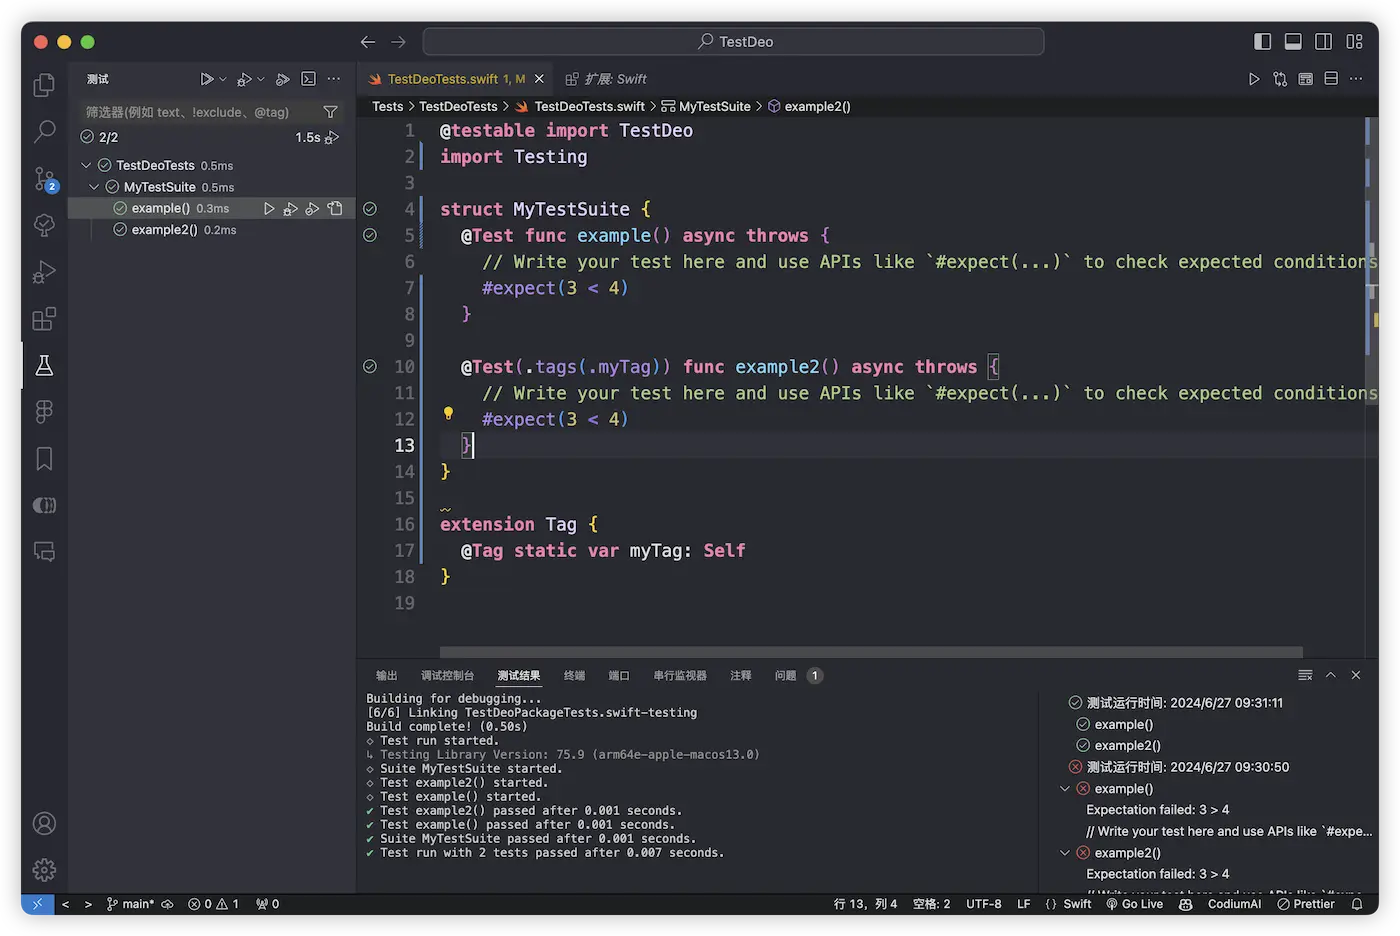
To accommodate developers using different development environments, the Swift Server Work Group provides comprehensive support for VSCode users. With their developed VSCode plugin, Swift Testing can be truly plug-and-play in a Swift 6 environment.
Swift Testing on the Command Line
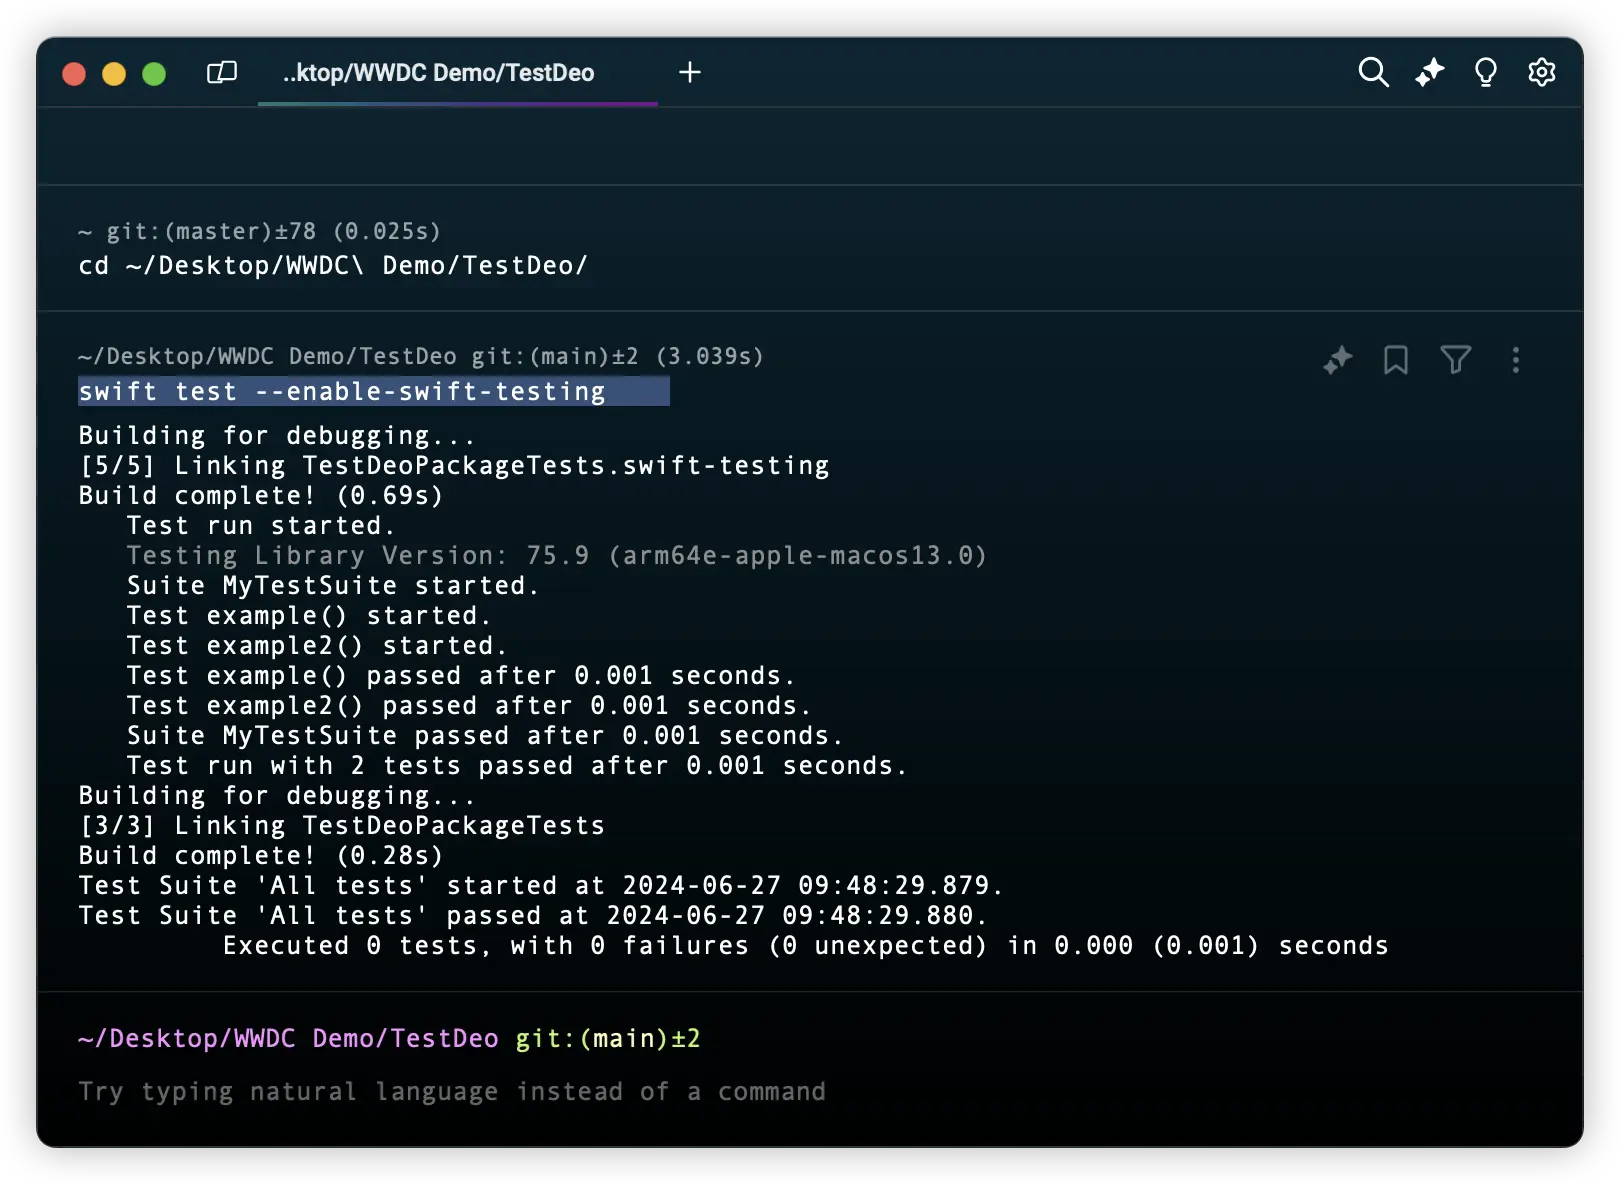
It is important to note that as of the Xcode 16 beta2 version, the swift test command in the command line still defaults to using the XCTest framework. To enable Swift Testing, a specific parameter must be added:
swift test --enable-swift-testingAdding this parameter ensures that test codes based on the Swift Testing framework are executed:
Writing Your First Swift Testing Test Case
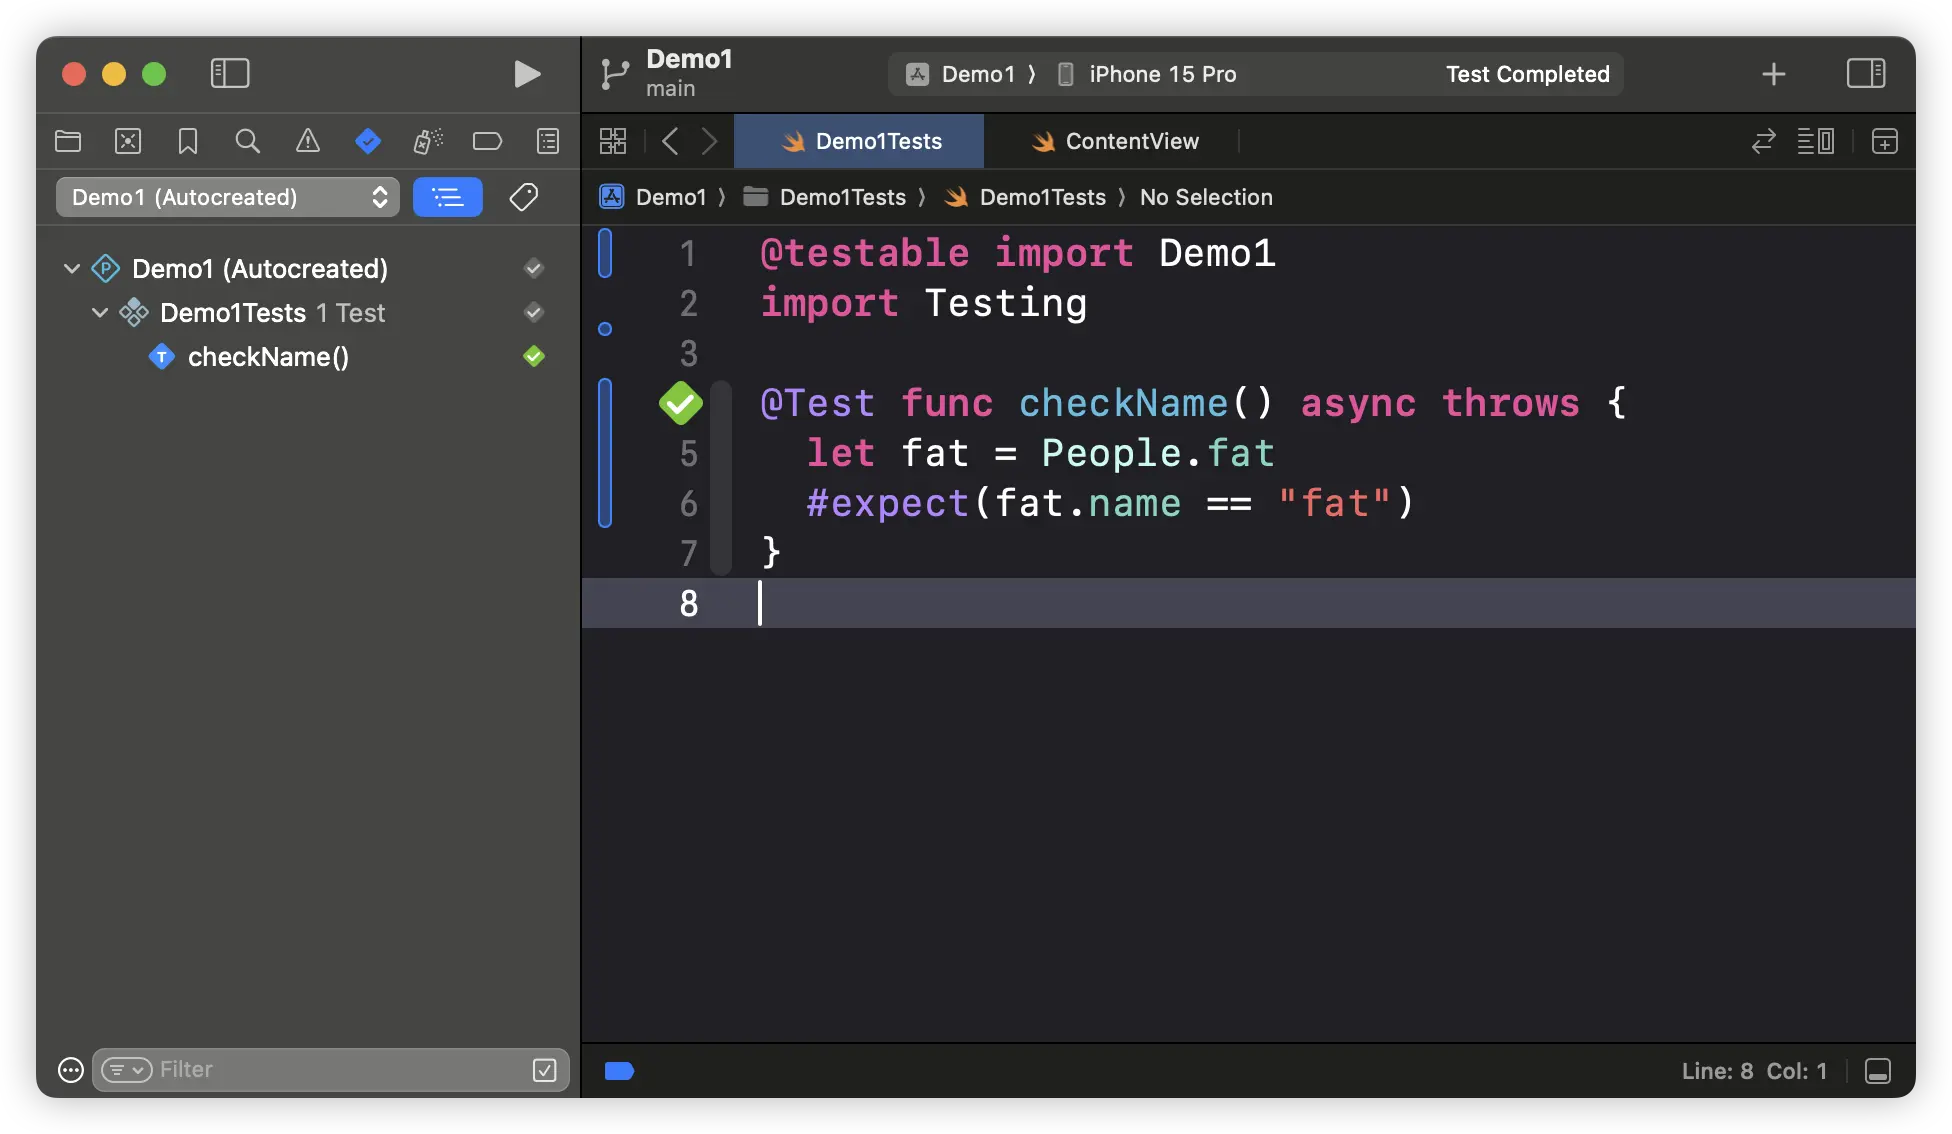
The syntax of Swift Testing is much more concise and clear compared to XCTest. Here is a basic username check test case:
@testable import Demo1
import Testing

@Test func checkName() async throws {
  let fat = People.fat
  #expect(fat.name == "fat")
}
This code demonstrates several features of Swift Testing:
- Uses
import Testingto introduce the framework - The
@Testmacro marks the test function - Supports the format of global function for test codes
- Test function naming is flexible, with no special restrictions
In the test navigator of Xcode, you can find and run this test case:
For enhanced readability, Swift Testing allows you to add descriptive names to your test cases:
@Test("Check Name") func checkName() async throws {This makes the test names in the test navigator easier to understand:
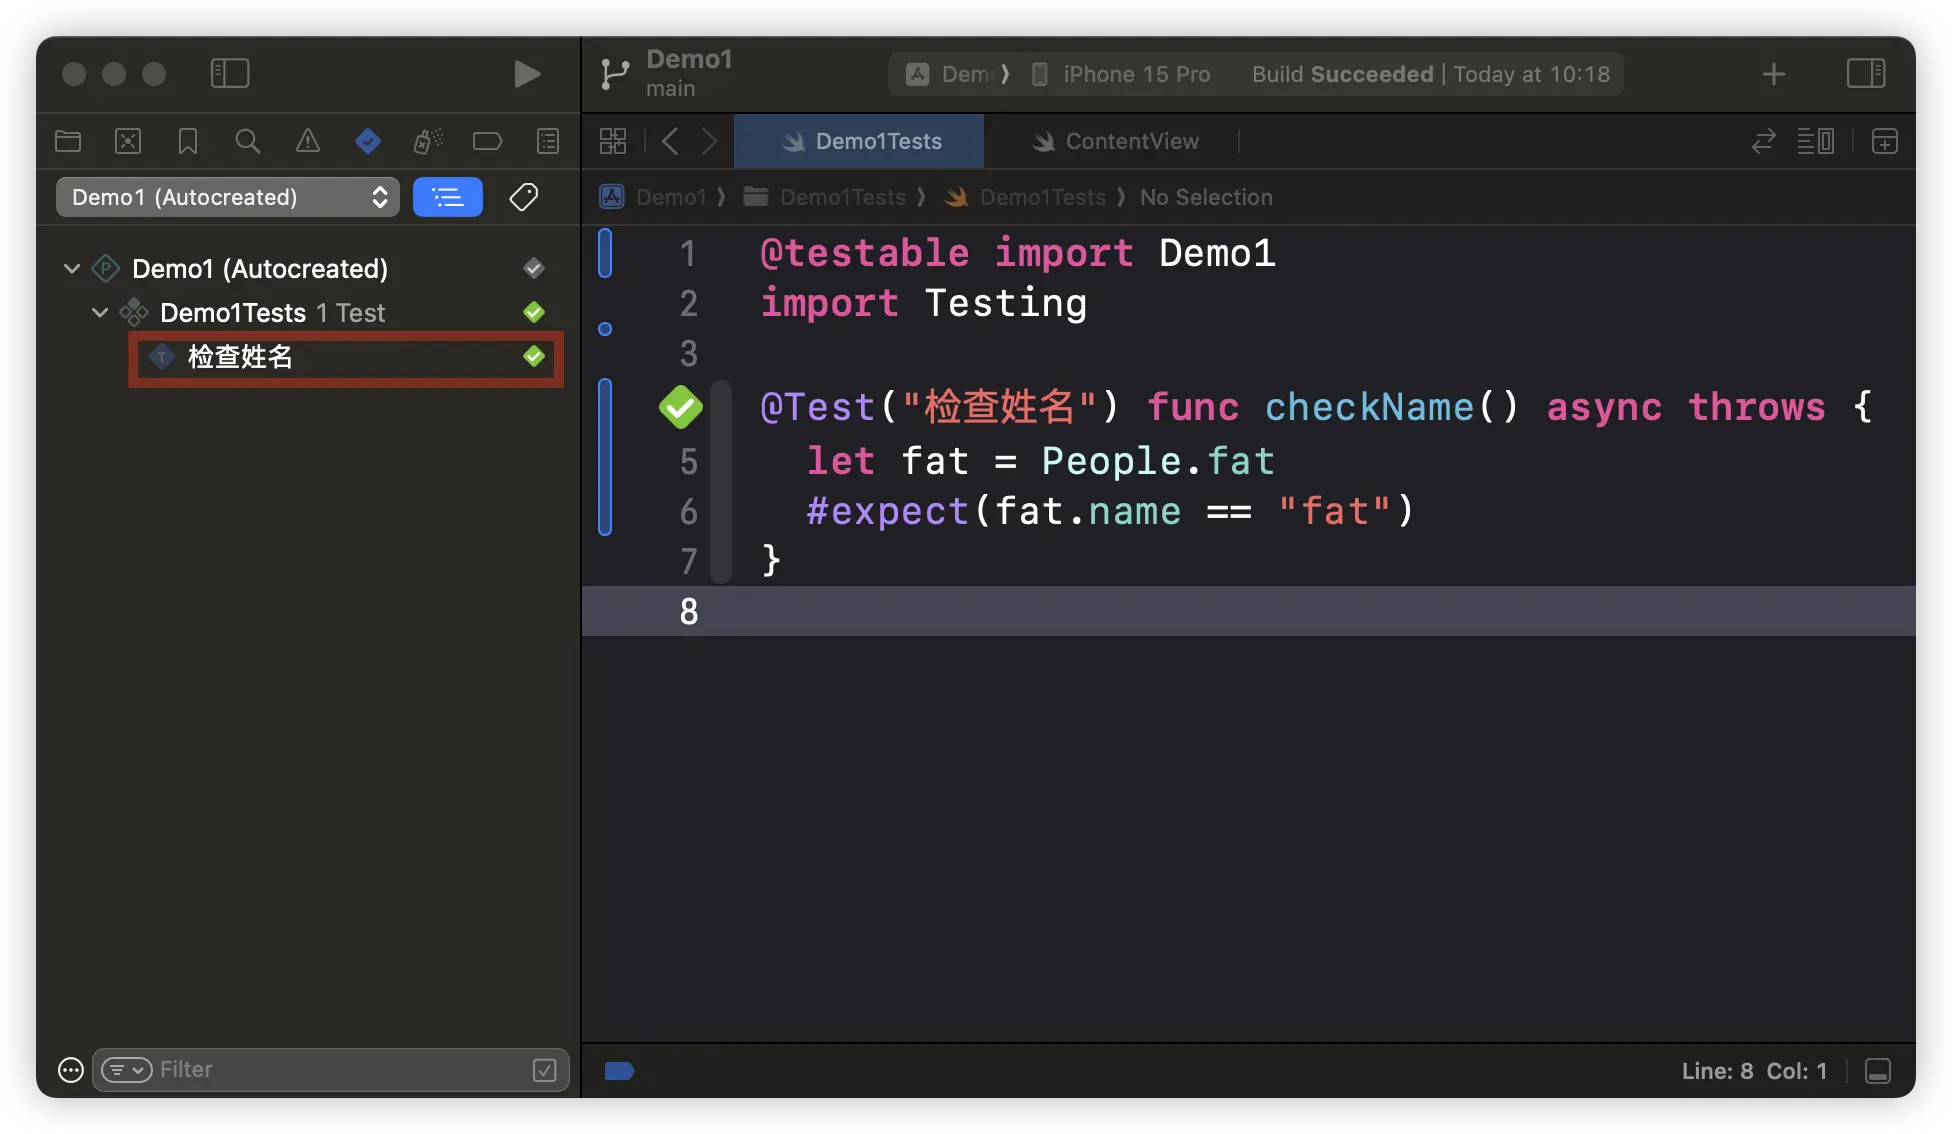
By following these simple steps, you have successfully configured and written your first Swift Testing test case. Subsequent sections will explore more advanced features of Swift Testing, helping you to fully leverage this powerful testing framework.
Expectations
When writing tests, libraries typically provide APIs for comparing values—such as verifying that a function returns the expected result. If the comparison fails, the test is reported as failed. These APIs might be called “assertions,” “expectations,” “checks,” “requirements,” “matchers,” etc., in different libraries. In Swift Testing, they are referred to as Expectations.
#expect Macro
Unlike XCTest, which has over 40 assertion functions, Swift Testing aims to minimize the learning curve for developers and offers greater flexibility. Leveraging the powerful expression capabilities of Swift, in Swift Testing, developers mostly need to express their expectations as a boolean expression and validate it through the #expect macro.
let x = 2
#expect(x < 1)  // failed: (x → 2) < 1

let a = [1, 2, 3]
let b = 4
#expect(a.contains(b)) // failed: (a → [1, 2, 3]) does not contain (b → 4)

let str = "fatbobman"
#expect(str.count > 5) // success

let array1 = [1, 2, 3, 4, 5]
let array2 = [1, 2, 3, 3, 4, 5]
#expect(array1 == array2) // failed: (array1 → [1, 2, 3, 4, 5]) != (array2 → [1, 2, 3, 3, 4, 5])
#expect also supports various forms for capturing exceptional scenarios:
- Should not throw an error
let age = 10
#expect(throws: Never.self) { // Expectation failed: an error was thrown when none was expected: "err1" of type MyError
  if age > 0 {
    throw MyError.err1
  }
}- Must throw an error (any error type)
let age = 10
#expect(throws: (any Error).self) { // Expectation failed: an error was expected but none was thrown
  if age < 10 {
    throw MyError.err1
  }
}- Must throw a specified error (error type must conform to
Equatableprotocol)
enum MyError: Error, Equatable {
  case err1
  case err2(Int)
}

let age = 10
#expect(throws: MyError.err1) { // Expectation failed: expected error "err1" of type MyError, but "err2(10)" of type MyError was thrown
  if age > 5 {
    throw MyError.err2(age)
  }
}- Must throw an error and make a decision based on the boolean return value of the error-catching logic
let age = 10
#expect(performing: {
  if age > 5 {
    throw MyError.err2(age)
  }
}, throws: { err in
  guard let error = err as? MyError, case let .err2(age) = error else {
    return false
  }
  return age > 10 // Evaluate the boolean return value of the error-catching logic
})
These examples clearly demonstrate that for Swift developers, using #expect combined with Swift’s syntax to construct test expressions offers clarity, simplicity, and flexibility.
#require Macro
The #require macro is primarily used to unwrap optional values in tests, similar to XCTest’s XCTUnwrap:
let x: Int? = 10
let y: String? = nil
let z = try #require(x) // succeeds, z == 10
let w = try #require(y) // fails, test ends prematurely due to thrown error
Besides unwrapping, #require also offers all the constructors available with the #expect macro, with the main difference being its semantic—#require is used for “tests that must pass,” whereas #expect focuses more on “what results are anticipated.”
Any code that uses #expect can be replaced with #require:
try #require(a == b)

try #require(throws: (any Error).self, performing: {
  if age < 10 {
    throw MyError.err1
  }
})
When using #require, the test function must be marked as able to throw errors, and try must be used before #require.
Confirmation
When it is necessary to verify the occurrence of certain events, especially when #expect and #require are insufficient, the confirmation function becomes crucial. It not only verifies that events occur within a specific context, such as event handlers or delegate callbacks, but can also confirm the number of times an event occurs.
The following code example demonstrates how to use the confirmation function: we set an expectation that the pressDown event must be triggered three times. The test will only pass if indeed three pressDown events are received:
await confirmation(expectedCount: 3) { keyPressed in
  keyHandler.eventHandler = { event in
    if event == .pressDown {
      keyPressed() // mark the event as occurred
    }
  }
  await keyHandler.getEvent() // activate the event handler to await the event
}
In some testing scenarios, verifying that certain events did not occur is equally important. For example, the following code snippet demonstrates how to ensure that no pressDown events are triggered during the test execution. The test only passes if no pressDown events are received:
await confirmation(expectedCount: 0) { keyPressed in
  keyHandler.eventHandler = { event in
    if event == .pressDown {
      keyPressed()
    }
  }
  await keyHandler.getEvent()
}
withKnownIssue
For functions that are known to potentially produce problems or errors, but you do not want these issues to cause test failure, you can use withKnownIssue to tag them.
@Test func example() async throws {
  withKnownIssue(isIntermittent: true) { // Expected failure
    try flakyCall()
  }
}
This method offers several advantages:
- Enhances test reliability, especially for tests containing unstable elements.
- Allows the continuation of tests containing known issues without affecting the overall test results.
- Provides a mechanism for recording and tracking known issues, rather than simply disabling tests.
withKnownIssue is a powerful tool, suitable for dealing with complex testing scenarios and known system limitations. It allows developers to continue testing while acknowledging existing problems, which is invaluable for maintaining large and complex test suites.
In Swift Testing, using the aforementioned tools can replace the numerous assertion methods in XCTest, significantly simplifying the process of writing test code.
Organizing Test Cases
Swift Testing offers various ways and dimensions to organize and manage test cases, enabling developers to effectively control and maintain their test code. Through flexible structured approaches, including suites, nested suites, and a tagging system, developers can build clear and logically strong test architectures tailored to project needs.
Test Suites
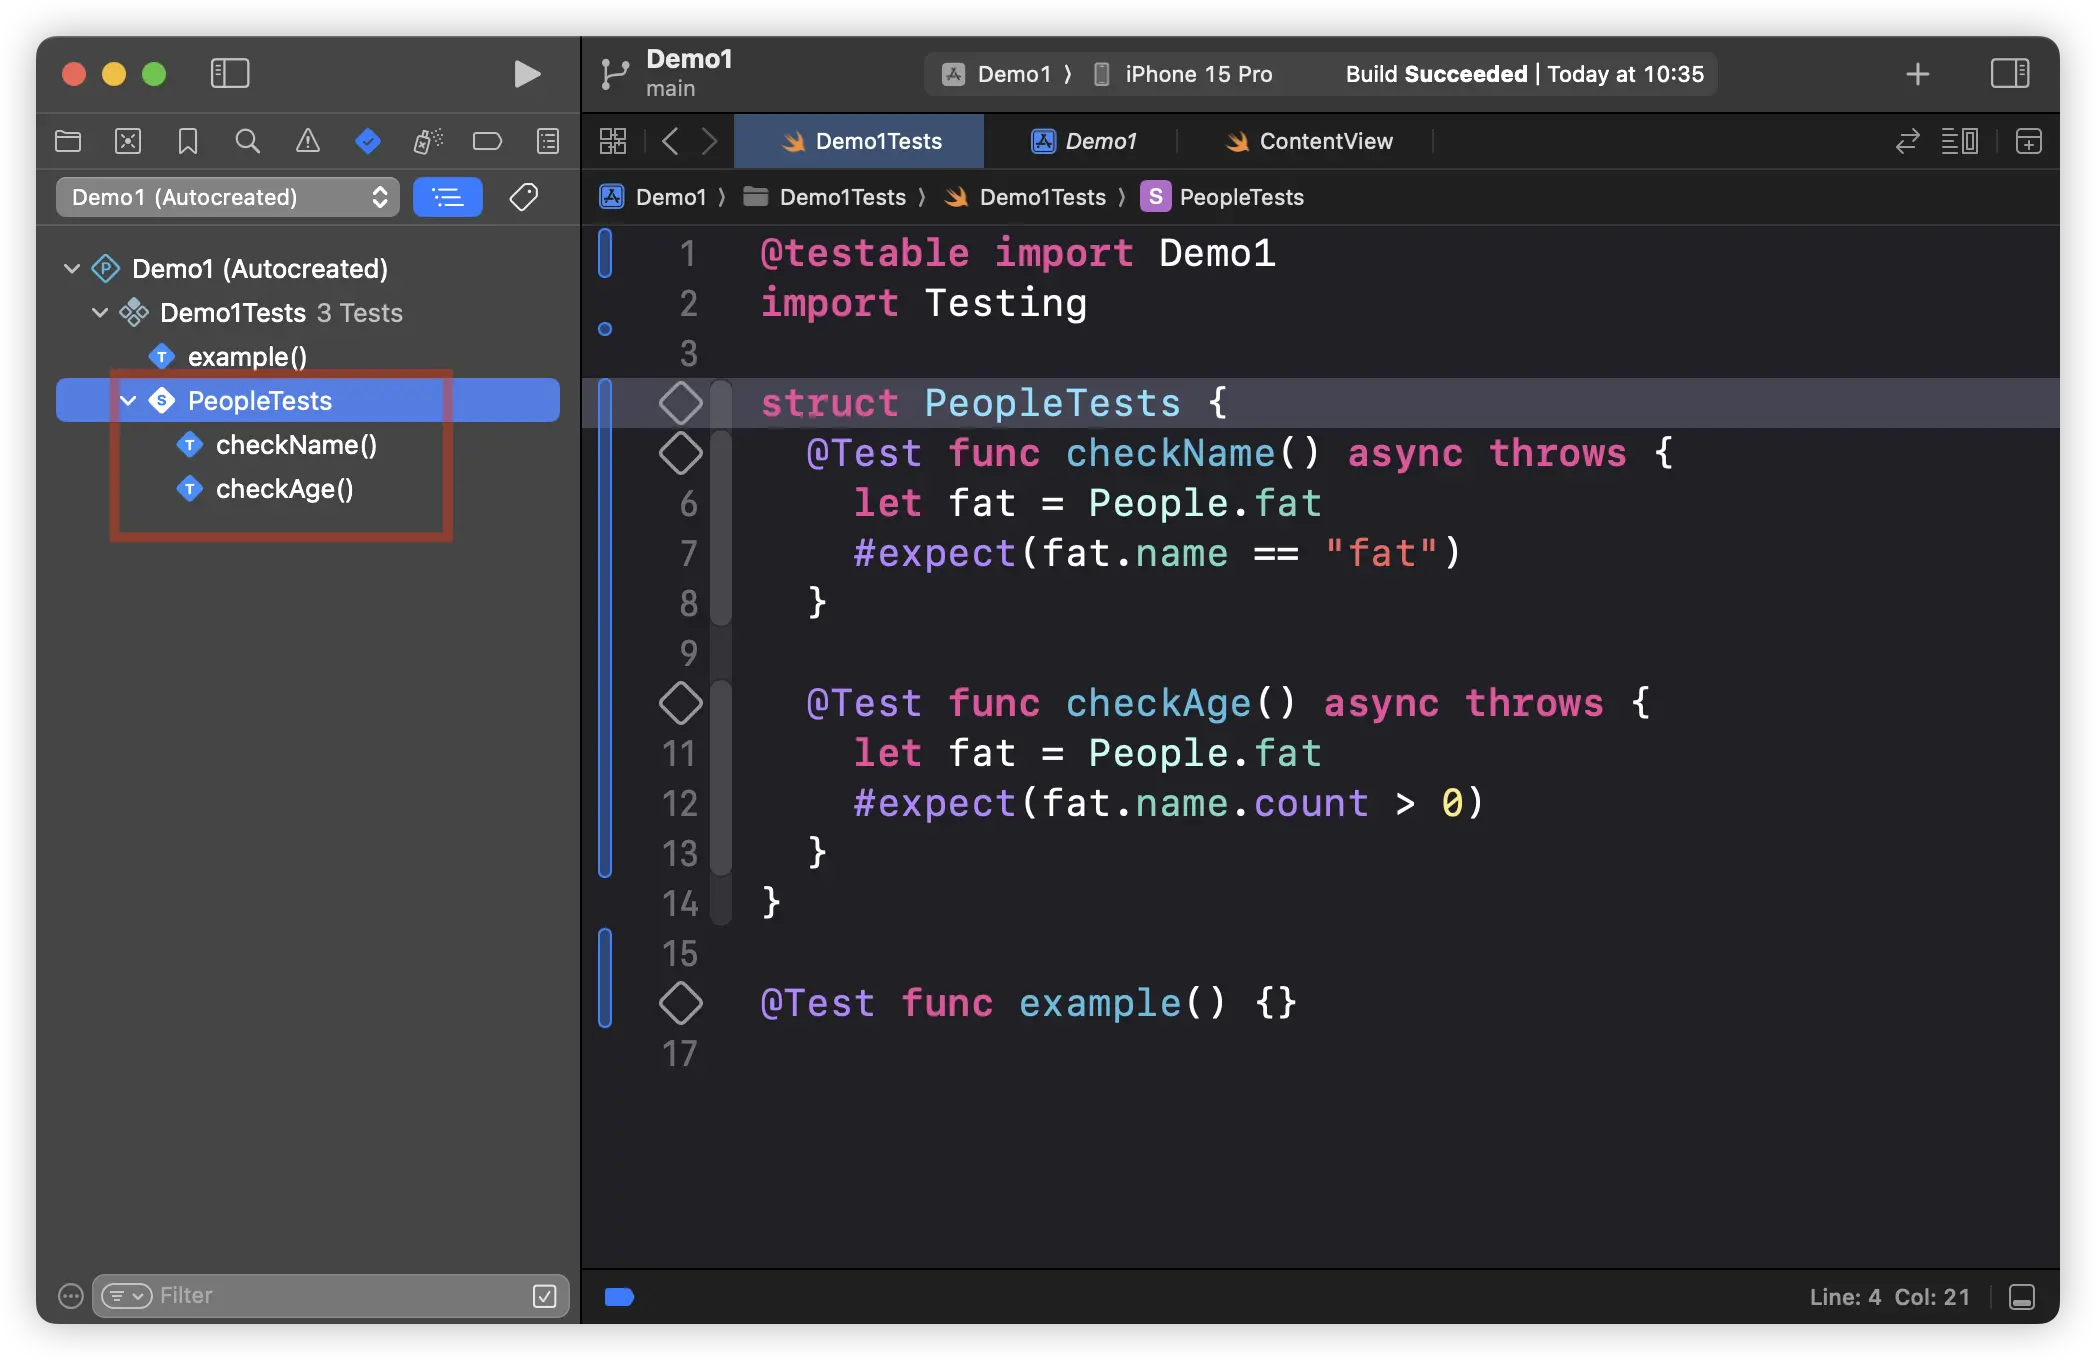
Swift Testing supports constructing tests through global functions and also allows defining test cases within structures (struct), classes (class), and actors (actor), thereby forming structured test suites.
A type that contains @Test functions is implicitly considered a suite without any additional configuration. The following example demonstrates a basic test suite that includes validations for names and ages:
struct PeopleTests {
  @Test func checkName() async throws {
    let fat = People.fat
    #expect(fat.name == "fat")
  }

  @Test func checkAge() async throws {
    let fat = People.fat
    #expect(fat.name.count > 0)
  }
}
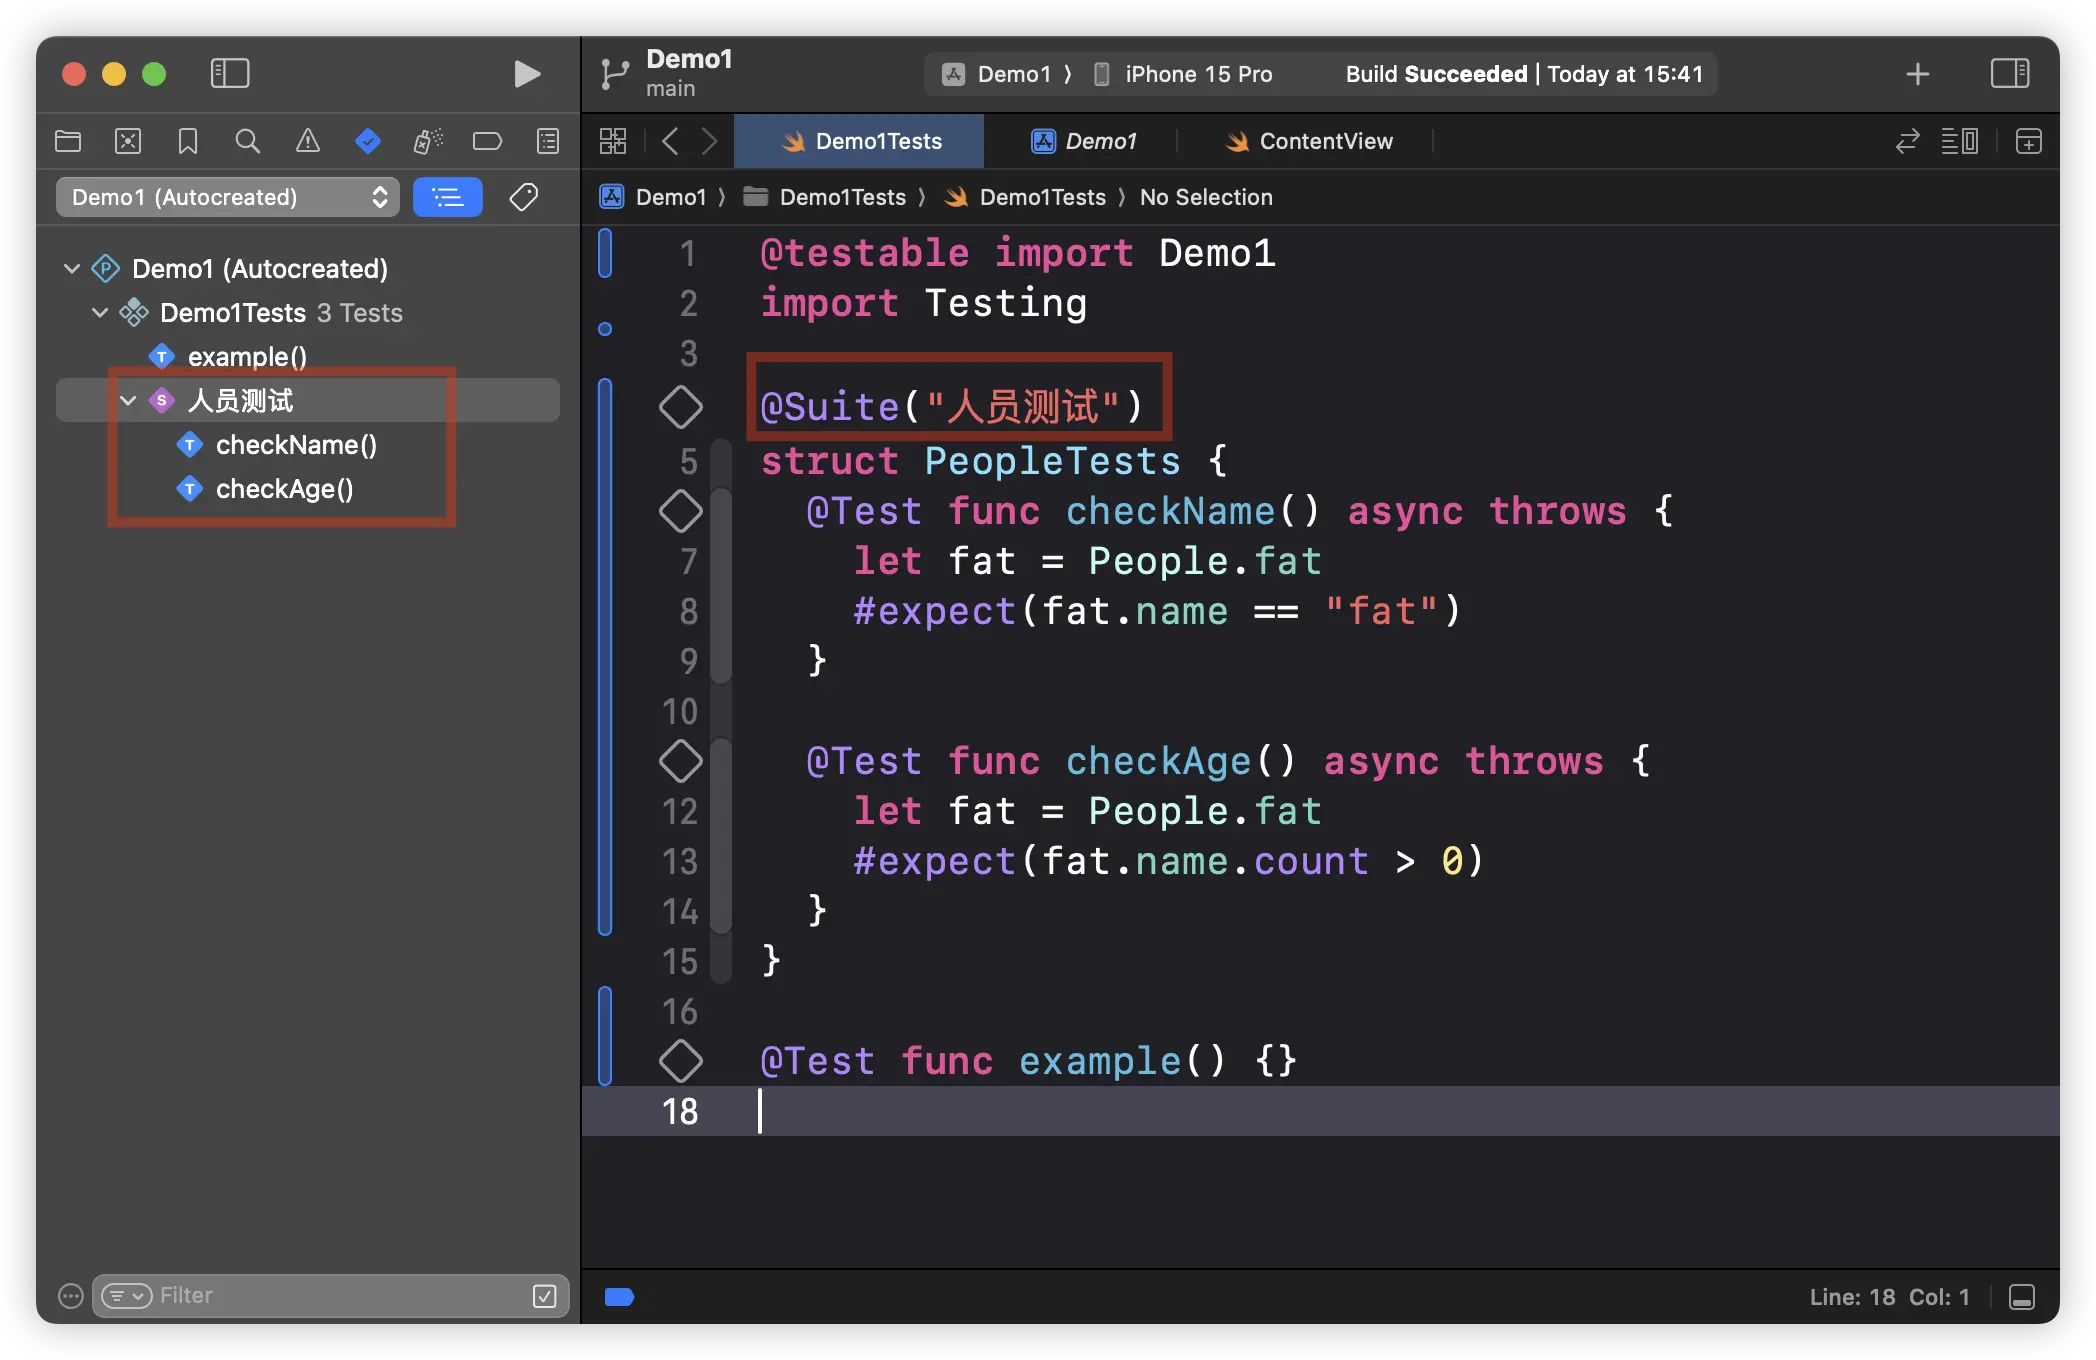
If there is a need to rename a suite or set specific conditions, the @Suite macro can be used to clearly specify:
@Suite("Personnel Tests")
struct PeopleTests {
  // Definitions of test functions
}
In Swift Testing, test methods not only support async and throws but can also use the mutating keyword to modify the data of struct type suites.
struct Group {
  var count = 0
  @Test mutating func test1() {
    count += 1
    #expect(count > 0)
  }
}
Nested Suites
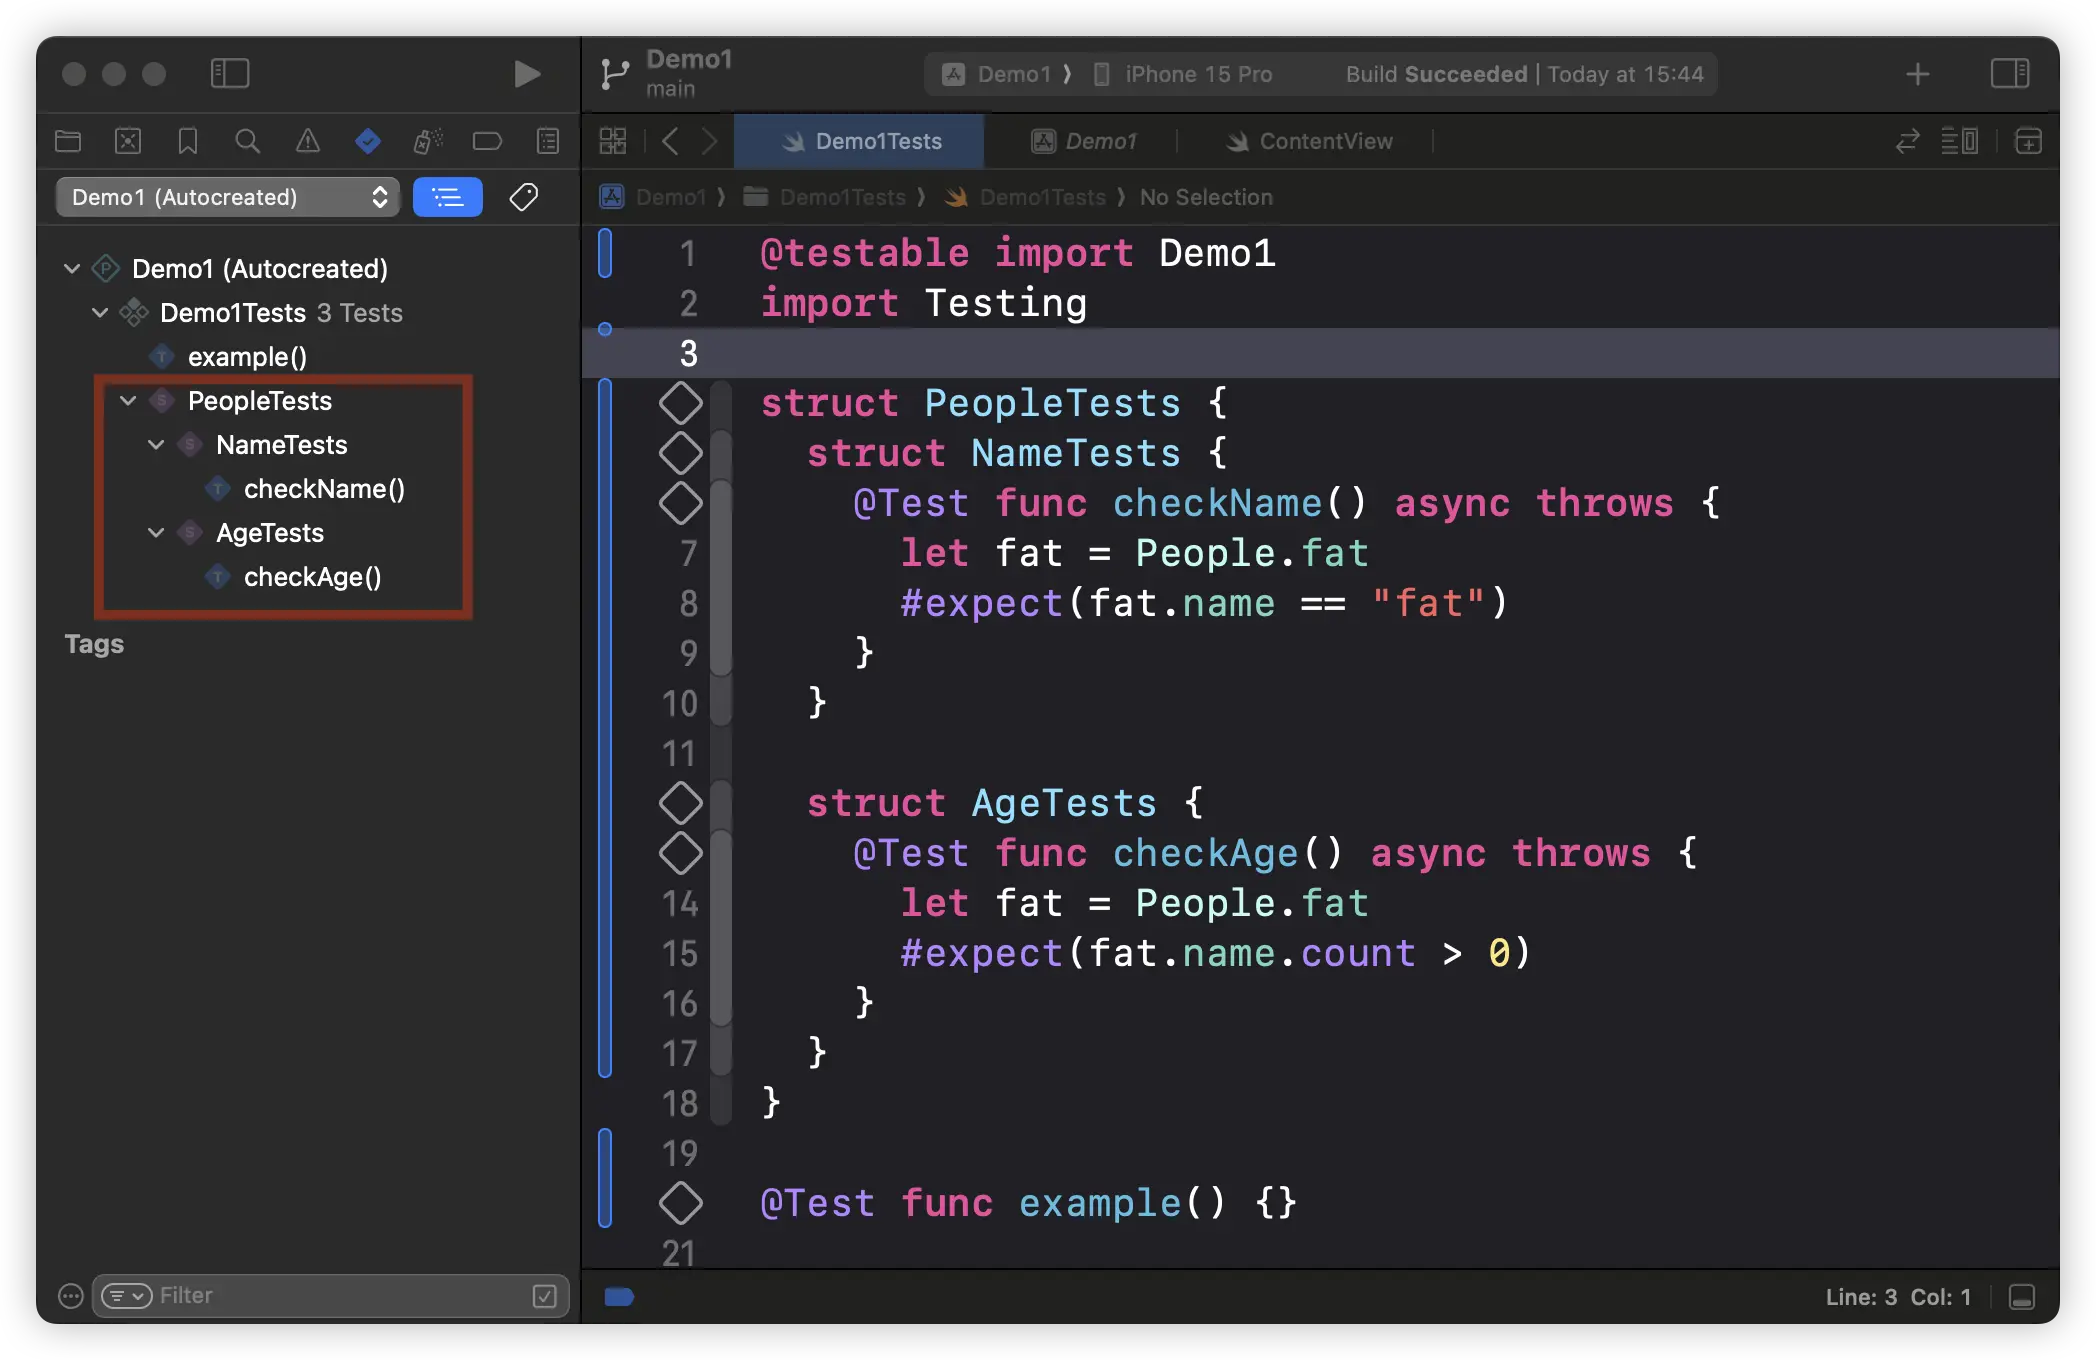
For more complex testing needs, Swift Testing supports nested suites, allowing other suites to be embedded within one, thus building a more detailed testing structure.
struct PeopleTests {
  struct NameTests {
    @Test func checkName() async throws {
      let fat = People.fat
      #expect(fat.name == "fat")
    }
  }

  struct AgeTests {
    @Test func checkAge() async throws {
      let fat = People.fat
      #expect(fat.name.count > 0)
    }
  }
}
In Swift Testing, test suites need to contain a parameterless init(), thus, it is not possible to directly define test cases within enums. However, enums can be used to organize suites:
enum PeopleTests {
  struct Name Tests {
    @Test func checkName() async throws {
      let fat = People.fat
      #expect(fat.name == "fat")
    }
  }

  struct Age Tests {
    @Test func checkAge() async throws {
      let fat = People.fat
      #expect(!fat.name.isEmpty)
    }
  }
}
Using Tags for Test Management
Swift Testing also provides a tagging-based classification system, adding flexibility and dimensions to test case management.
@Suite(.tags(.people))
struct PeopleTests {
  struct NameTests {
    @Test func checkName() async throws {
      let fat = People.fat
      #expect(fat.name == "fat")
    }
  }

  struct AgeTests {
    @Test(.tags(.numberCheck)) func checkAge() async throws {
      let fat = People.fat
      #expect(!fat.name.isEmpty)
    }
  }
}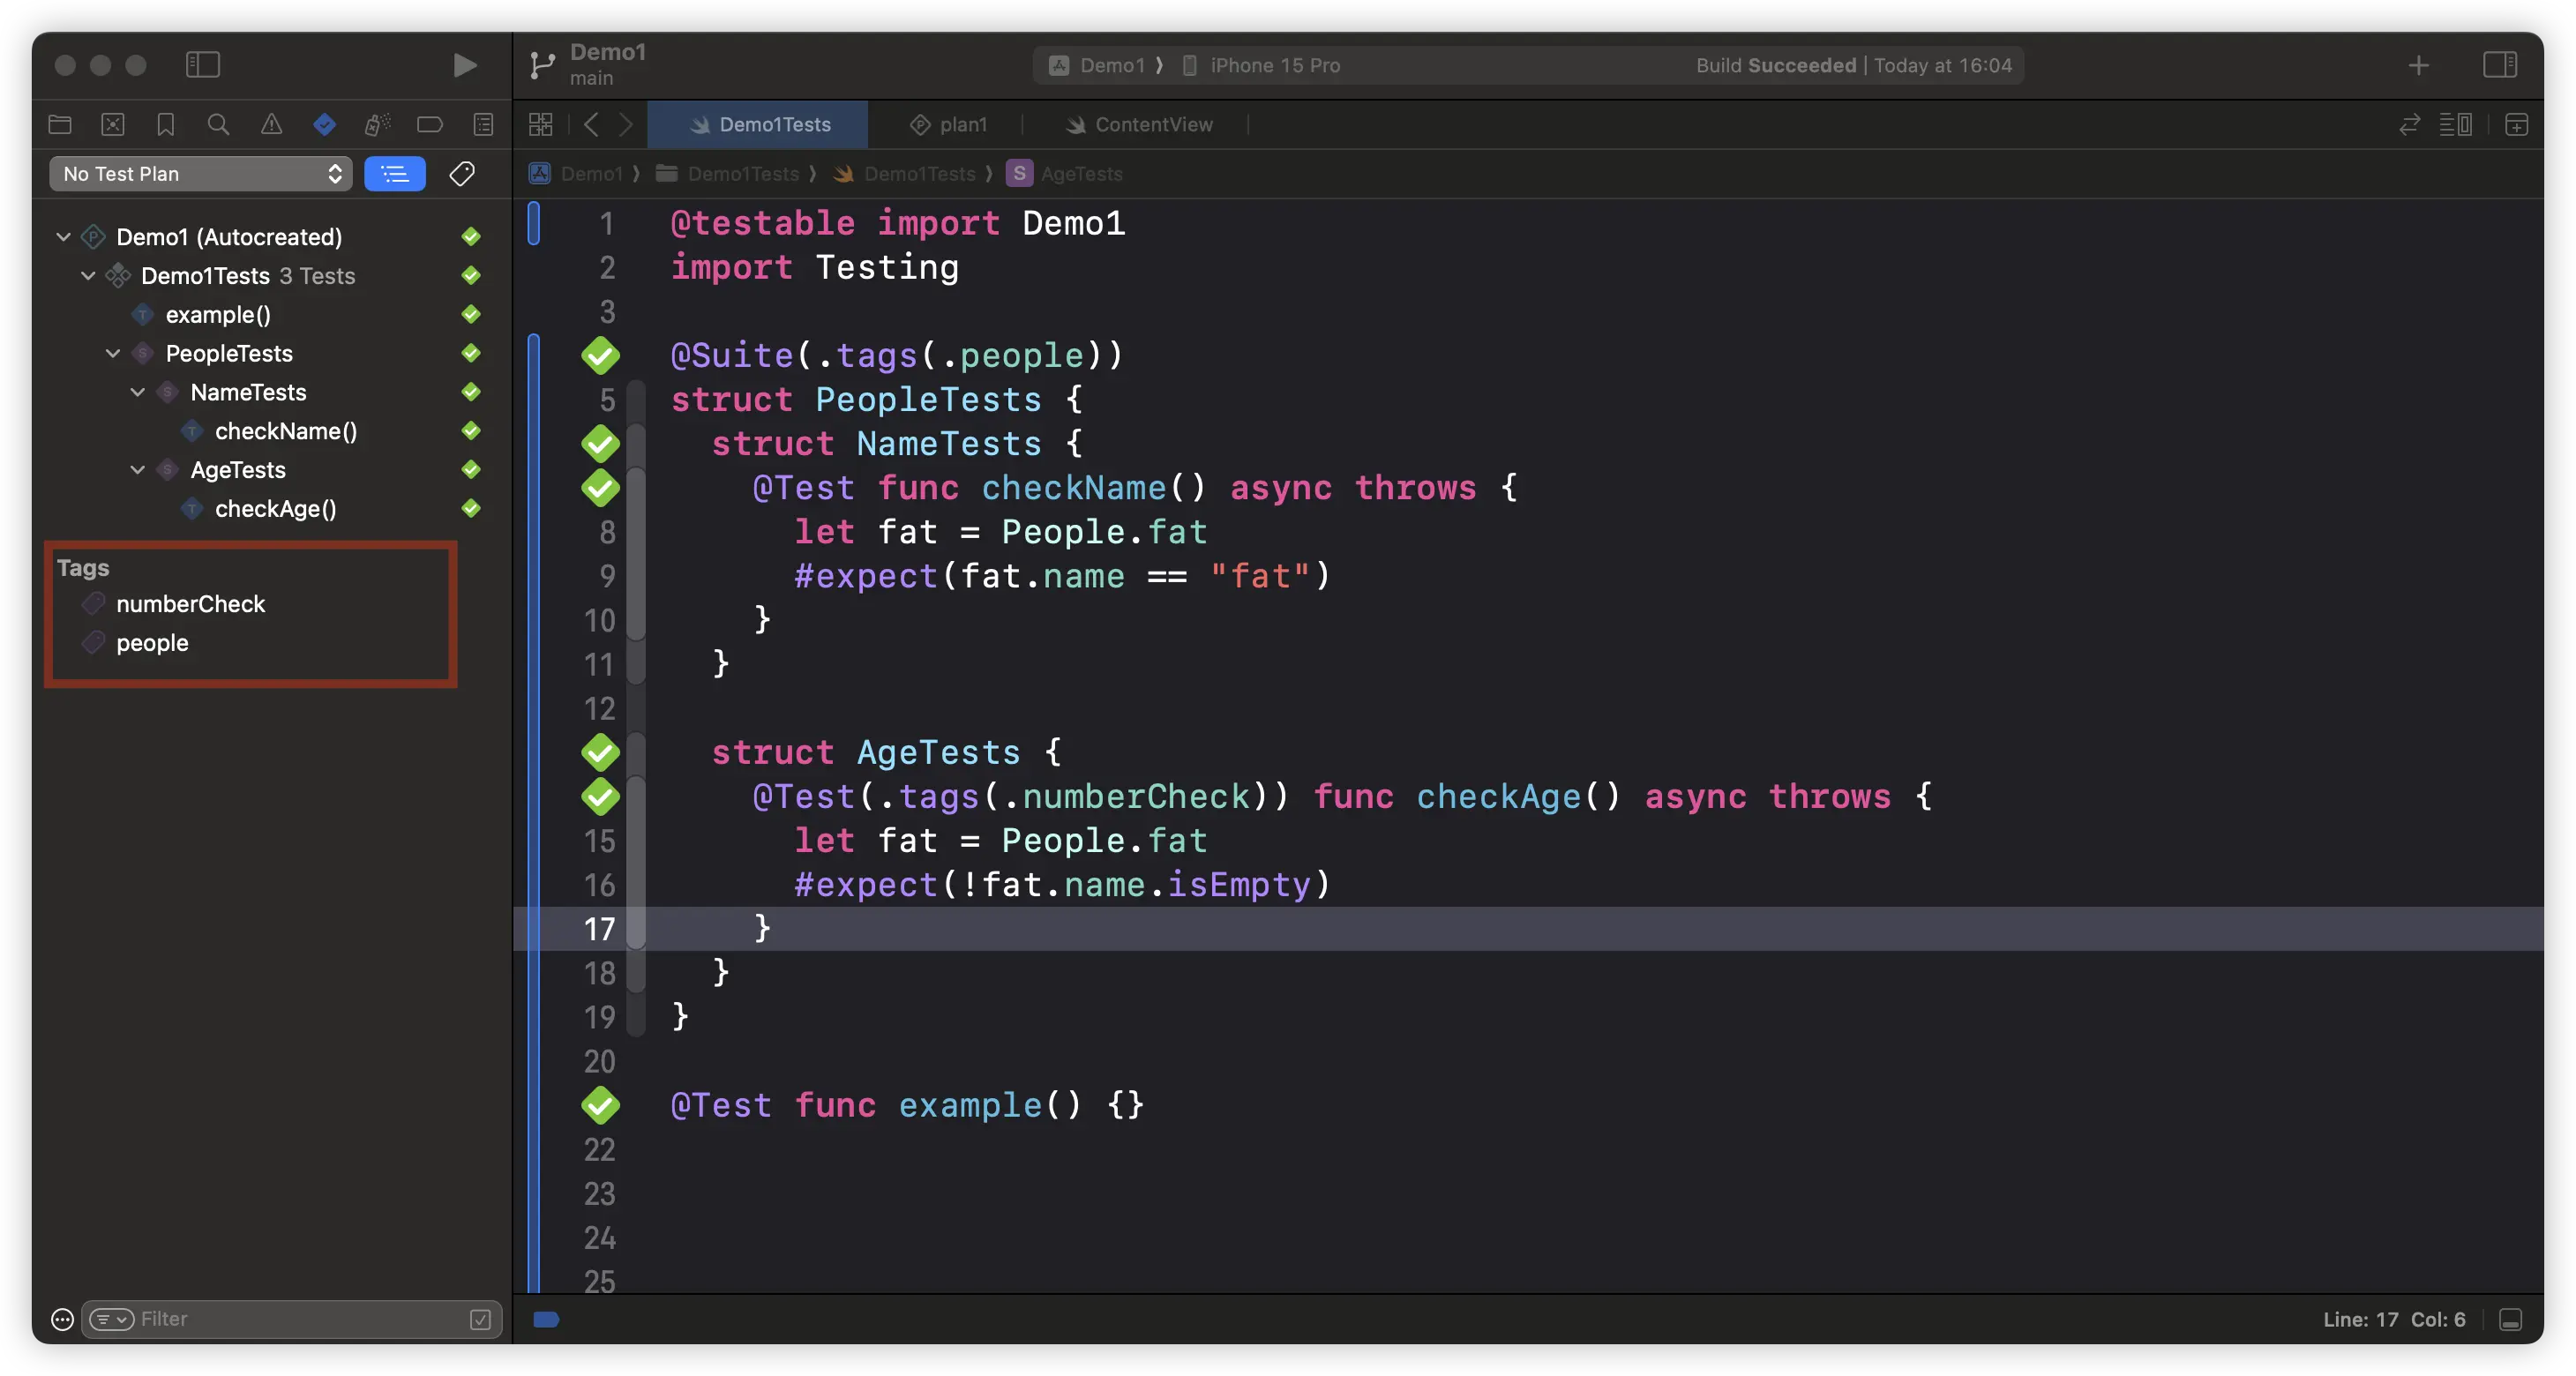
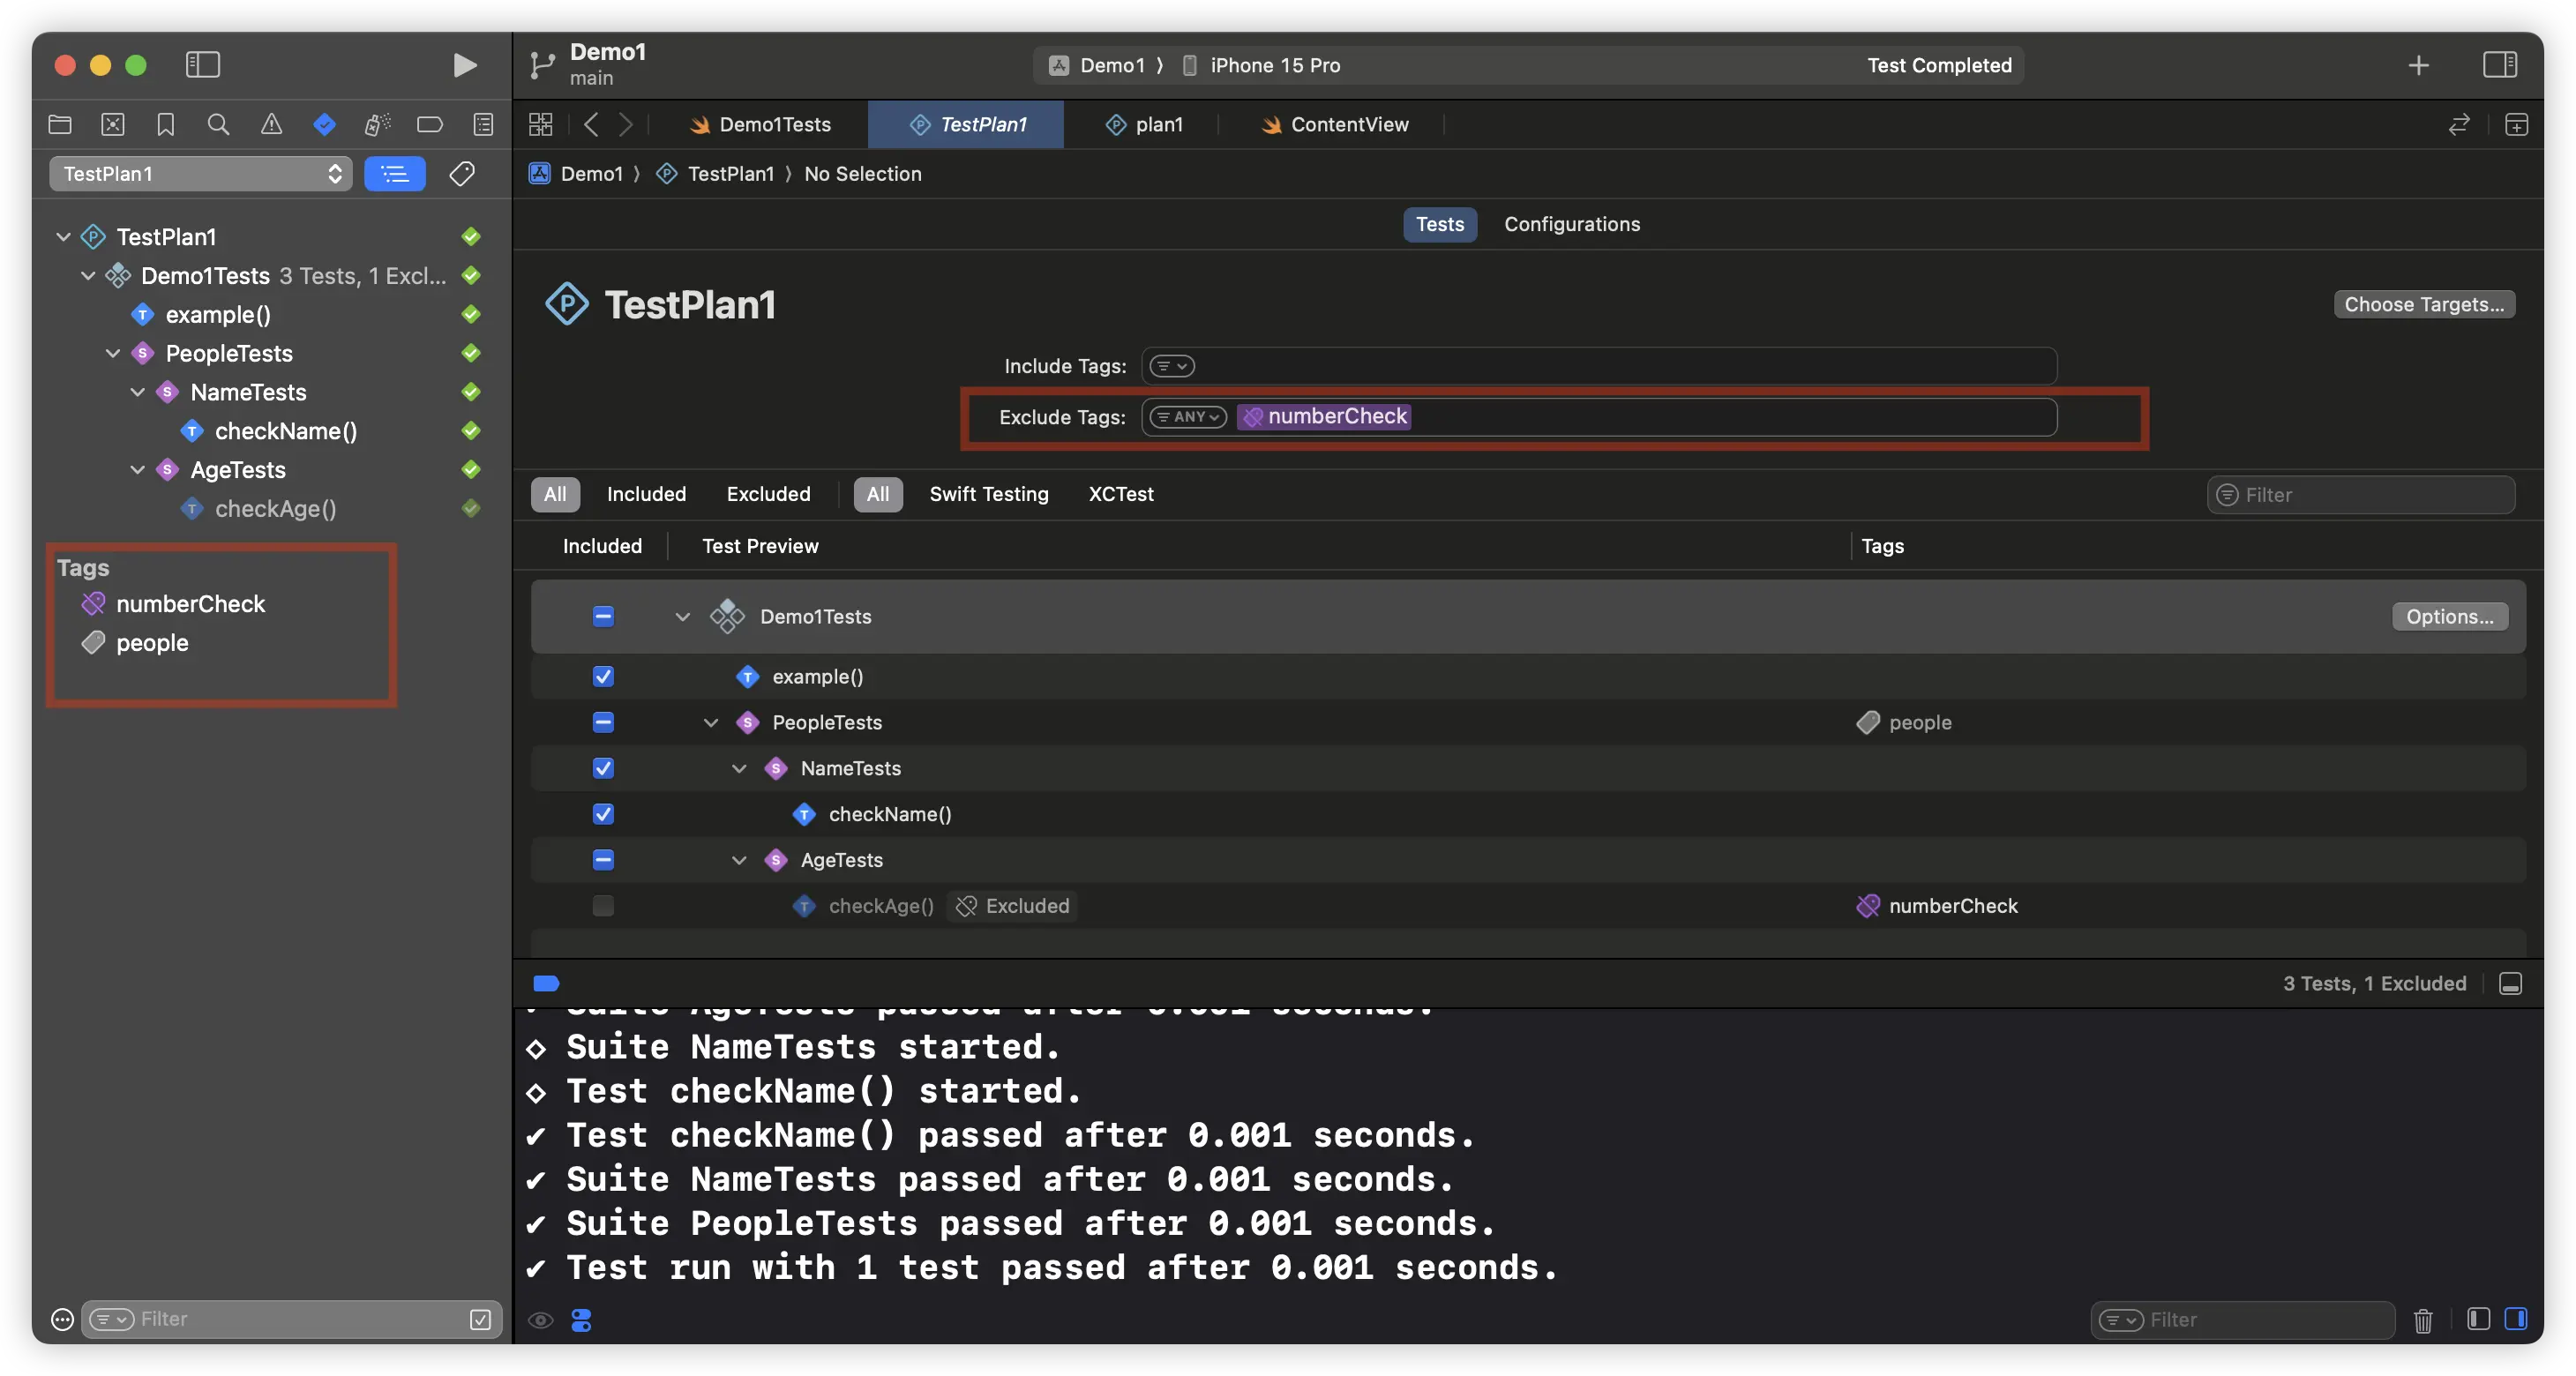
After tagging suites (@Suite) or test cases (@Test), not only can you directly run tests containing specific tags, but you can also conveniently build and manage test plans (Test Plan). This makes it simpler and more efficient to focus testing on different features or requirements.
Traits
Swift Testing offers a variety of trait definitions, allowing developers to control and configure both test suites (@Suite) and test cases (@Test). These traits enable meticulous management of the behavior of test executions, such as the .tag trait previously mentioned, which is used specifically for adding tags.
tag
Add tags to a suite or test case. Developers can declare tags as follows:
@Suite(.tags(.people))

extension Tag {
  @Tag static var people: Self
  @Tag static var numberCheck: Self
}
enabled
Execute the test only if specific conditions are met:
let enableTest = true
@Test(.enabled(if: enableTest)) func example() {}
disabled
Disable the current test. Compared to disabling tests through comments, the disabled trait allows for a clearer explanation of the reason for disabling in the test log:
@Test(.enabled(if: enableTest), .disabled("ignore for this loop"))
func example() {} // Test 'example()' skipped: ignore for this loop
bug
Add information related to bugs (such as URLs, identifiers, or comments) to a test case or suite. This information is integrated into the test report:
@Test(.bug("https://example.org/bugs/1234"))
func example() {
  withKnownIssue {
    #expect(3 > 4)
  }
}
timeLimit
Set the maximum runtime for the test; exceeding this time is considered a test failure:
@Test(.timeLimit(.minutes(1)))
func example() async throws{  // Time limit was exceeded: 60.000 seconds

  try await Task.sleep(for: .seconds(70))
  #expect(4 > 3)
}
serialized
Although Swift Testing defaults to parallelized testing modes, the serialized trait allows designated test suites to run in a serial manner:
@Suite(.serialized)
struct PeopleTests {
  struct NameTests {
    @Test func checkName() async throws {
      let fat = People.fat
      #expect(fat.name == "fat")
    }
  }

  struct AgeTests {
    @Test(.tags(.numberCheck)) func checkAge() async throws {
      let fat = People.fat
      #expect(!fat.name.isEmpty)
    }
  }
}
Trait Inheritance
Traits defined on a test suite are inherited by all its nested types and test cases. For example, the .tags(.people) trait added to PeopleTests automatically applies to NameTests and AgeTests, as well as their included test cases:
@Suite(.tags(.people)) // Add the people tag to the suite
struct PeopleTests {
  struct Name Tests { // Inherits people tag by default
    @Test func checkName() async throws { // Inherits people tag by default
      let fat = People.fat
      #expect(fat.name == "fat")
    }
  }

  struct Age Tests { // Inherits people tag by default
    @Test func checkAge() async throws { // Inherits people tag by default
      let fat = People.fat
      #expect(!fat.name.isEmpty)
    }
  }
}
Understanding the rules of trait inheritance and their interrelationships across multiple levels is crucial. In the following example, test1() is executed only if both the Suite and the individual test case’s conditions are met. If the conditions are not satisfied, such as if count is not greater than 20, the relevant test case will be skipped:
let count = 10
@Suite(.enabled(if: count > 3))
struct Group1 {
  @Test(.enabled(if: count > 20)) // skip
  func test1() async throws {
    #expect(true)
  }

  @Test
  func test2() async throws { // success
    #expect(true)
  }
}
Making Test Content and Results More Clear
Swift Testing has significantly improved the quality of failure messages, surpassing XCTest. However, we can further enhance the clarity and informativeness of error reports with the following approaches:
Custom Error Messages
Swift Testing offers robust capabilities for customizing error messages, applicable to assertions like #expect, #require, confirmation, and withKnownIssue:
@Test func checkAge() async throws {
  let age = 0
  #expect(age > 10, "age should be greater than 10") // Expectation failed: (age → 5) > 10 age should be greater than 10
}
These custom messages make the reasons for errors immediately apparent, aiding in quick problem resolution.
Custom Representation in Error Reports
For complex data types, we can implement the CustomTestStringConvertible protocol and customize the testDescription property to improve their representation in error reports. This approach not only makes the error information more intuitive but also enhances the readability of the reports.
struct Student: Equatable {
  let name: String
  let age: Int
  let address: String
  let id: Int
}

@Test func checkStudent() async throws {
  let fat = Student(name: "fat", age: 5, address: "", id: 0)
  let bob = Student(name: "bob", age: 5, address: "", id: 0)
  // Expectation failed: (fat → Student(name: "fat", age: 5, address: "", id: 0)) == (bob → Student(name: "bob", age: 5, address: "", id: 0))
  #expect(fat == bob)
}

// Custom testDescription
extension Student: CustomTestStringConvertible {
  var testDescription: String {
    "student: \(name)"
  }
}

@Test func checkStudent() async throws {
  let fat = Student(name: "fat", age: 5, address: "", id: 0)
  let bob = Student(name: "bob", age: 5, address: "", id: 0)
  // Expectation failed: (fat → student: fat) == (bob → student: bob)
  #expect(fat == bob)
}
By employing these techniques, the descriptions of test outcomes are not only more specific but also easier to understand, greatly simplifying the debugging process of test code.
Parameterized Testing
Parameterized testing is a distinctive feature of Swift Testing that significantly reduces the need to repetitively test the same logic with different parameters. This allows developers to expand the test coverage and encompass a broader range of scenarios with minimal code duplication.
Consider the following examples of multiple test cases:
struct VideoContinentsTests {

    @Test func mentionsFor_A_Beach() async throws {
        let videoLibrary = try await VideoLibrary()
        let video = try #require(await videoLibrary.video(named: "A Beach"))
        #expect(!video.mentionedContinents.isEmpty)
        #expect(video.mentionedContinents.count <= 3)
    }

    @Test func mentionsFor_By_the_Lake() async throws {
        let videoLibrary = try await VideoLibrary()
        let video = try #require(await videoLibrary.video(named: "By the Lake"))
        #expect(!video.mentionedContinents.isEmpty)
        #expect(video.mentionedContinents.count <= 3)
    }

    @Test func mentionsFor_Camping_in_the_Woods() async throws {
        let videoLibrary = try await VideoLibrary()
        let video = try #require(await videoLibrary.video(named: "Camping in the Woods"))
        #expect(!video.mentionedContinents.isEmpty)
        #expect(video.mentionedContinents.count <= 3)
    }

    // ...and more, similar test functions
}
By utilizing parameterized testing, the above code can be simplified as follows:
struct VideoContinentsTests {
    @Test("Number of mentioned continents", arguments: [
        "A Beach",
        "By the Lake",
        "Camping in the Woods",
        "The Rolling Hills",
        "Ocean Breeze",
        "Patagonia Lake",
        "Scotland Coast",
        "China Paddy Field",
    ])
    func mentionedContinentCounts(videoName: String) async throws {
        let videoLibrary = try await VideoLibrary()
        let video = try #require(await videoLibrary.video(named: videoName))
        #expect(!video.mentionedContinents.isEmpty)
        #expect(video.mentionedContinents.count <= 3)
    }
}
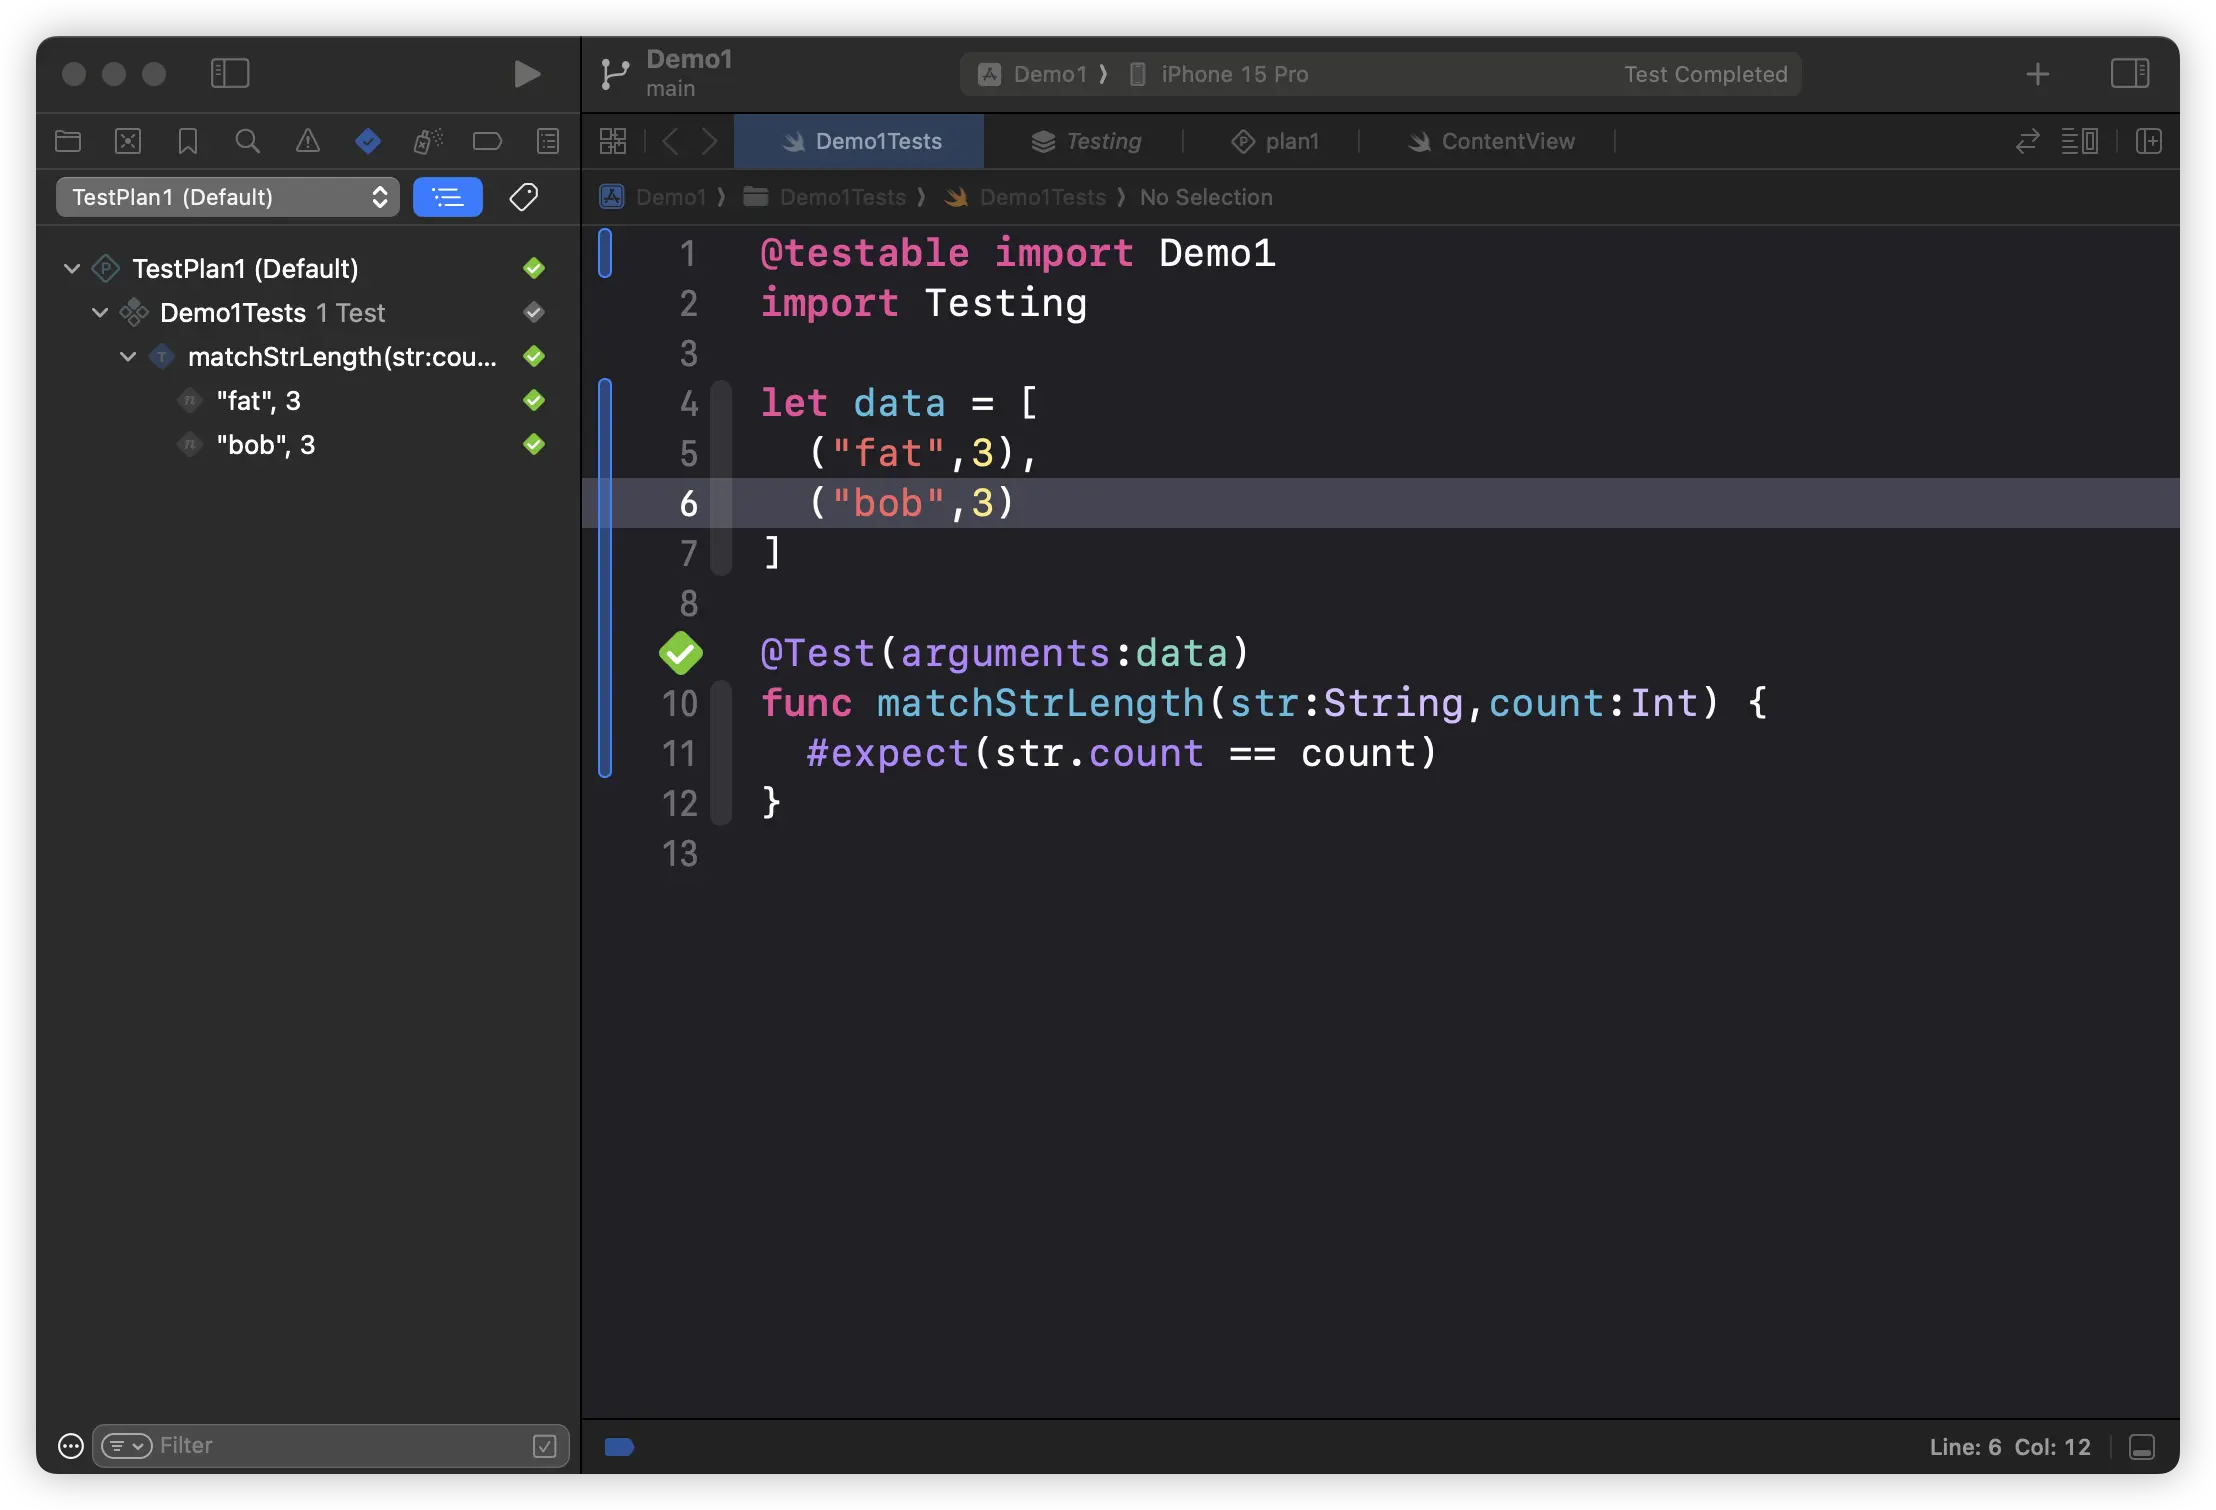
Swift Testing automatically tracks the parameters used in each test call and records them in the results. Developers can selectively rerun specific parameter combinations that failed, enabling fine-grained debugging:
let data = [
  ("fat",3),
  ("bob",2)
]

@Test(arguments=data)
func matchStrLength(str:String, count:Int) {
  #expect(str.count == count)
}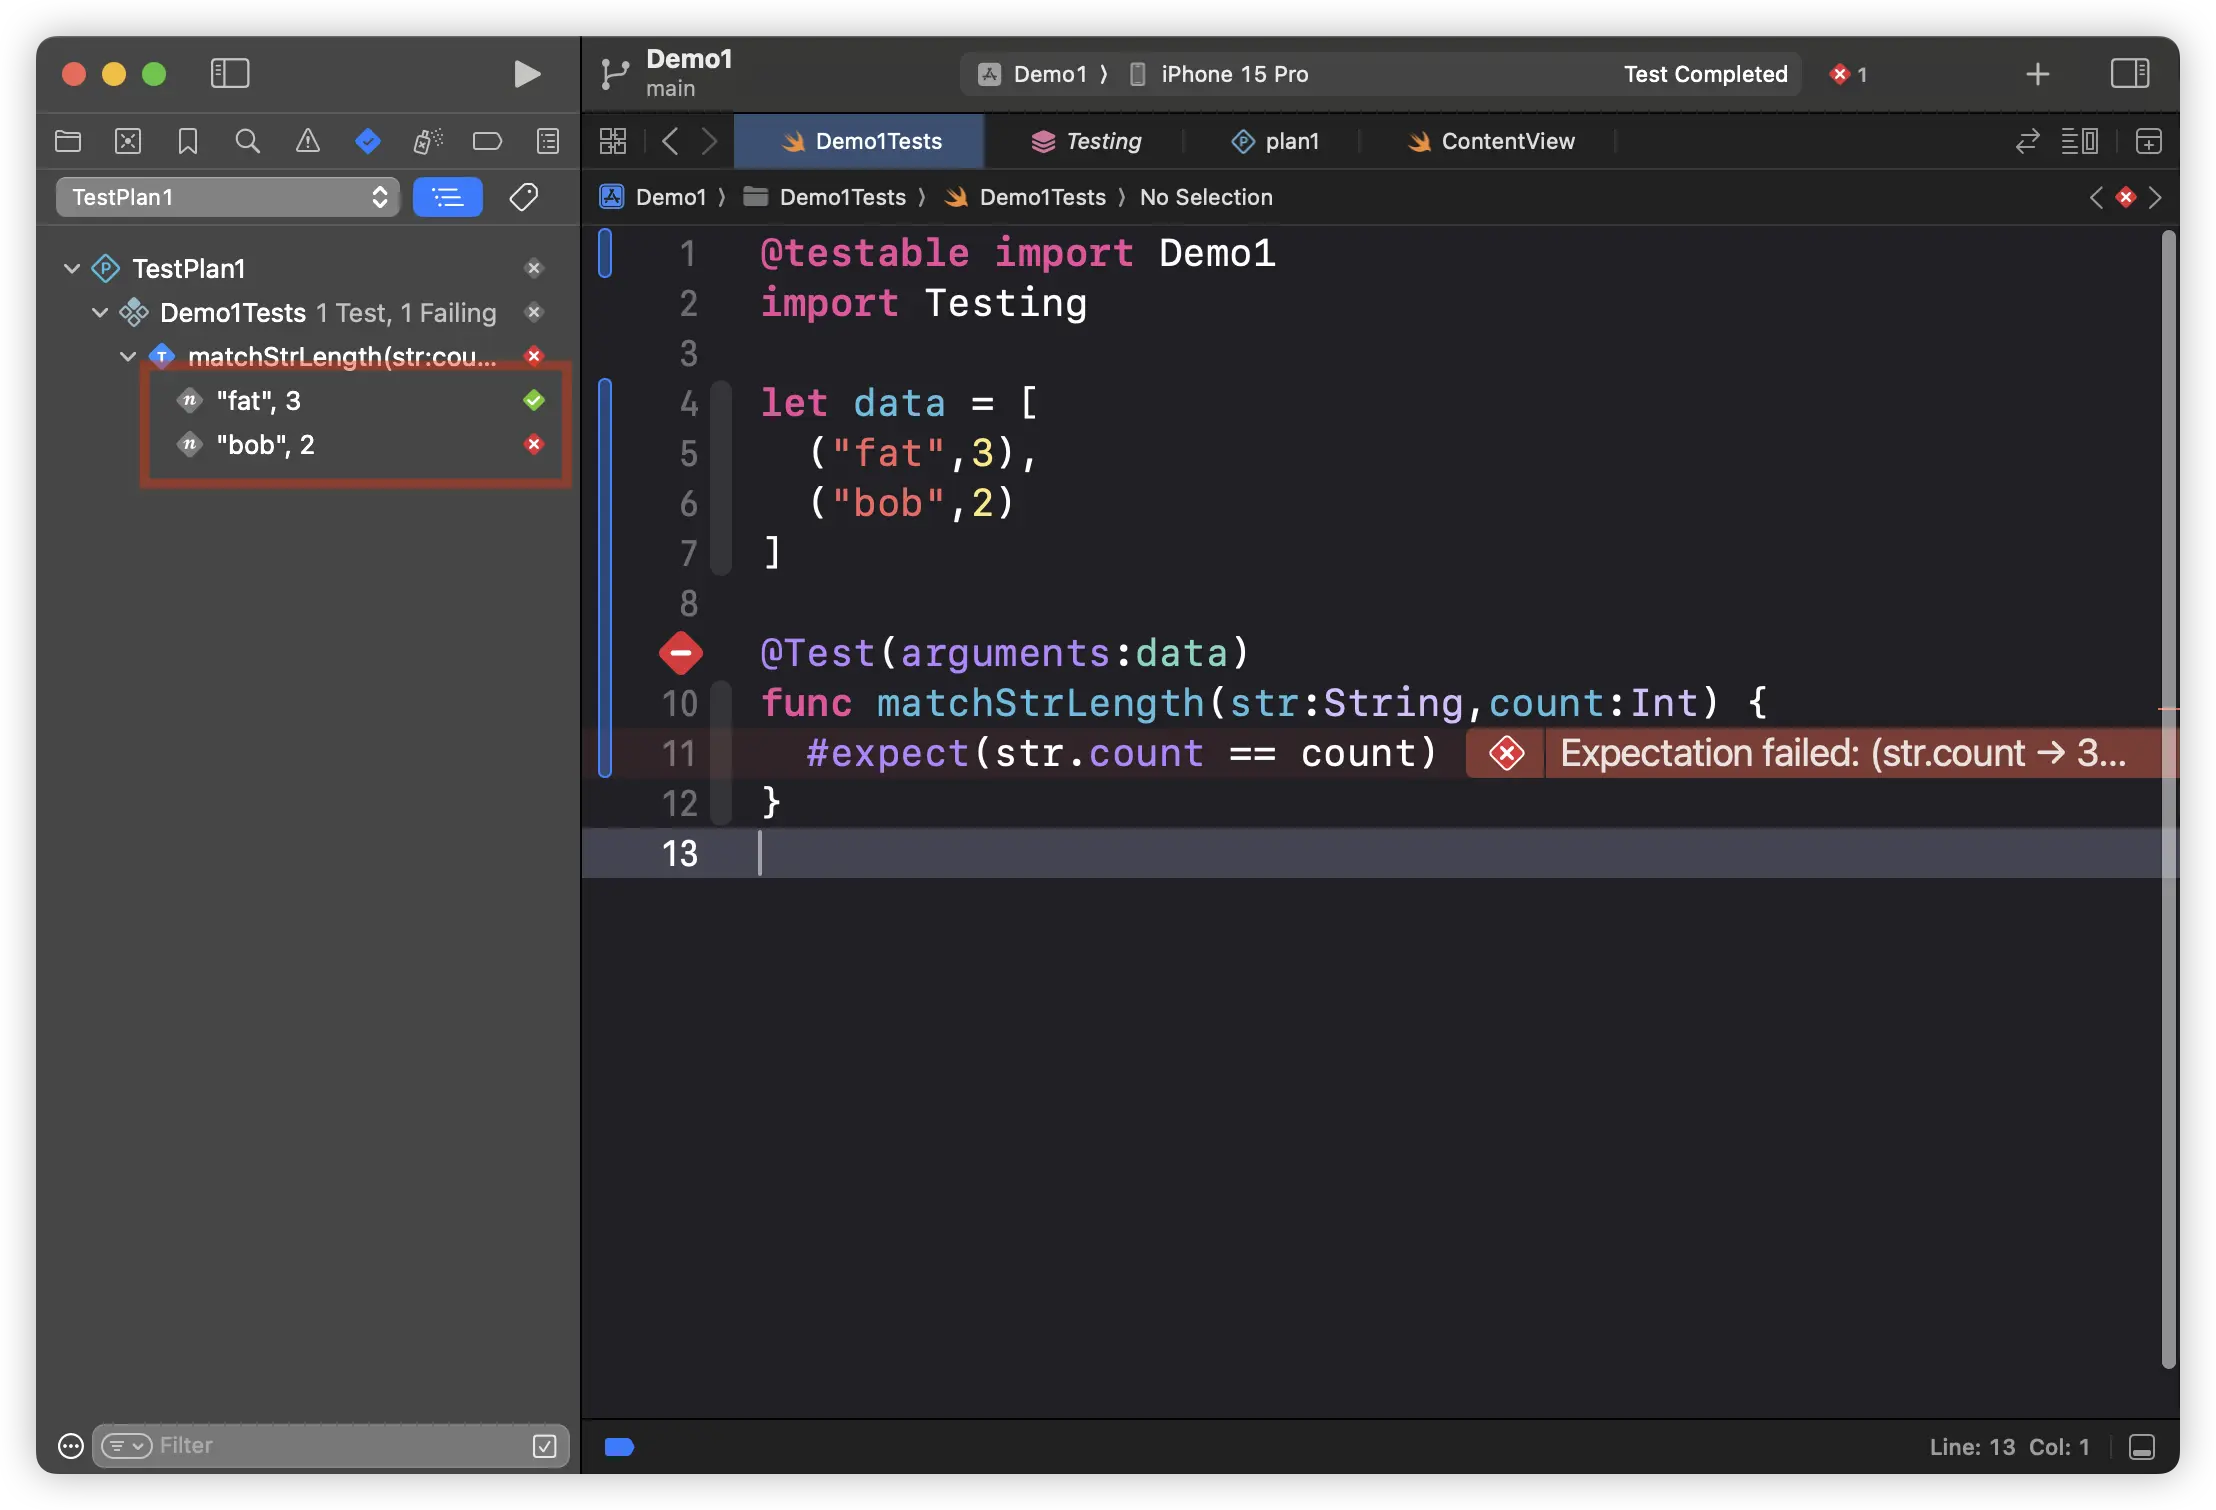
In the tests above, an error with the data for “bob” being “2” was identified, and after adjusting it to “3”, you can click on the corresponding “bob” parameter in the navigation bar to run the test for that specific data set alone.
Swift Testing supports using any data structure that conforms to the Collection protocol as a source of parameters, with the requirement that the data types are consistent and each item complies with the Sendable protocol. The following data declarations can all be used as sources for the matchStrLength test:
let data: [String: Int] = [
  "fat": 3,
  "bob": 3,
]
@Test(arguments: data)

let strs = ["fat","bob"]
let counts = [3,3]
@Test(arguments: strs,counts)

let strs = ["fat","bob"]
let counts = [3,3]
@Test(arguments: zip(strs,counts))
The parallel execution of parameterized tests not only simplifies the testing code but also significantly enhances the flexibility and accuracy of the testing process through automatic tracking of test parameters and the provision of selective rerun capabilities.
Parallelization
Swift Testing adopts a default parallelized testing approach. Parallelization not only speeds up the output of test results and shortens iteration cycles but also helps reveal hidden dependencies between tests, prompting developers to implement stricter state isolation measures in their code.
For tests unsuitable for parallel execution, the serialized trait can be added to @Suite to disable parallelization. Due to the inheritable nature of traits, once a suite is marked as serialized, all tests within it will execute sequentially.
Parameterized testing is also parallelized by default, significantly enhancing test efficiency compared to traditional for in loop iterations. However, this method does not guarantee the order of data processing.
In XCTest, adding the @MainActor or other GlobalActor annotations to a subclass of XCTestCase might trigger warnings, forcing developers to add @MainActor to each test case individually.
@MainActor // Main actor-isolated class 'LoggerTests' has different actor isolation from nonisolated superclass 'XCTestCase'; this is an error in the Swift 6 language mode
class LoggerTests: XCTestCase {
}
In Swift Testing, such restrictions do not exist. You can directly use the @MainActor annotation on a Suite or declare an actor type of Suite. It is important to note that even in this setup, the included test cases will still execute in parallel, thus the order of execution cannot be guaranteed.
Developers can define init and deinit methods for each suite to prepare and clean up data for each test case:
actor IntermediateTests {
  private var count: Int

  init() async throws {
    // Runs before each @Test instance method in this type
    this.count = try await fetchInitialCount()
  }

  deinit {
    // Runs after each @Test instance method in this type
    print("count: \(count), delta: \(delta)")
  }

  @Test func example3() async throws {
    delta = try await computeDelta()
    count += delta
    // ...
  }
}
The testing framework creates an independent suite instance for each test case, ensuring that variables within each instance are isolated, thus supporting a higher degree of test isolation and parallelism.
Mixing with XCTest
Swift Testing is an emerging testing framework that does not yet support certain functionalities, such as performance and UI testing, necessitating its use alongside other testing frameworks like XCTest. Moreover, it is unrealistic to expect developers to convert all existing XCTest cases to Swift Testing at once. Therefore, Swift Testing is designed to coexist with XCTest within the same target, supporting a gradual migration.
It is important to note that using XCTest assertions within Swift Testing, or vice versa, is not allowed.
By executing the swift test --enable-swift-testing command in the command line, it is possible to run test cases from both Swift Testing and XCTest in a single run, achieving seamless integration of the two frameworks.
Does Swift Testing Only Run in Swift 6 Language Mode?
While Swift Testing requires the Swift 6 toolchain to run, it does not mandate the use of Swift 6 language mode. Even under Swift 5 language mode, or with minimal concurrency checks, Swift Testing operates normally. However, to fully leverage the concurrent testing capabilities offered by Swift Testing, developers are encouraged to use more modern concurrency models and enforce strict data race restrictions, thereby benefiting from these default features.
Open Source and Cross-Platform
Swift Testing is an open-source framework developed under community leadership, covering all major platforms supported by the Swift language, including the Apple ecosystem, Linux, and Windows. As an open-source project, Swift Testing is more than just a testing tool; it is a vibrant technical community. The development team actively encourages developers worldwide to participate in the project’s discussions and development. Whether it’s proposing new ideas, reporting issues, or directly contributing code, every effort helps Swift Testing grow and mature more quickly.
This open and collaborative model not only ensures that the framework continues to improve and adapt to evolving development needs but also provides Swift developers with a valuable opportunity to learn and influence the direction of testing tools. By actively participating, developers can collectively shape the future of this critical component within the Swift ecosystem.
Conclusion
The Swift Testing framework offers a new testing experience for Swift developers. Its concise syntax, flexible expression of expectations, and robust feature support make writing and maintaining test code not only faster (Swifter) but also more in tune with the habits of Swift developers (Swifty). This article has detailed the core functionalities of Swift Testing with code examples, showing how to apply it in projects and utilize its unique advantages to enhance test quality.
In practice, gradually transitioning to the Swift Testing framework is a prudent choice. Developers can start by adopting Swift Testing for new test cases and gradually migrate existing XCTest cases. Meanwhile, for performance and UI tests, Swift Testing still needs to be used in conjunction with other testing frameworks to achieve comprehensive test coverage. As Swift Testing continues to evolve and improve, we look forward to it bringing more functionalities and optimizations. The introduction of Swift Testing not only enriches the Swift language ecosystem but also marks a significant step in enhancing developer productivity. Let’s anticipate the additional surprises Swift Testing will bring to Swift development!