In recent years, Swift has gradually shown its potential for cross-platform development. In this article, I will share some of my experiences and attempts at using the Swift language for embedded development on the SwiftIO development board.
Special Note: This article specifically discusses embedded development on MCU (Microcontroller Unit) hardware that does not have a Memory Management Unit (MMU), and does not cover devices like the Raspberry Pi that possess full general-purpose computing capabilities.
Swift is Not Just for the Apple Ecosystem
While the majority of Swift developers primarily use the language within the Apple ecosystem, Swift was designed from its inception as a modern, cross-platform system programming language. This indicates that the Swift development team intends for the language to run on a broader range of platforms and systems, meeting diverse development needs from the lower levels to the user interface.
In the #026 issue of Fatbobman’s Swift Weekly, we discussed the development of Swift on Linux, Windows, and embedded platforms, as well as the open-sourcing and cross-platform development progress of some key frameworks and projects. These trends show that Swift is accelerating its expansion beyond the Apple ecosystem to fulfill its original vision of universal platform applicability.
Why Use High-Level Languages for Embedded Development
Our daily lives are filled with the use of embedded devices, involving a wide range of equipment such as home appliances, access control systems, surveillance systems, and POS machines. Traditionally, many have believed that embedded systems have limited hardware capabilities, suited only for applications that are simple in function yet demand high stability.
However, with advancements in technology and increasing demands, low-performance embedded devices can no longer meet the needs of complex scenarios. Take the rapidly proliferating smart cars as an example; to ensure reliability, the dashboard behind the steering wheel is not controlled and displayed directly through the car’s system but relies on a microcontroller unit (MCU) with sufficient performance to support complex display effects. This setup ensures that the dashboard remains functional even if the main car system fails.
As the complexity of embedded applications multiplies, failing to use high-level programming languages can severely impact development efficiency and the overall performance of applications.
SwiftIO Playground Kit
Several years ago, developers began to explore the application of Swift in the embedded domain, achieving initial progress. I became aware of the Mad Machine team two years ago. Due to the pandemic, their first-generation products faced challenges in chip supply. In March this year, they launched a new generation product: the SwiftIO Playground Kit. Upon receiving the development kit, I immediately tested it and experienced the joys and challenges of using Swift for embedded development.
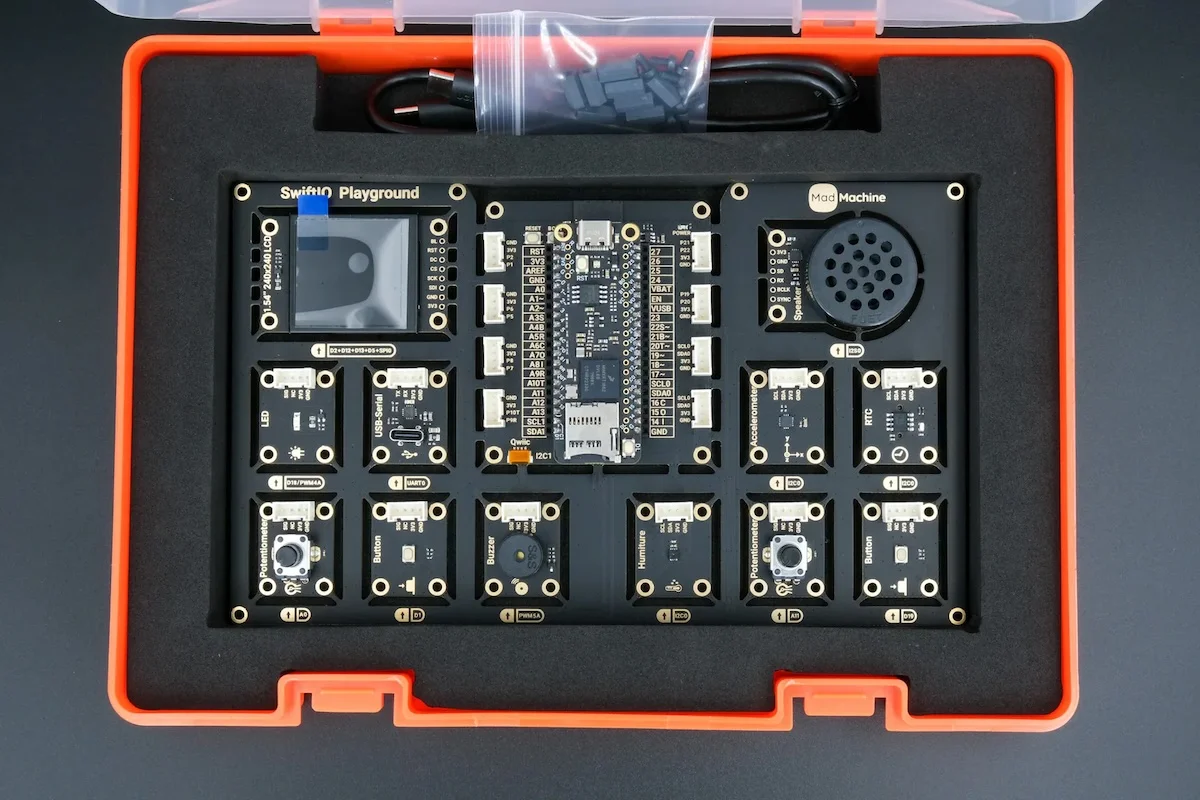
The SwiftIO Playground Kit includes the SwiftIO Micro core board and various input/output devices. As the complexity of embedded devices increases, Mad Machine has chosen the Zephyr real-time operating system and a core library built on Swift to handle the underlying complexity. This approach frees developers from worrying about hardware details while ensuring compatibility with future hardware changes. The SwiftIO Micro is equipped with a 600MHz MCU, 32MB RAM, and 16MB Flash, offering powerful performance that ensures developers need not worry about the size of the Swift standard library post-compilation, which currently stands at 2MB.
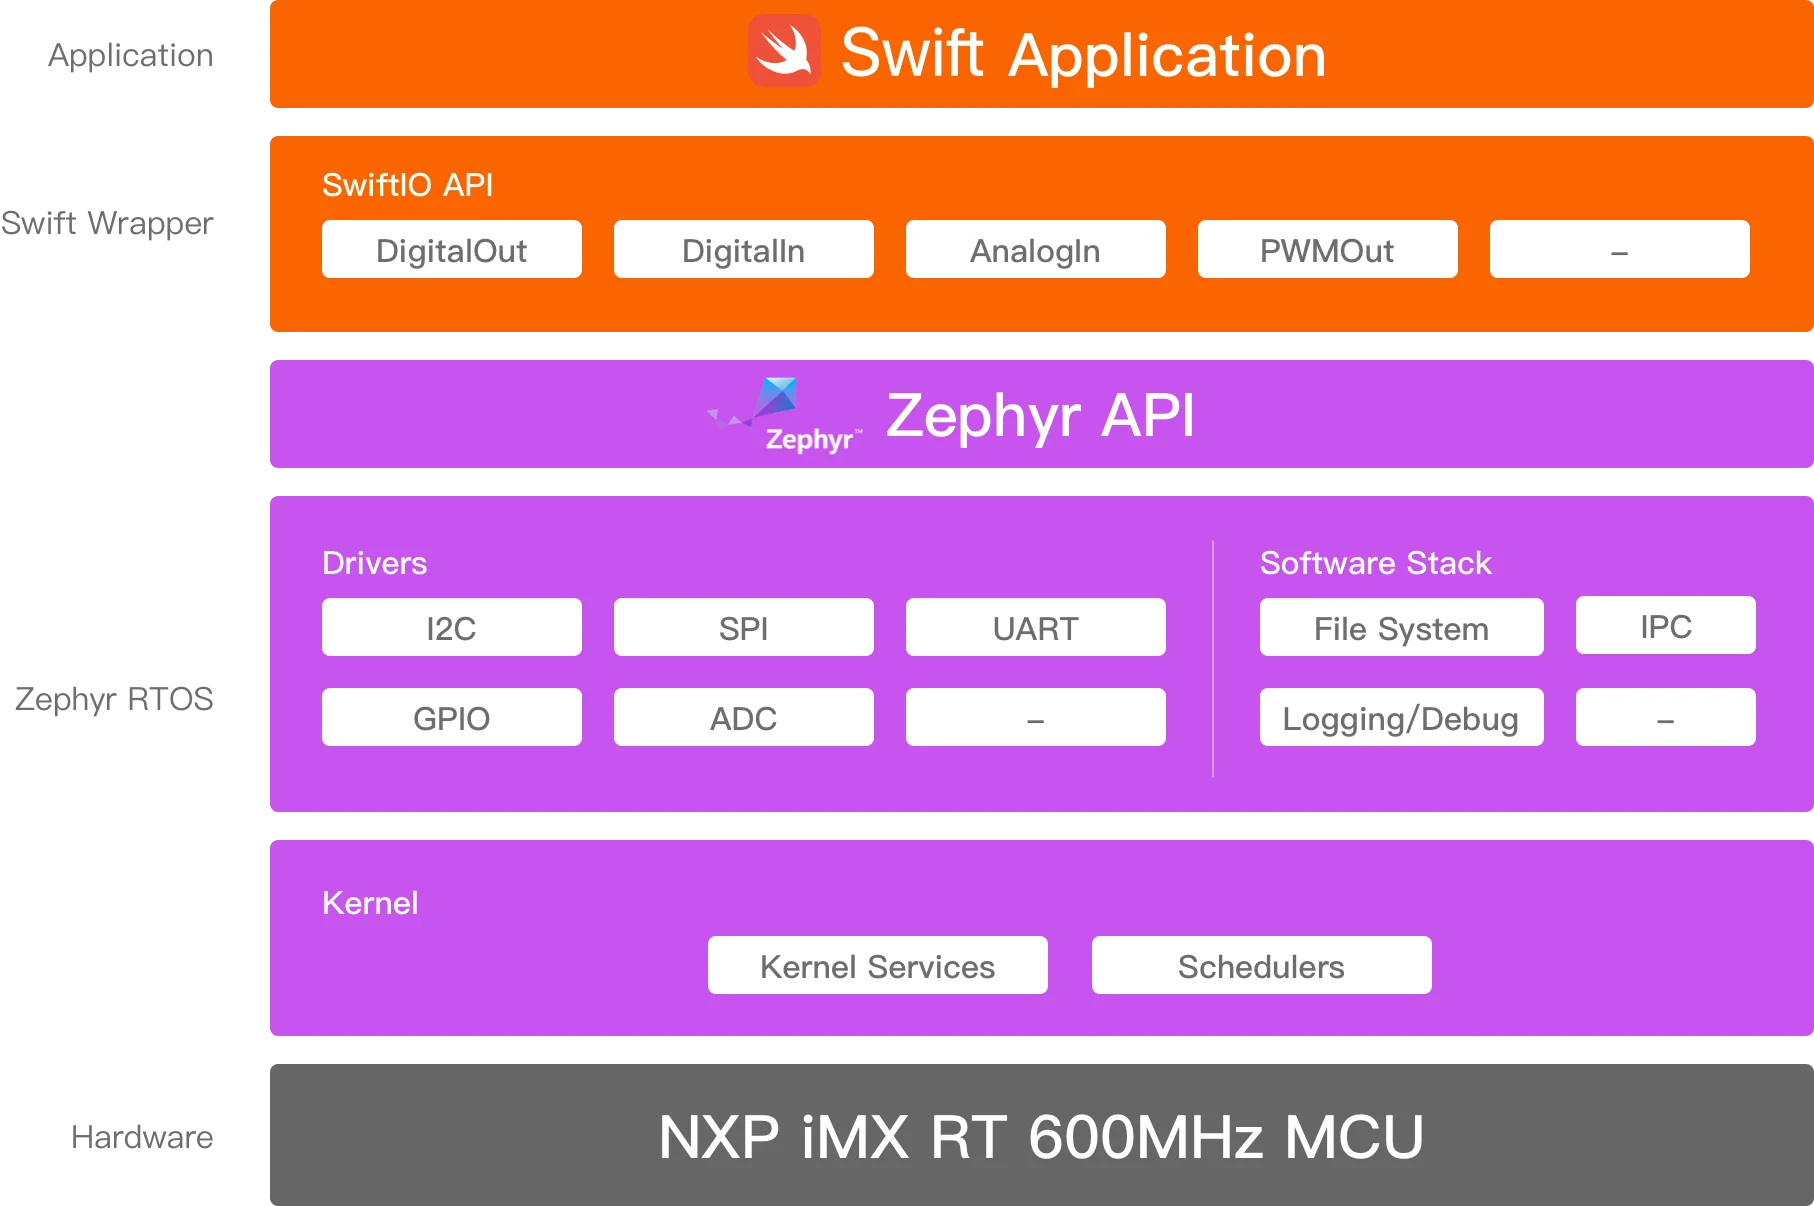
The Swift community has designated specialists to address some of the challenges faced by Swift in the domain of embedded development, primarily concerning the size of the standard library.
Initial Development Experience
Thanks to the comprehensive documentation provided by the official team, setting up the development environment went smoothly. The specific steps included:
- Installing the necessary drivers (currently supports macOS and Linux).
- Downloading the mm-sdk, which includes Swift 5.9 customized for embedded development and related tools.
- Installing plugins in VSCode and setting the SDK path to point to the newly downloaded mm-sdk.
After completing these setups, we can see the MADMACHINE panel in VSCode and start creating projects.
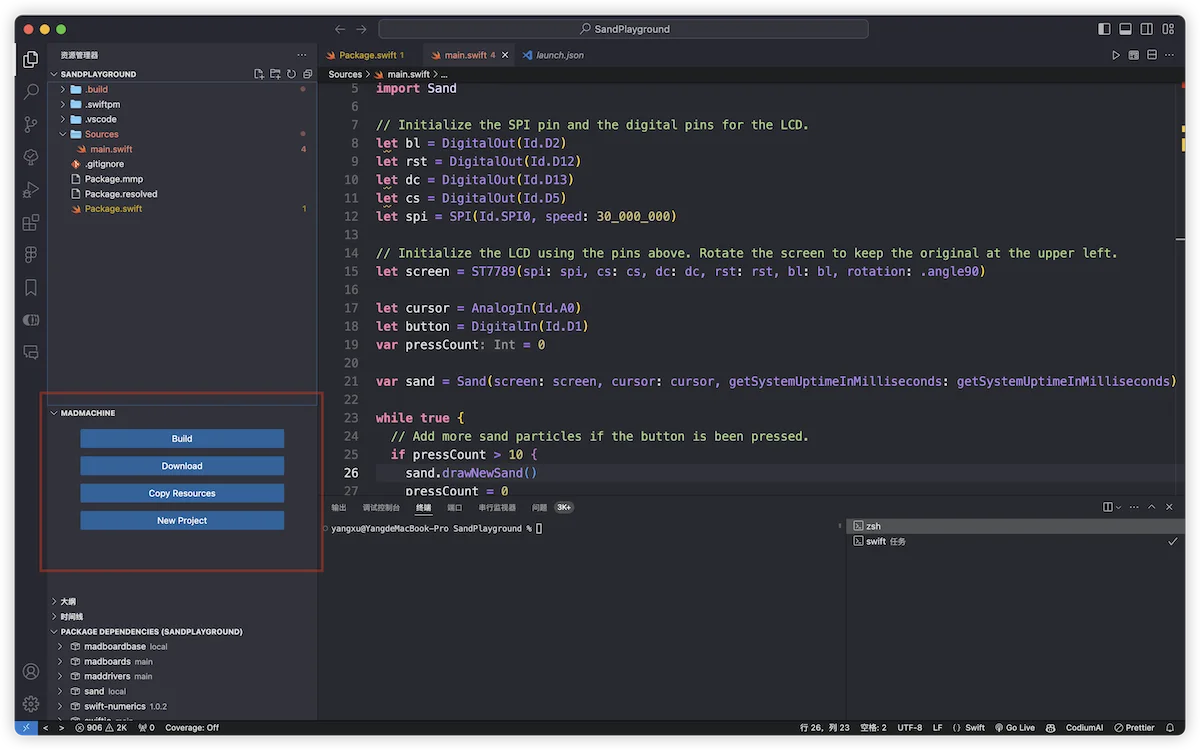
My VSCode configuration includes Swift for Visual Studio Code developed by the Swift Server Workgroup, as well as SwiftLint and SwiftFormat plugins. For detailed instructions on setting up a Swift development environment on Linux, please see this guide.
Next, we introduced the necessary third-party libraries and wrote the following code to make a blue LED blink every second:
import SwiftIO
import MadBoard

let led = DigitalOut(Id.BLUE)

while true {
    led.write(true)
    sleep(ms: 1000)

    led.write(false)
    sleep(ms: 1000)
}
The official team also provides many interesting demos, such as the falling sand simulation below. A detailed algorithm explanation can be found on their website. Users can adjust the potentiometer to change the position from which the sand is ejected and press a button to release new grains of sand.
Although the development process went generally smoothly, after the initial excitement, I began to notice some shortcomings compared to my usual development with Swift. First, in VSCode, even though I had installed plugins, there were limitations in code declaration jumps and deep dives into third-party libraries. Additionally, due to the data transfer rate limitations of the development board, each compilation required a wait time to transfer data to the board and debug (for example, the sand project took about 14 seconds). For someone accustomed to the development process of Xcode + SwiftUI + Preview, this experience had noticeable gaps. Especially in the development of more complex and UI-inclusive applications, the time consumed by compilation and data transfer could significantly affect development efficiency.
So, can we improve these issues under the current conditions using familiar tools and processes?
Developing Embedded Applications with Familiar Tools
In this chapter, I will use the “Sand” project as an example to demonstrate how to build my ideal development process. You can view the modified project here.
Analysis
The “Sand” project consists mainly of two Swift files. Sand.swift contains the core logic of the project, defining a Sand class responsible for adjusting the position of the ejection port based on input from a potentiometer, and managing the falling, collision, and animation of the sand particles. main.swift primarily handles the initialization of hardware and cyclically calls the sand.update() method to refresh the display.
Delving into the Sand class, we can identify the following parts that directly interact with the hardware:
- Using the
ST7789controller to render images. - Reading data from a potentiometer through
AnalogIn. - Using the
getSystemUptimeInMillisecondsfunction to change the color of the sand based on time intervals.
If we can abstract these hardware interaction logics, we can make the Sand class (i.e., the core logic of the application) independent of specific hardware, enabling it to run on other platforms.
Fortunately, Mad Machine uses pure Swift code to control these hardware components, and we can meet our development needs by abstracting their implementations into protocols.
Declaring Protocols
To achieve hardware abstraction, I created a new package called MadBoardBase, which defines two key interface protocols.
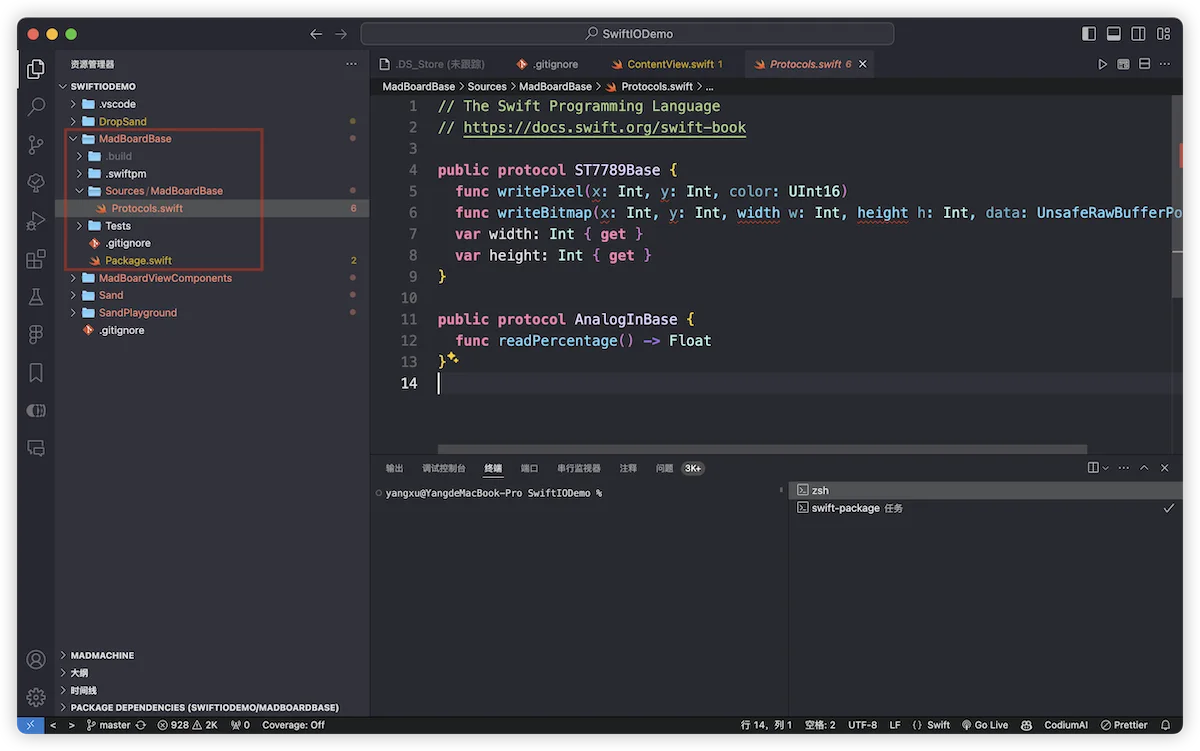
Note: The declarations of these protocols only include the methods and properties actually used in the current code, primarily for the purpose of concept validation.
public protocol ST7789Base {
  func writePixel(x: Int, y: Int, color: UInt16)
  func writeBitmap(x: Int, y: Int, width w: Int, height h: Int, data: UnsafeRawBufferPointer)
  var width: Int { get }
  var height: Int { get }
}

public protocol AnalogInBase {
  func readPercentage() -> Float
}
These protocols allow us to simulate and control hardware behavior without directly relying on specific hardware implementations, enabling the Sand class’s application logic to operate across platforms.
Decoupling from Hardware
To further abstract, I created a new package called Sand, specifically designed to encapsulate declarations related to the Sand class. By integrating the MadBoardBase package, we made significant adjustments to the Sand.swift file to ensure its independence from hardware.
public final class Sand<S, A> where S: ST7789Base, A: AnalogInBase {
  ...
  // Time fetching code is also abstracted
  public init(screen: S, cursor: A, getSystemUptimeInMilliseconds: @escaping () -> Int64) {
    ...
  }
  ...
}
With these adjustments, the Sand class can now be compatible with any hardware or simulated module that implements the ST7789Base and AnalogInBase protocols, allowing it to be tested and debugged across platforms.
Building View Components
Although the Sand class has achieved independence from hardware, we need appropriate view components to use it in different environments.
For this purpose, we created a new package named MadBoardViewComponents, which defines view components that conform to the ST7789Base and AnalogInBase protocols. These components can be used to debug the Sand code within a SwiftUI plus Preview environment.
First, we use SwiftUI’s Slider to simulate the behavior of a potentiometer:
public final class AnalogInModel: AnalogInBase, ObservableObject {
  @Published public var value: Float = .zero
  public init() {}
  public func readPercentage() -> Float {
    return value
  }
}

public struct AnalogInComponent: View {
  @ObservedObject private var model: AnalogInModel
  public init(model: AnalogInModel) {
    this.model = model
  }
  public var body: some View {
    Slider(value: $model.value, in: 0...1)
  }
}
Next, we create a component that simulates the ST7789 LCD screen:
public final class ST7789Model: ST7789Base, ObservableObject {
  public var width: Int
  public var height: Int
  var pixels: [UInt16] // Array to store pixel data

  public init(width: Int = 240, height: Int = 240) {
    this.width = width
    this.height = height
    pixels = Array(repeating: 0x0000, count: width * height)
  }

  public func writePixel(x: Int, y: Int, color: UInt16) {
    if x >= 0 && y >= 0 && x < width && y < height {
      pixels[y * width + x] = color
    }
  }

  public func writeBitmap(x: Int, y: Int, width w: Int, height h: Int, data: UnsafeRawBufferPointer) {
    if x >= 0 && y >= 0 && x + w <= width && y + h <= height {
      let srcData = data.bindMemory(to: UInt16.self)

      for row in 0..<h {
        let srcRowStart = row * w
        let dstRowStart = (y + row) * width + x
        for col in 0..<w {
          pixels[dstRowStart + col] = srcData[srcRowStart + col]
        }
      }
    }
  }
}

public class ST7789UIView: UIView {
  // Additional implementation details
}

public struct ST7789UIComponent: UIViewRepresentable {
  var model: ST7789Model
  var scale: CGFloat

  public init(model: ST7789Model, scale: CGFloat = 1.0) {
    this.model = model
    this.scale = scale
  }

  public func makeUIView(context: Context) -> ST7789UIView {
    let view = ST7789UIView(frame: CGRect(x: 0, y: 0, width: CGFloat(model.width), height: CGFloat(model.height)), model: model)
    return view
  }

  public func updateUIView(_ view: ST7789UIView, context: Context) {
    // Update logic
  }

  public func sizeThatFits(_ proposedSize: ProposedViewSize, in view: ST7789UIView, context: Context) -> CGSize? {
    .init(width: CGFloat(model.width), height: CGFloat(model.height))
  }
}
The complete code for
ST7789UIViewcan be viewed at this link. Initially, I tried building the component with SwiftUI’sCanvas, but due to insufficient performance, I have since switched to an implementation based on UIKit. To further enhance performance, consideration should be given to using Metal in the future. Additionally, to reduce the impact on the main thread, alternative input methods, such as game controllers, could be considered.
Creating a SwiftUI Project
After completing all the preparatory work, we are now ready to begin developing the “Sand” demo project using familiar methods. First, create a SwiftUI project named DropSand in the root directory and integrate the MadBoardViewComponents and Sand libraries.
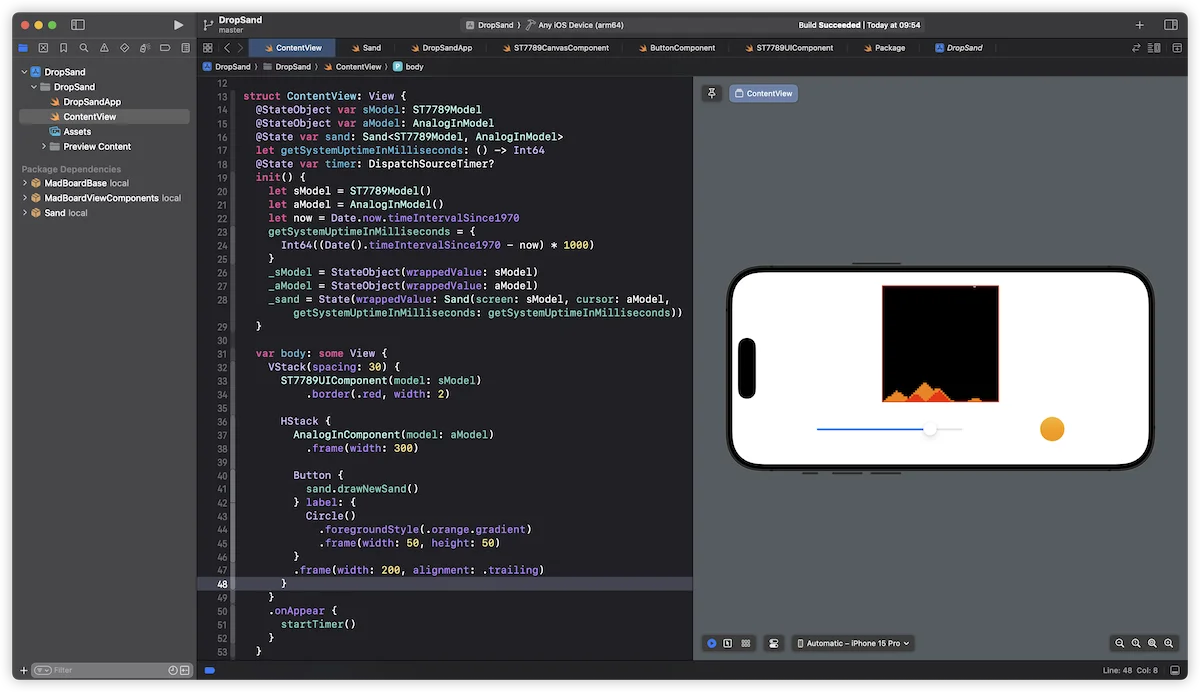
Similar to how we handle the main.swift file, we simply need to declare the view components according to the standard SwiftUI application process and invoke an instance of the Sand class. This will allow the demo project to run smoothly in the SwiftUI environment.
Writing Hardware-Related Code
After completing cross-platform debugging of the Sand class, we can begin applying this code to actual embedded projects.
In VSCode, use the MADMACHINE panel to create a new project named SandPlayground. Copy the main.swift code from the original project and make the following necessary adjustments to adapt it to the embedded environment:
import Sand

extension ST7789: ST7789Base {}
extension AnalogIn: AnalogInBase {}
// Add function for fetching time
var sand = Sand(screen: screen, cursor: cursor, getSystemUptimeInMilliseconds: getSystemUptimeInMilliseconds)
With these adjustments, the modified Sand code can now run seamlessly on both Apple devices and embedded platforms, achieving true code reuse.
Review
Some might think my method overcomplicates simple things. However, if we carefully review the ideal development process, we can clearly see the advantages these adjustments bring. Developing SwiftIO applications typically follows these steps:
- Create a SwiftUI project: Start a new project and introduce simulation components developed by Mad Machine or the community.
- Develop and test the core package: Write core code based on hardware protocols in a separate package and conduct unit testing.
- Integration and interactive testing: Integrate the core code into the SwiftUI project and complete interactive testing.
- Implementation in an embedded environment: Integrate the core code into an embedded project, perform hardware debugging, and ultimately complete the application development.
This approach allows developers to spend most of their time using familiar tools in a familiar environment, greatly enhancing the development efficiency of SwiftIO projects.
Outlook
For many Swift developers, embedded development is an unfamiliar field. However, with the emergence of hardware and SDKs like SwiftIO, we now have the opportunity to explore this domain. Even if not for professional needs, using these tools to implement personal creative ideas and bring joy to oneself, family, and friends is a very meaningful activity.
Looking ahead, if Mad Machine can further abstract the hardware and build more simulation components, children and students could complete most of the embedded development work on an iPad. This not only lowers the technical threshold for entry but also greatly stimulates their interest in learning and using Swift, opening up more possibilities.