This article is based on my presentation at the “SwiftUI Technology Salon (Beijing Station)” on April 20, 2023, and is organized from memory. For more details about the event, you can refer to the article I Attended a SwiftUI Tech Salon in Beijing.
The format of this event was offline interaction complemented by live coding, so the focus and organization of the content differ significantly from previous blog posts.
Opening Remarks
Hello everyone, I am Fatbobman. Today, I want to discuss the topic of building cross-platform SwiftUI apps.
Movie Hunter
Let’s start with an example before we delve into today’s main topic.

This is a demo application I created for this talk – “Movie Hunter”. It’s developed 100% in SwiftUI and currently supports three platforms: iPhone, iPad, and macOS.
Users can browse movie information through it, including movies that are currently in theaters and upcoming releases. It allows users to explore movies based on various dimensions such as public opinion, ratings, popularity, and movie genres.
“Movie Hunter” is a demo specifically prepared for this talk, so it only includes essential features.
Compared to the iPhone version, the iPad version not only adjusts the layout to utilize the larger screen space but also offers the ability to run in multiple windows, allowing users to operate independently in each window.
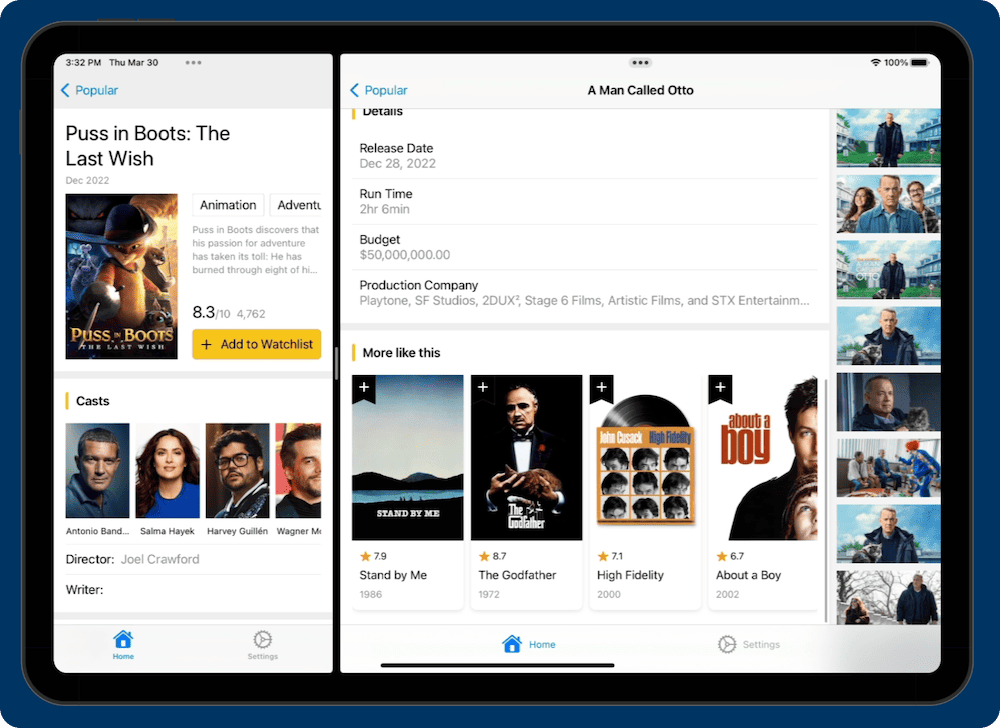
The macOS version has more adaptations to fit the macOS style, such as a settings view that conforms to macOS standards, pointer hover responses, menu bar icons, and the ability to create new windows that jump directly to specific movie categories (based on a data-driven WindowGroup).

Due to time constraints, we will not discuss the complete adaptation process of this app in this talk. Instead, we will focus on two aspects that I personally find important yet easy to overlook.
Compatibility
Unlike many cross-platform frameworks that advocate the “Write once, run anywhere” philosophy, Apple’s approach to SwiftUI is more about “Learn once, apply anywhere.”
In my understanding, SwiftUI is more of a programming philosophy. Once mastered, it equips developers with the ability to work across different platforms within the Apple ecosystem for an extended period. From another perspective, while most SwiftUI code can run on various platforms, some parts are platform-specific, often showcasing the unique features and advantages of those platforms.
SwiftUI sets certain compatibility constraints, prompting developers to consider the differences in platform characteristics when adapting to multiple platforms, and make targeted adjustments based on these differences.
However, if developers fail to understand this “constraint” of SwiftUI and do not prepare in advance, it could lead to potential issues and unnecessary workload in later stages of multi-platform development.
Take the iPad version of “Movie Hunter” as an example. On the iPad, users can adjust the window size of the app. To align the layout with the current window state, we often use environment values for assessment in the view:
@Environment(\.horizontalSizeClass) var sizeClassLayout adjustments are made dynamically based on whether the sizeClass is compact or regular.
If your app is only intended for iPadOS, this approach is entirely appropriate. However, for “Movie Hunter”, which needs to be adapted to macOS as well, this method poses a problem.
The horizontalSizeClass environment value is not available on macOS, as UserInterfaceSizeClass is a concept unique to iOS (iPadOS). The more the view code relies on this environment value, the more adjustments will be needed later on.

To avoid repeating code adjustments when adapting to other platforms, a similar approach to horizontalSizeClass can be used (via an environment variable) to create a custom environment variable that works across all targeted platforms.
First, create a DeviceStatus enumeration:
public enum DeviceStatus: String {
  case macOS
  case compact
  case regular
}
In this enum, in addition to the two window states found in iOS, we have also added an enumeration item for macOS.
Then, create an environment value of type DeviceStatus:
struct DeviceStatusKey: EnvironmentKey {
  #if os(macOS)
    static var defaultValue: DeviceStatus = .macOS
  #else
    static var defaultValue: DeviceStatus = .compact
  #endif
}

public extension EnvironmentValues {
  var deviceStatus: DeviceStatus {
    get { self[DeviceStatusKey.self] }
    set { self[DeviceStatusKey.self] = newValue }
  }
}
With the conditional compilation statement #if os(macOS), the environment value is set to the corresponding option on macOS. We also need to create a View Modifier to be able to understand the current window state in iOS:
#if os(iOS)
  struct GetSizeClassModifier: ViewModifier {
    @Environment(\.horizontalSizeClass) private var sizeClass
    @State var currentSizeClass: DeviceStatus = .compact
    func body(content: Content) -> some View {
      content
        .task(id: sizeClass) {
          if let sizeClass {
            switch sizeClass {
            case .compact:
              currentSizeClass = .compact
            case .regular:
              currentSizeClass = .regular
            default:
              currentSizeClass = .compact
            }
          }
        }
        .environment(\.deviceStatus, currentSizeClass)
    }
  }
#endif
When the view’s horizontalSizeClass changes, the custom deviceStatus is updated accordingly. Finally, a View Extension combines the different platform codes:
public extension View {
  @ViewBuilder
  func setDeviceStatus() -> some View {
    self
    #if os(macOS)
    .environment(\.deviceStatus, .macOS)
    #else
    .modifier(GetSizeClassModifier())
    #endif
  }
}
Apply setDeviceStatus to the root view:
ContentView:View {
    var body:some View {
      RootView()
          .setDeviceStatus()
    }
}
With this, we now have the ability to understand the current window state on iPhone, iPad, and macOS.
@Environment(\.deviceStatus) private var deviceStatusIf, in the future, we need to adapt to more platforms, we just need to adjust the setting of the custom environment value. Although adjusting the view code is still necessary, the amount of modification will be much less compared to using horizontalSizeClass.
setDeviceStatusis not only for use with the root view, but should at least be applied at the widest view in the current app. This is becausehorizontalSizeClassonly represents the current view’s horizontal size class, meaning if you gethorizontalSizeClassin a view with a constrained horizontal size (such as the Sidebar view inNavigationSplitView), the current view’ssizeClasscan only be compact regardless of the application’s window size. We createdeviceStatusto observe the current application window state, so it must be applied at the widest point.
In SwiftUI, besides environment values, another area with significant platform “constraints” is the view’s Modifier.
For instance, when starting to adapt the macOS version of “Movie Hunter” (after completing the adaptation for the iPad version), you will encounter several errors similar to the following after adding the macOS destination and compiling in Xcode:

This is because certain View Modifiers are not supported on macOS. For errors like the one above, a simple solution is to use conditional compilation statements to exclude them.
#if !os(macOS)
    .navigationBarTitleDisplayMode(.inline)
#endif
However, if there are many such compatibility issues, a more permanent solution would be more efficient.
In “Movie Hunter,” navigationBarTitleDisplayMode is a frequently used Modifier. We can create a View Extension to handle compatibility issues across different platforms:
enum MyTitleDisplayMode {
    case automatic
    case inline
    case large
    #if !os(macOS)
        var titleDisplayMode: NavigationBarItem.TitleDisplayMode {
            switch self {
            case .automatic:
                return .automatic
            case .inline:
                return .inline
            case .large:
                return .large
            }
        }
    #endif
}

extension View {
    @ViewBuilder
    func safeNavigationBarTitleDisplayMode(_ displayMode: MyTitleDisplayMode) -> some View {
        #if os(iOS)
            navigationBarTitleDisplayMode(displayMode.titleDisplayMode)
        #else
            self
        #endif
    }
}
This extension can be used directly in views:
.safeNavigationBarTitleDisplayMode(.inline)Preparing compatibility solutions in advance can significantly improve development efficiency when planning to introduce your application to more platforms. This approach not only solves cross-platform compatibility issues but also has other benefits:
- It improves the cleanliness of the code within views (by reducing the use of conditional compilation statements).
- It enhances the compatibility of SwiftUI across different versions.
Of course, the prerequisite for creating and using such code is that developers must already have a clear understanding of the “constraints” of SwiftUI on different platforms (the characteristics, advantages, and handling methods of each platform). Blindly using these compatibility solutions might undermine the intent of SwiftUI’s creators, preventing developers from accurately reflecting the unique features of different platforms.
Source of Truth
After discussing compatibility, let’s talk about another issue that is often overlooked in the early stages of building multi-platform applications: data sources (data dependencies).
When we port “Movie Hunter” from iPhone to iPad or Mac, in addition to having more screen space available, another significant change is that users can open multiple windows simultaneously and operate “Movie Hunter” independently in different windows.
However, if we directly run the iPhone version of “Movie Hunter” on an iPad without multi-screen adaptation, we’ll find that although multiple “Movie Hunter” windows can be opened at the same time, all operations are synchronized. This means that an action in one window is simultaneously reflected in another window, which defeats the purpose of having multiple windows.

Why does this happen?
We know SwiftUI is a declarative framework. This means not only can developers construct views declaratively, but even scenes (corresponding to independent windows) and the entire app are created based on declarative code.
@main
struct MovieHunterApp: App {
    @StateObject private var store = Store()
    var body: some Scene {
        WindowGroup {
            ContentView()
               .environmentObject(store)
        }
    }
}
In the SwiftUI project template created by Xcode, WindowGroup corresponds to a scene declaration. Since the iPhone only supports a single window mode, we usually don’t pay much attention to it. However, in systems like iPadOS and macOS that support multiple windows, it means that every time a new window is created (in macOS, through the new window option in the menu), it will be strictly according to the declaration in WindowGroup.
In “Movie Hunter,” we create an instance of Store (a unit that saves the app state and main logic) at the app level and inject it into the root view with .environmentObject(store). Information injected through environmentObject or environment can only be used in the view tree created for the current scene.
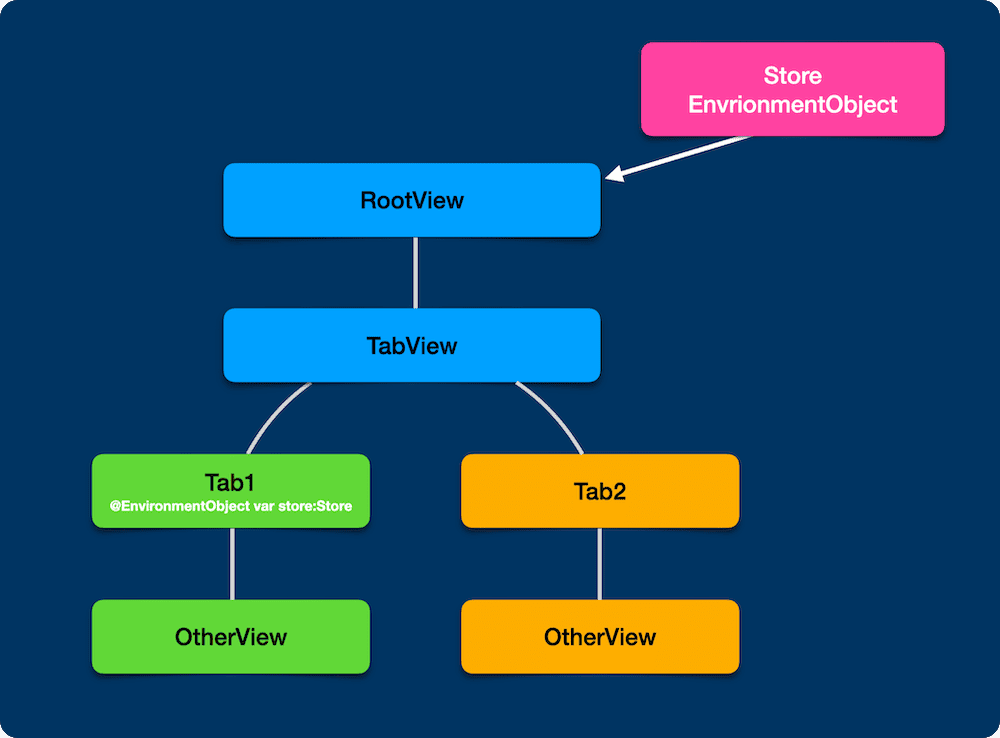
Although the system creates a new view tree when creating a new scene (new window), since the same instance of Store is injected into the root view of the new scene, the application state obtained in different windows is exactly the same, despite the scenes being different.
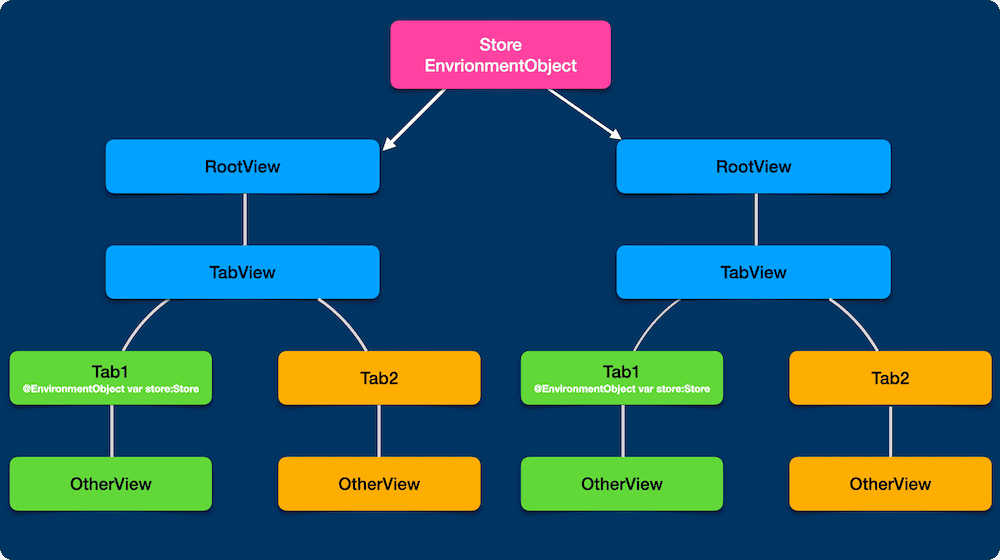
Since “Movie Hunter” uses programmatic navigation, the view stack and the state of TabView are all stored in Store, resulting in synchronized operations.
Therefore, if we plan to introduce the application to a platform that supports multiple windows, it’s best to consider this situation in advance and think about how to organize the app’s state.
For the current state configuration of “Movie Hunter,” we can solve the above problem by moving the creation of the Store instance into the scene (moving the code related to Store in MovieHunterApp into ContentView).
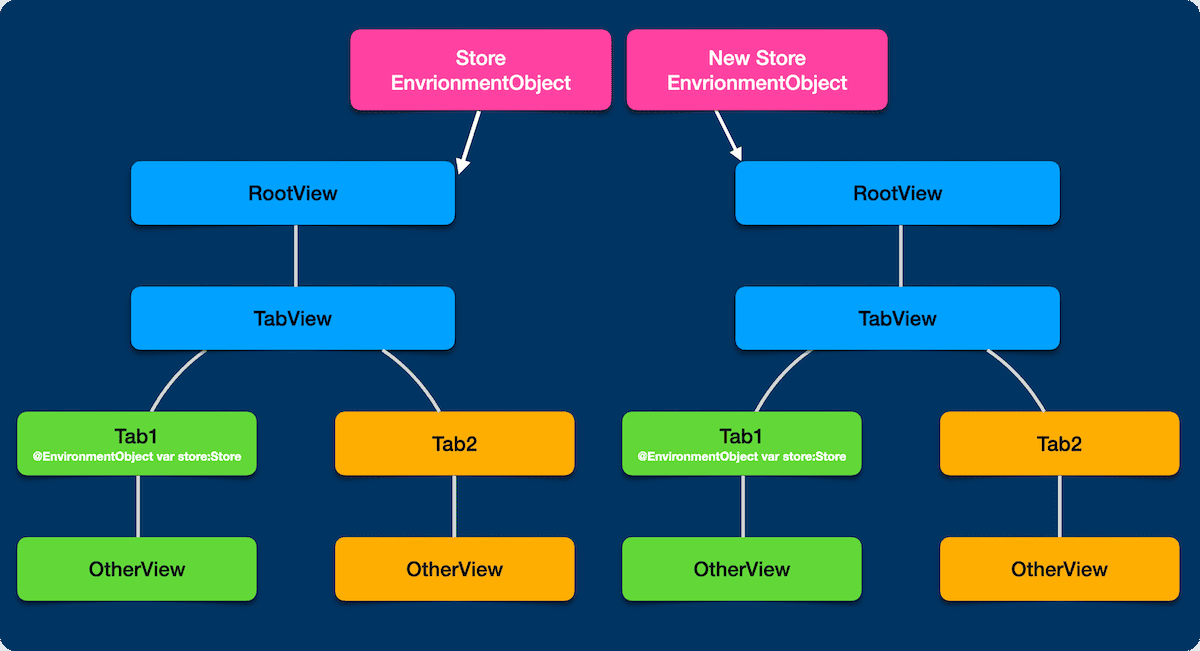
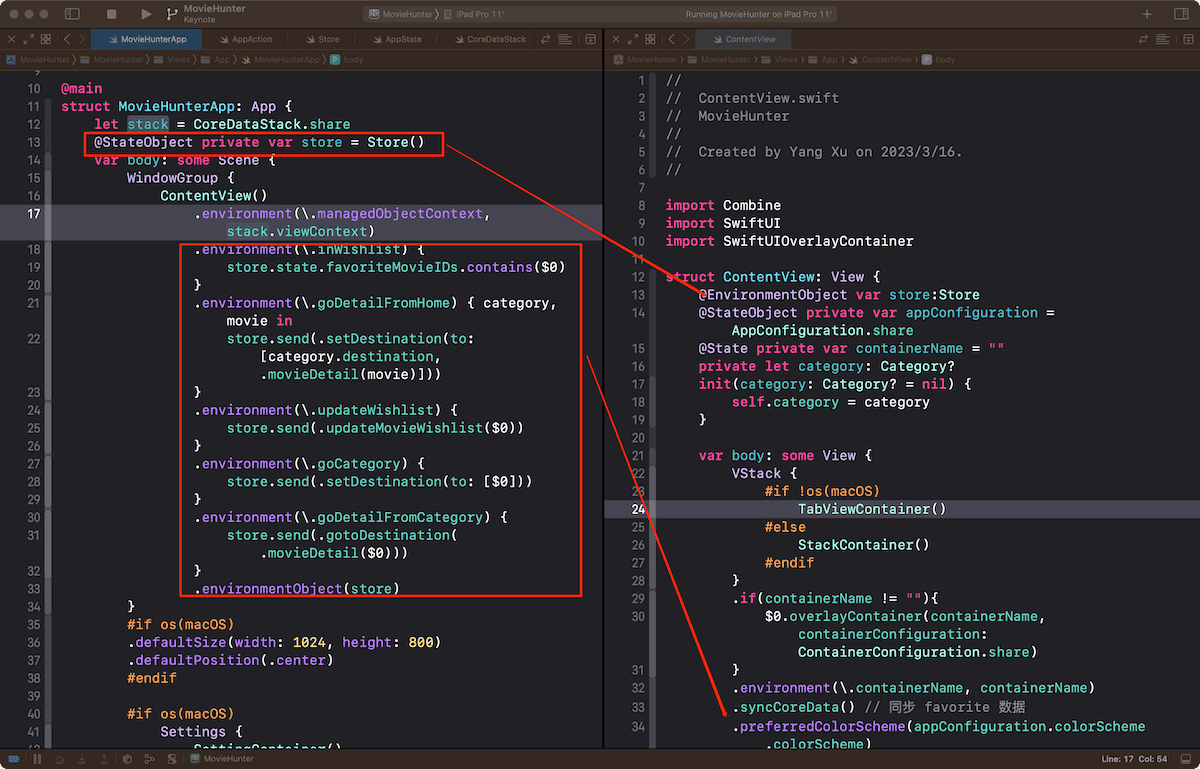
However, this method of creating an independent Store instance in each scene is not suitable for all situations. In many cases, developers only want to maintain a single instance of Store in the app. I will demonstrate this scenario with another simple application.
Many readers might not fully agree with the approach of creating a separate Store instance for each scene. Whether this approach is correct or aligns with the currently popular Single Source of Truth concept will be further discussed later.
Here is a very simple demo - SingleStoreDemo. It has only one Store instance and supports multiple windows, allowing users to independently switch TabViews in each window, with the state of the TabView held by the sole Store instance. Clicking the “Hit Me” button in any tab of any window increases the hit count, which is displayed at the top of the window.
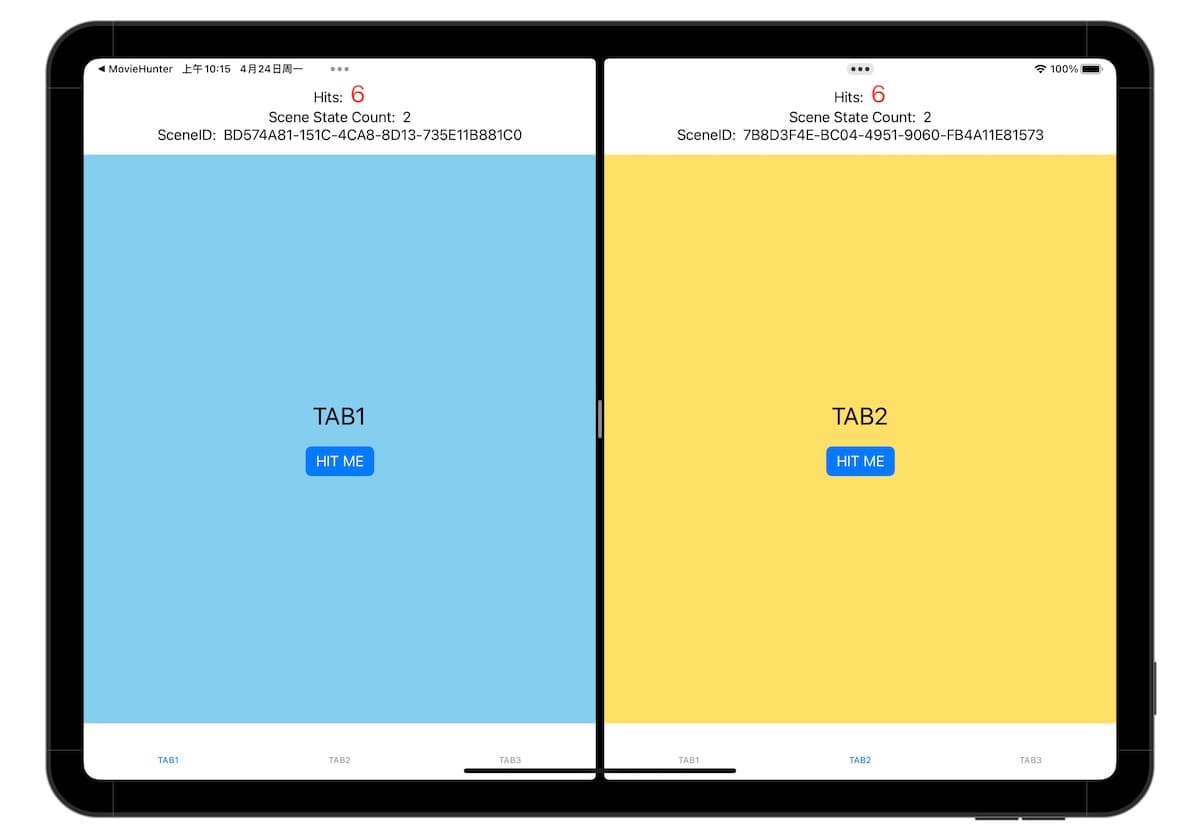
When designing the state of this app, we need to consider which aspects are global states of the application and which are specific to the current scene (window).
struct AppReducer: ReducerProtocol {
    struct State: Equatable {
        var sceneStates: IdentifiedArrayOf<SceneReducer.State> = .init()
        var hitCount = 0
    }
}

struct SceneReducer: ReducerProtocol {
    struct State: Equatable, Identifiable {
        let id: UUID
        var tabSelection: Tab = .tab1
    }
}
In the total State of the application, in addition to the global hitCount, we have isolated the State of the scenes for potential multi-scene requirements. We manage different scene States using IdentifiedArray.
After a scene is created, code in onAppear creates its own State data in the App State, and when the scene is removed, code in onDisappear clears the current scene’s State.
.onAppear {
    viewStore.send(.createNewScene(sceneID)) // create new scene state
}
.onDisappear {
    viewStore.send(.deleteScene(sceneID)) // delete current scene state
}
This way, we can support independent operations in multiple windows through one Store instance.
For more details, please refer to the code
Note that, for some reason (perhaps related to the seed of random numbers), root views created through the same scene declaration, if using @State to create UUIDs or random numbers, will have the exact same values in different windows, even if the windows are created at different times. This makes it impossible to create different state sets for different scenes (the current scene state uses UUID as the identifier). To avoid this, you need to regenerate a new UUID or random number in onAppear.
.onAppear {
    sceneID = UUID()
    ...
}
This issue also occurred in “Movie Hunter” when creating scenes with overlayContainer (used to display full-screen movie stills), and was resolved using the above method.
Although SingleStoreDemo uses TCA as the data flow framework, this doesn’t imply that TCA has a particular advantage in implementing similar requirements. In SwiftUI, as long as developers understand the relationship between state, declaration, and response, they can organize data in any form they prefer. Whether managing state uniformly or distributing it across different views, each has its advantages and significance. Moreover, SwiftUI itself offers several property wrappers specifically for handling multi-scene modes, such as @AppStorage, @SceneStorage, @FocusedSceneValue, @FocusedSceneObject, etc.
Looking back, let’s re-examine the implementation of multiple Store instances in “Movie Hunter.” Does “Movie Hunter” not have application-level (global) state requirements?
Of course not. In “Movie Hunter,” most of the application-level states are managed by @AppStorage, while other global states are maintained through Core Data. This means that although “Movie Hunter” adopts the external form of creating an independent Store instance for each scene, its underlying logic is essentially no different from the TCA implementation of SingleStore.
I believe that developers should use appropriate methods according to their needs, without being rigidly confined to any specific data flow theory or framework.
Finally, let’s talk about another issue related to data sources that we encountered when adapting “Movie Hunter” to macOS.
To make “Movie Hunter” conform more to macOS application standards, we moved views into menu items and removed TabView in the macOS code.
@main
struct MovieHunterApp: App {
    let stack = CoreDataStack.share
    @StateObject private var store = Store()
    var body: some Scene {
        WindowGroup {
         ...
        }

        #if os(macOS)
            Settings {
                SettingContainer() // Declaring the settings view
            }
        #endif
    }
}

// ContentView
VStack {
    #if !os(macOS)
        TabViewContainer()
    #else
        StackContainer()
    #endif
}
After these changes, you’ll find that we can only change the color mode and language of the movie information window in settings, and the settings view will not change like it does on iPhone and iPad.

This is because, in macOS, using Settings to declare a Settings window also creates a new scene, resulting in a separate view tree. In iOS, we change the color and language by modifying the environment values in the root view (ContentView), which does not affect the Settings scene in macOS. Therefore, in macOS, we need to adjust the environment values for color and language separately for the Settings view.
struct SettingContainer: View {
    @StateObject var configuration = AppConfiguration.share
    @State private var visibility: NavigationSplitViewVisibility = .doubleColumn
    var body: some View {
        NavigationSplitView(columnVisibility: $visibility) {
          ...
        } detail: {
           ...
        }
        #if os(macOS)
        .preferredColorScheme(configuration.colorScheme.colorScheme)
        .environment(\.locale, configuration.appLanguage.locale)
        #endif
    }
}
It’s precisely because global states are managed with @AppStorage that we can easily adapt the settings window without introducing a Store instance.
Conclusion
Compared to adjusting the view layout for different platforms, the issues discussed today are not as noticeable and are easily overlooked.
However, by understanding the existence of these points and preparing in advance, the adaptation process can be smoother. Developers can then invest more energy in creating a unique user experience on different platforms.
That concludes the content of today’s discussion. Thank you all for listening, and I hope it was helpful.